Windows 10 Misconfigured Services Lab
Disclaimer: The enclosed PowerShell script and executable file will introduce vulnerabilities to a system upon execution for training purposes. Do not run this outside of a virtual environment.
Requirements:
- Windows 10 virtual machine (VM) with network connectivity in NAT mode
- Misconfigured Services PowerShell scripts archive
Lab Setup:
This lab provides you with a program to run to make a virtual machine vulnerable. Do not run this outside of your virtual machine. This will make the VM susceptible to attack.
When working with the provided script, warnings can be expected from a host machine with anti-malware programs installed. These provided resources deal with the same remote access tools that are often leveraged by threat actors with malicious intent.
Before powering up the VM, take a snapshot of your virtual machine if possible. This will allow you to revert it to a clean slate after completing the lab, allowing you to reuse the same machine after this lab.
Ensure that this Virtual Machine is connected in NAT mode. This will allow connectivity to the machine from both the host machine and other virtual machines on the same host machine.
PowerShell Script Steps:
Extract the lab archive inside your Windows VM. This can either be done by downloading the file inside the Virtual Machine or using VMware tools or VirtualBox shared folders to move files between your host and virtual machine.
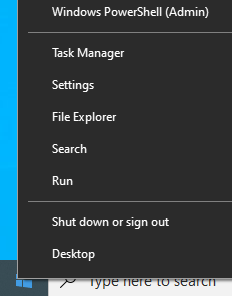
Open PowerShell as an administrator. This can be done by right clicking on the Windows icon in the bottom left corner and clicking Windows PowerShell (Admin):
Set the execution policy to allow the script to run:

Change directories to the folder containing the PowerShell script and associated resource scripts. This will vary depending on the location of the file and the username on the Virtual Machine. Run it with the dot-backslash command:

While the script runs, software will be installed on the virtual environment. Some pieces of software may require user interaction (clicking through prompts) to successfully install. This script will take an extended amount of time (15-20 minutes) to complete.
Note: This PowerShell script is not intended to be reverse engineered to find vulnerabilities on the system, but rather emulate an authentic vulnerable environment that was caused by other means. This script can be removed from the virtual machine after running to completion.
User Accounts
For this lab, two users will be present:
- Bill - Administrator
- Username:
bill - Password:
Passw0rd!
- Username:
- Linda - FTP User
- Username:
linda - Password:
SuperSecret!
- Username:
This machine is Bill’s; Linda has been given access to the machine to get some files. Linda shouldn’t be able login to the machine locally and only has an account for file access.
Background
Bill is a systems administrator at a small business. He needs to share some files with Linda who works in the finance department at the same company. The files are already on Bill’s computer, and he’s tried sharing them with Linda in a few ways.
File sharing can be achieved in many ways in Windows environments so different clients can connect and use file systems from remote computers. When creating a file sharing solution, administrators often cut corners and make errors, sacrificing security for ease of access. By not locking down access to a remote file share, the confidentiality, integrity, and availability of a host can be compromised.
In this scenario, Bill’s computer is acting as a server that Linda is connecting to. This could be found in a small enterprise or a peer-to-peer sharing solution, but can present issues if a user’s host files become compromised. Bill has configured a File Transfer Protocol (FTP) Server and a Server Message Block (SMB) share to share files related to finance with Linda.
Initial Access
Login to the VM as Bill. Bill’s company files are stored in C:\Files,
and the files he wishes to share with Linda are stored in
C:\Files\Financial.
The FTP Server that Bill configured can be accessed by Linda on another
virtual machine or by the host machine. Find out the virtual machine’s
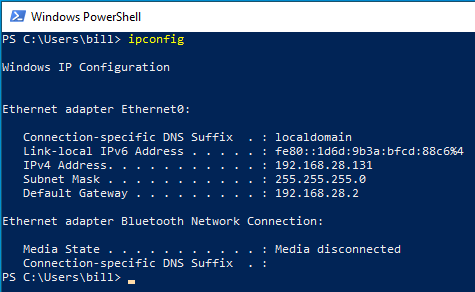
IP address with the ipconfig command from a PowerShell window:
From another virtual machine or host machine with FileZilla installed,
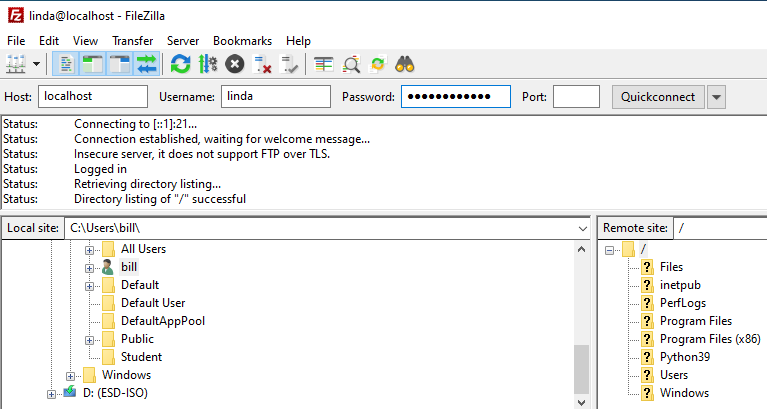
you can connect to the instance by typing in Linda’s credentials in the
Host field. From the local machine itself, just substitute the Host
value with localhost:
Viewing SMB share information can be done by visiting the Properties of
a folder in Windows Explorer. Right click on the C:\Files directory,
open Properties, and click on the Sharing tab to see the network
share status:
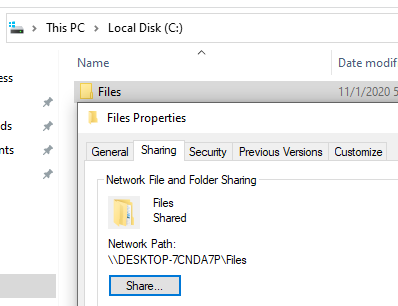
Accessing the SMB share can be done directly in Windows Explorer. This
can again be done from the host machine and the VM’s IP address or from
the VM itself by using localhost instead of a routable network
address. Additionally, the network path specified from the command above
can be used to reference the share by the computer’s hostname. Note that
the Network Path listed above will vary depending on the virtual machine
you are using.
To access the share, type in the share path in the Explorer bar and press enter. If using another virtual machine or the host machine, be sure to use a network address or hostname. When prompted, enter Linda’s credentials:
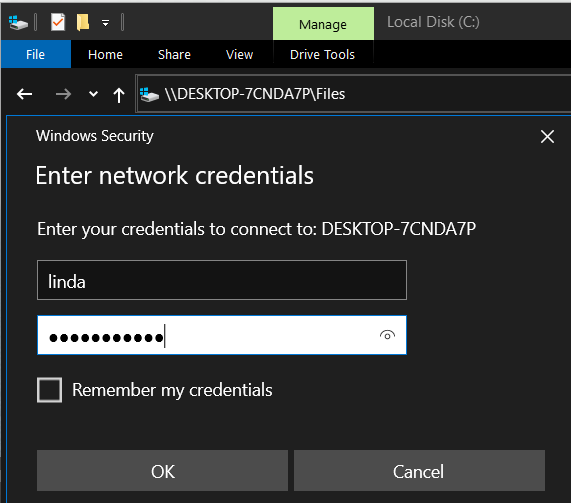
If connecting from the same virtual machine, the share will be automatically accessed by Bill. Use Windows Explorer on the host machine or another virtual machine to connect as Linda for this lab.
Navigating the FTP Server
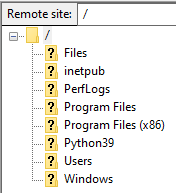
Using FileZilla, navigate the content of the server as Linda. What doesn’t look right?
Notice that Bill’s entire C:\ drive is visible. This will be shown
under the Remote site pane to the right of the FileZilla window:
Due to a lack of permissions, Linda can view all information in the
Files directory and modify Bill’s operating system files. Right-click
on passwords.kbdx. Linda can download this file and any other file on
Bill’s hard drive:
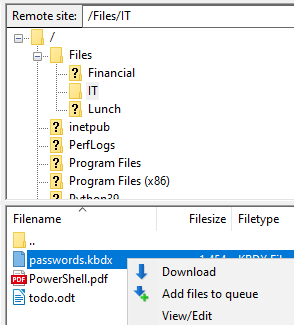
This flaw compromises the confidentiality of data on Bill’s computer.
Download or create a file in the Downloads folder on the VM and try to
upload it to the C:\Files\Lunch directory by right-clicking on the
item in FileZilla on the Local site pane. Does Linda have privileges
to upload files?
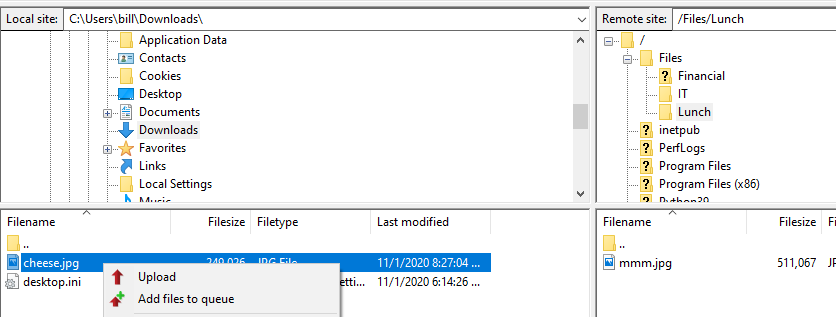
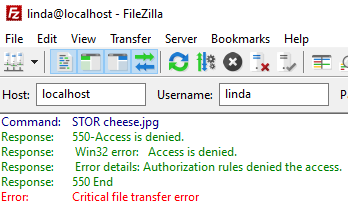
Although Linda can see Bill’s entire drive, she does not have permissions to modify content on the FTP server. The integrity of data on the server shouldn’t be compromised:
FTP Protocol
While FTP can be easy to use, it is not a secure protocol on its own.
Encryption isn’t used by default, so files that travel over the network
can be seen by anyone listening for traffic. Open Wireshark on the VM to
look at the raw network traffic being generated by this FTP program.
Click on the interface in Wireshark that matches the interface with an
IP address that you’re using for FTP. In this example, Ethernet0 was the
interface name. You can check this by running the ipconfig command:
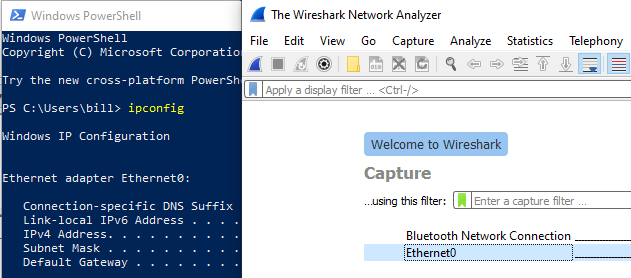
Once the interface is clicked on, Wireshark will start capturing the VM’s traffic.
To look at traffic being sent, FileZilla needs to be used on another virtual machine or the host machine. Connect to Bill’s computer using the virtual machine’s IP address in FileZilla.
Once connected, download a file from the C:\Files directory. Once
this is downloaded, stop the capture with the red square next to the
shark fin:

Look through the network traffic that happened during this FTP
connection. Specific protocols can be filtered in Wireshark; type ftp
in the capture filters bar to narrow down the capture to only show FTP
traffic.
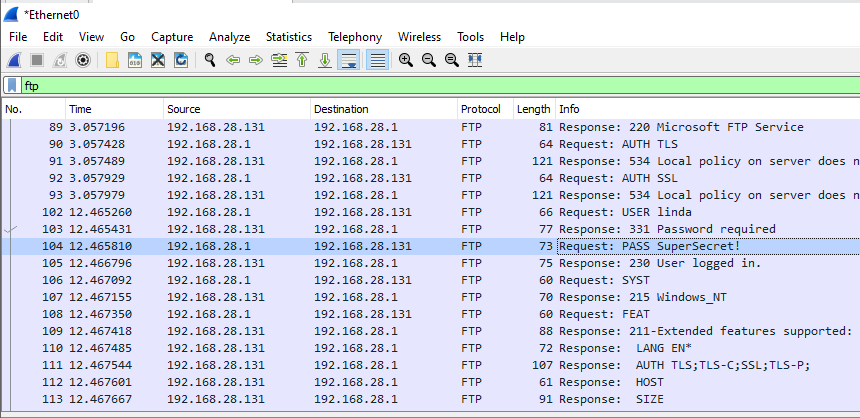
Note that the plaintext password is visible in the network traffic. This is an example of FTP not using encryption. An attacker listening to traffic between Bill and Linda could capture her password and gain access to the FTP Server.
The ftp filter in Wireshark will show FTP commands. FTP communicates
using two different channels: one for commands, and the other for
sending files. The files that were sent over FTP can be viewed with the
ftp-data filter:

An attacker listening on the network could extract files transmitted over FTP in this way.
Securing FTP
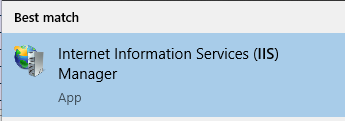
Bill created this FTP server using Microsoft Internet Information Services (IIS). This service can be managed via the IIS Manager. Type IIS in the Windows search bar to open this:
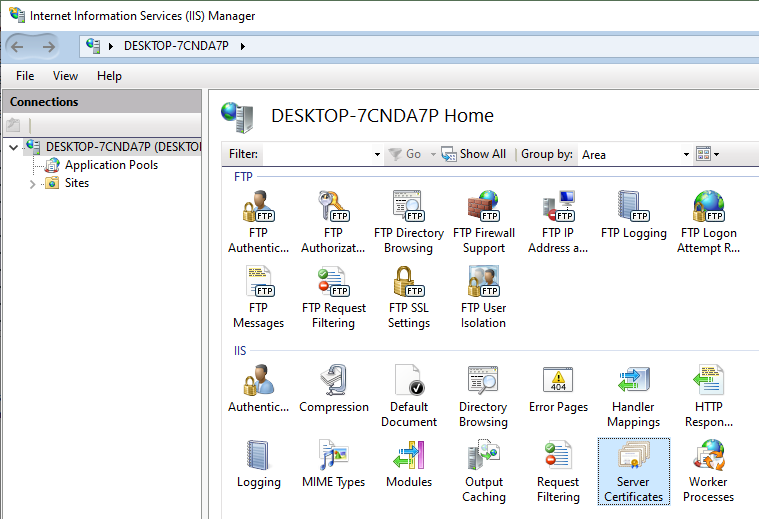
One way to secure FTP is to use Transportation Layer Security (TLS) to encrypt data that is being transmitted. This will require Bill to create a certificate on his computer. While a properly-configured FTP server would obtain a certificate from a certificate authority, self-signed certificates will work to quickly encrypt data. From the IIS Manager, go to Server Certificates:
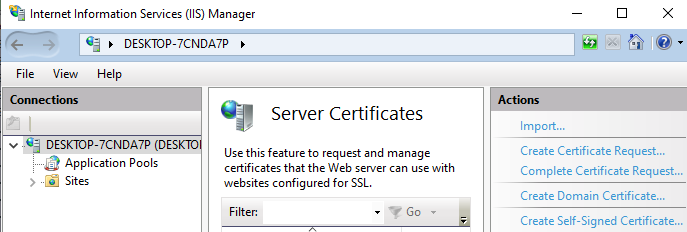
Now, click Create Self-Signed Certificate:
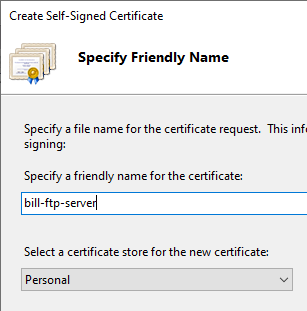
Create a name for the certificate:
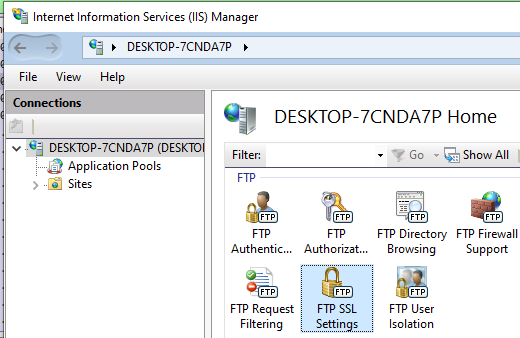
Now, navigate to FTP SSL Settings:
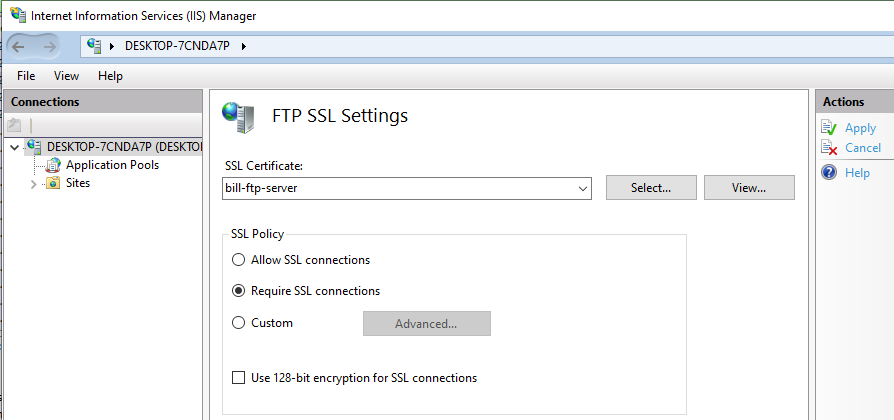
Select the previously created certificate, select Require SSL connections, and click apply on the actions pane:
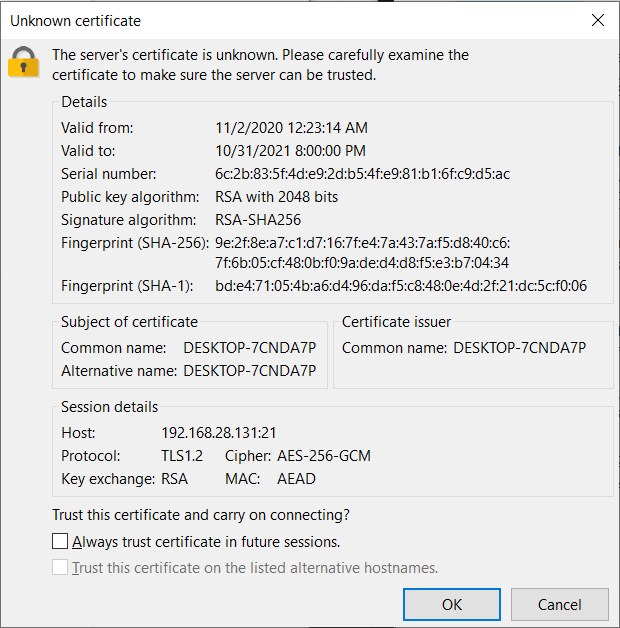
Using the same steps as before, run another Wireshark capture on the VM’s network interface. Now, connect to the server from another VM or your host machine as you did before. When connecting again, FileZilla should greet you with a certificate message on the client’s end:
Click OK to continue with the message and download another file. Go back and stop the Wireshark capture. The FTP data should now be encrypted and scrambled to anyone listening in on network traffic between Bill and Linda:

In a properly configured environment with a central certificate authority, Linda would not get an unknown certificate message from Bill’s FTP server. While encryption is being used here, there still isn’t a guarantee that the certificate presented belonged to Bill, and an attacker could still be performing a man in the middle attack by presenting their own faulty certificate. While this is more unlikely on a private network, this is not impossible. Due to the complexity involved, many administrators rely on self-signed certificates, especially in small environments such as this one.
Fixing FTP Permissions
Bill accidentally shared the contents of his entire hard drive to Linda,
when she really only needs access to the contents of
C:\Files\Financial. Under the Principle of Least Privilege (PLP),
Linda should only have access to the files that she needs. This can be
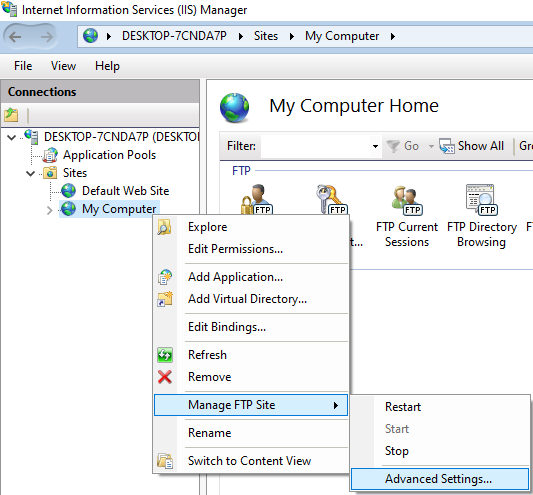
fixed within the IIS Manager by right-clicking on the FTP Site (Bill
named this site My Computer) and going into Advanced Settings:
Only Linda needs to use this site, so we can change the server’s
physical path to C:\Files\Financial:
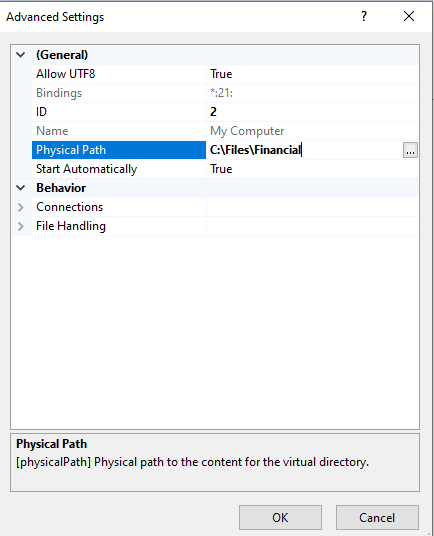
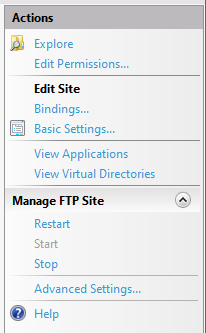
After clicking OK, make sure to restart the server using the Actions pane on the right side of the window:
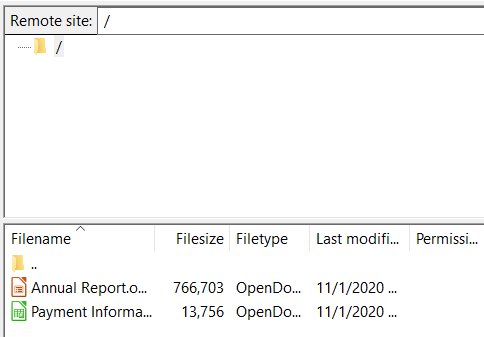
After restarting the server, connect again as Linda. Now that the root
of the FTP server is set to C:\Files\Financial, Linda can only see
files within this directory:
If more users than just Linda needed access to the FTP Server on Bill’s computer, we would need to configure special permissions on folders for specific users. In this case with only one user, changing the server’s path will suffice.
Navigating the SMB Share
Using Windows Explorer on another machine, connect to Bill’s SMB share as Linda and see what files you can browse. Can Linda create files on the SMB share?
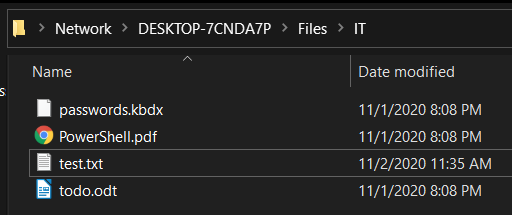
Bill misconfigured the server to allow Linda access to the IT folder. This contains a sensitive password database and other files that Linda should not have access to. Linda also has full access to modify, create, and delete items in the IT folder. This misconfiguration fully compromises the confidentiality, integrity and availability of the server.
Securing the SMB Share
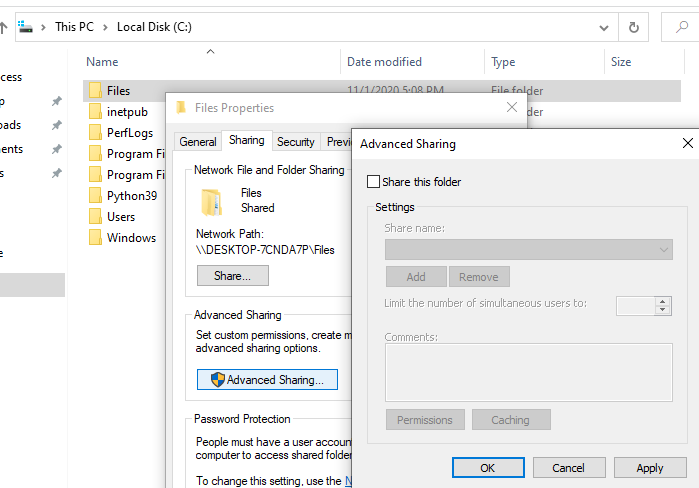
The SMB Share can be secured by only sharing the files with Linda that
she needs. In the VM, right click on the Files folder to open
Properties, click Sharing, and then Advanced Sharing. Uncheck
Share this folder to turn off sharing everything inside C:\Files:
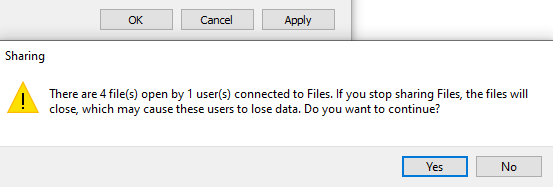
Click OK to apply the changes. You may be greeted with a warning message that Linda will be disconnected from the share. Click Yes to remove her access:
Now, Linda should be able to authenticate to Bill’s machine, but cannot see any shared files over SMB:

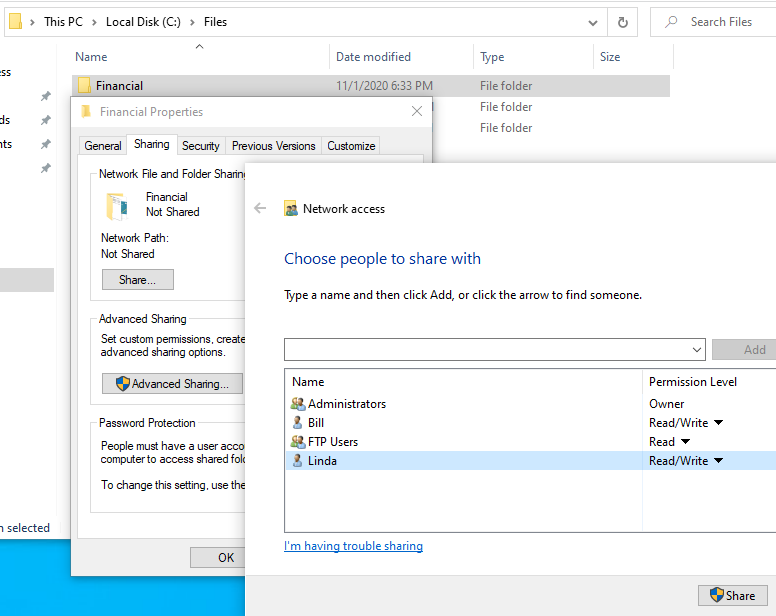
To share only the Financial folder with Linda, right click on the
Financial folder, open Properties, and go to Sharing. Click
Share. . . and type linda in the search bar to add her to the share.
Make sure to click the Permission Level drop-down to give her Read and
Write permissions on the share, and click Share:
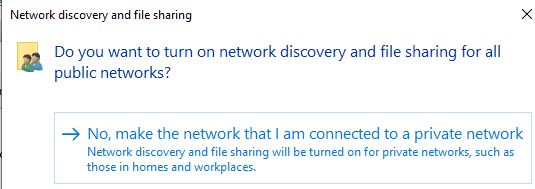
Because this is in a private network, click the No option if prompted:
Using the same method as before, connect as Linda to the server, but
this time by typing the hostname or IP address of the VM followed by
Financial:
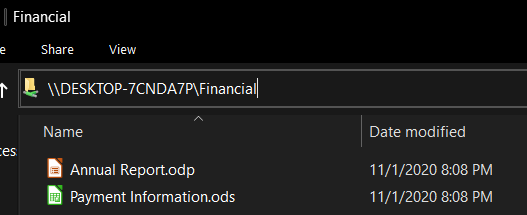
Linda should now only be able to access the files located in
Financial. This follows the Principle of Least Privilege, and Bill’s
files in the IT folder are safe.
SMB Protocol
Using the same method as before with FTP, start a Wireshark capture to look at the network data generated by SMB. To emulate Linda downloading a file, connect to the share and open or copy a file from the share on the host machine or separate virtual machine. Stop the Wireshark capture after doing this.
Type smb2 in the Wireshark filter bar. The files transferred should be
visible in cleartext:

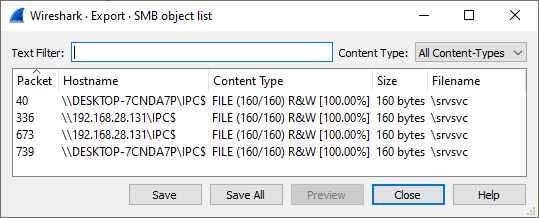
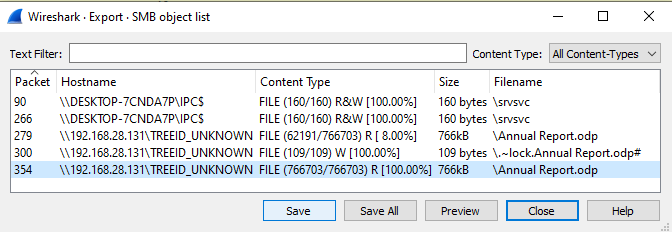
Wireshark additionally allows some files to be downloaded that were seen in a packet capture. Open this dialogue in Wireshark:
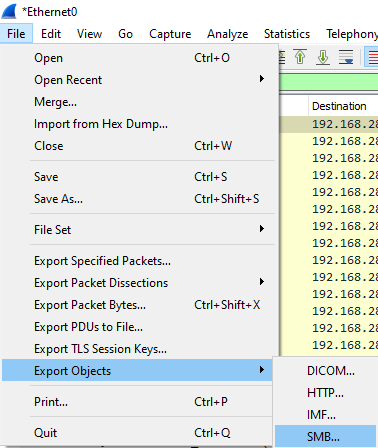
Find one of these files and save it to the Downloads folder on Bill’s
computer.
This should be able to be opened in LibreOffice:
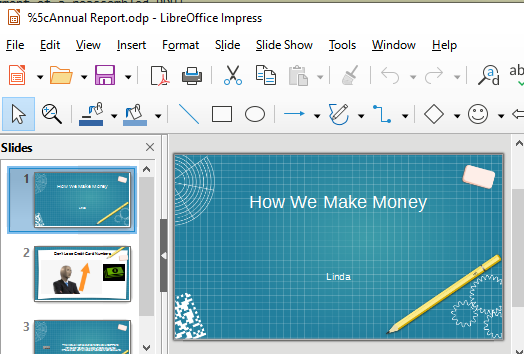
An attacker who has access to the network between Linda and Bill could see files being accessed or transferred in cleartext and could steal confidential information in this way with Wireshark. This is another example of why encryption should be used when configuring file sharing services.
Securing FTP
Windows 10 allows SMB shares to be optionally encrypted. This can be achieved with a PowerShell command. From an administrative PowerShell prompt, run the following command:
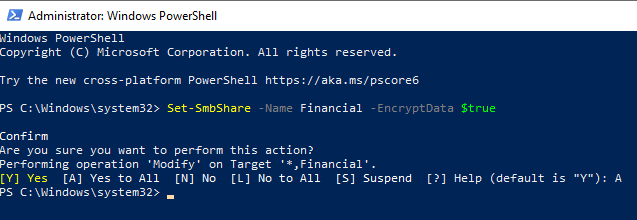
Additionally, disable unencrypted access to Bill’s SMB server altogether:

Now, restart the virtual machine so these changes take effect. From this point, the server should be encrypting SMB communications. Using the same method as before, start a new Wireshark capture. Access a file as Linda on the host machine or another VM and then stop the capture. The data in Wireshark should show encrypted SMB communications:
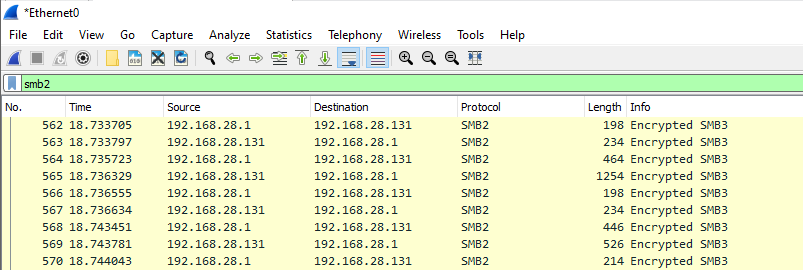
In Wireshark, the accessed item isn’t visible when trying to export SMB objects. The communications between Bill’s SMB share and Linda are now secured across the network.
