Linux Software Deep Dive & Password Hardening Lab
Download and Setup Instructions:
Before starting the lab, make sure you downloaded the ZIP file provided to you. When you do that, begin to unzip the file and place the folder wherever appropriate. These following instructions assume you are using a VMware Workstation Client, however most of these instructions are easy to follow no matter what VM client you use.
Go to the File tab in the upper left hand corner of the window, once
you have clicked it, a drop down menu will appear. From there, click on
Open. It should then open up a file explorer, navigate to where you
put your VM’s and do either of the following. Click on the Sprint7_Cyber
Patriot.vmx image and it should appear within your client. If that does
not work, click on the Sprint 7_Cyber PatriotVM.ovf, from there it will
open up an import menu, where you can name your VM and choose where to
store it.
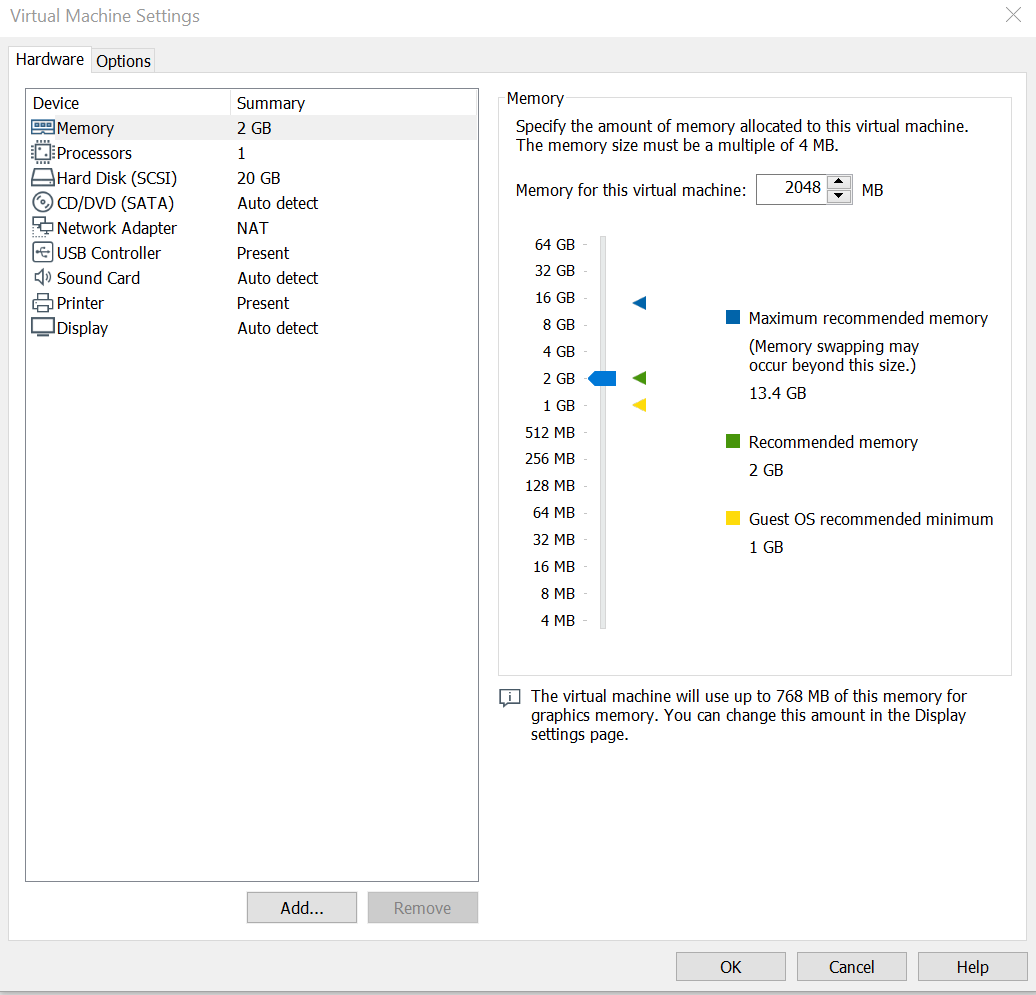
Once you have chosen both of these click on the Import button, and the VM should appear for you! Once you have the VM in front of you, click on the Edit Virtual Machine Settings, here is where the settings for the VM are. Below is an image showing what your VMs settings should be, if needed you can always turn down how much Hard Disk space the VM is taking up, as you would not need too much for this. Once checked out you should be good to go, by clicking Ok, and then click on Power on this Virtual Machine.
User Accounts:
For this lab, we will be using Revy, while switching between the others when needed. This lab will primarily only be using this specific user, however if you need access to the other account, it will be provided here.
- Revy - Administrator
- User Login:
Revy - Password:
Jitterbug4
- User Login:
- Rock - Local User
- User Login:
Rock - Password:
Lagoon001
- User Login:
Housekeeping before jumping into the lab:
Once logged in as Revy, make sure to run this command to make sure your systems are up to date/your box is connected. Also, make sure to take note of the IP your machine gives you here, you will need to use it a lot in this lab:
dhclient
ip addr
sudo apt update
sudo apt update
sudo apt upgrade
The focus of this lab is to cover not only ways of installing applications but password hardening of a Linux box in order to try and make it as safe as possible. These steps should be done on almost all Linux Virtual Machines when first starting to work with one, or when you first start working on one.
In this instance, for the most part, this is mostly a fresh box. We have two users Revy and Rock, Revy is our Administrator while Rock is the Local User. However, due to misconfigurations when creating Rock’s account, he had too many permissions available to him and was able to download applications and software that were unnecessary for our network to have on them. It will be your job as Revy to go ahead and look through the various ways of looking at installed software, and determine what applications that you may need to go ahead and get rid of.
How to find installed applications/software:
Within Linux there are plenty of different ways you can not only look at the applications that you have installed, but also ways you can get applications installed. One of the most common ways you may think of is going ahead and installing an application from a website, such as what you would do with a SSH application such as PuTTY. However, with Linux, it’s not as easy as downloading an installer, and going through a wizard. While that is there for most cases, oftentimes with Linux you get applications with tar packages, or tape archives. Essentially all these are collections of files that are highly compressed, essentially an archive file. The problem with that is you would need to “untar” the files, similar to unzipping a file. To do this you would often run a command such as “tar -xvf application.tar”, and once you have done that, you could go ahead and access the file and run the installer for the application.
This method works well, however most of the time, you would not see that method be used unless it is truly needed to be done. For most administrators and users on a Linux based system, they leave all of the application installation to the ways of the CLI, and not to mention, there are multiple ways of even using the CLI to get applications installed. We will be going over three methods, the first one being the most common, that one being apt-get. If you have seen any of the other labs previously and even at the start of this one, I have mentioned that you may need to update the system by using this command, but what is apt-get?
APT:
To get to the bottom of this, we would first need to explain what Ubuntu is! Ubuntu is derived from Debian which is a form of Linux that uses the Debian Packaging Management System, dpkg for short. All this means is that in order to provide programs or applications, it uses these packages to get them, that way you do not need to build a program for the source code!
This now allows us to go into APT, or the Advanced Package Tool. This is the main way you will be interacting with the packaging system, and while dpkg does have its own commands to manage it, APT is more user friendly and you can use it for more than just installation, but as upgrading and cleaning your applications as well. In order to install any application using APT, you would use the apt-get install command, this is also used for the other methods mentioned above. If you wanted to find any new packages, you would use the command apt-cache!
If you want to go ahead and look at what has been installed on the system using this command, you would want to go ahead and use the command apt list –installed to get the general idea!
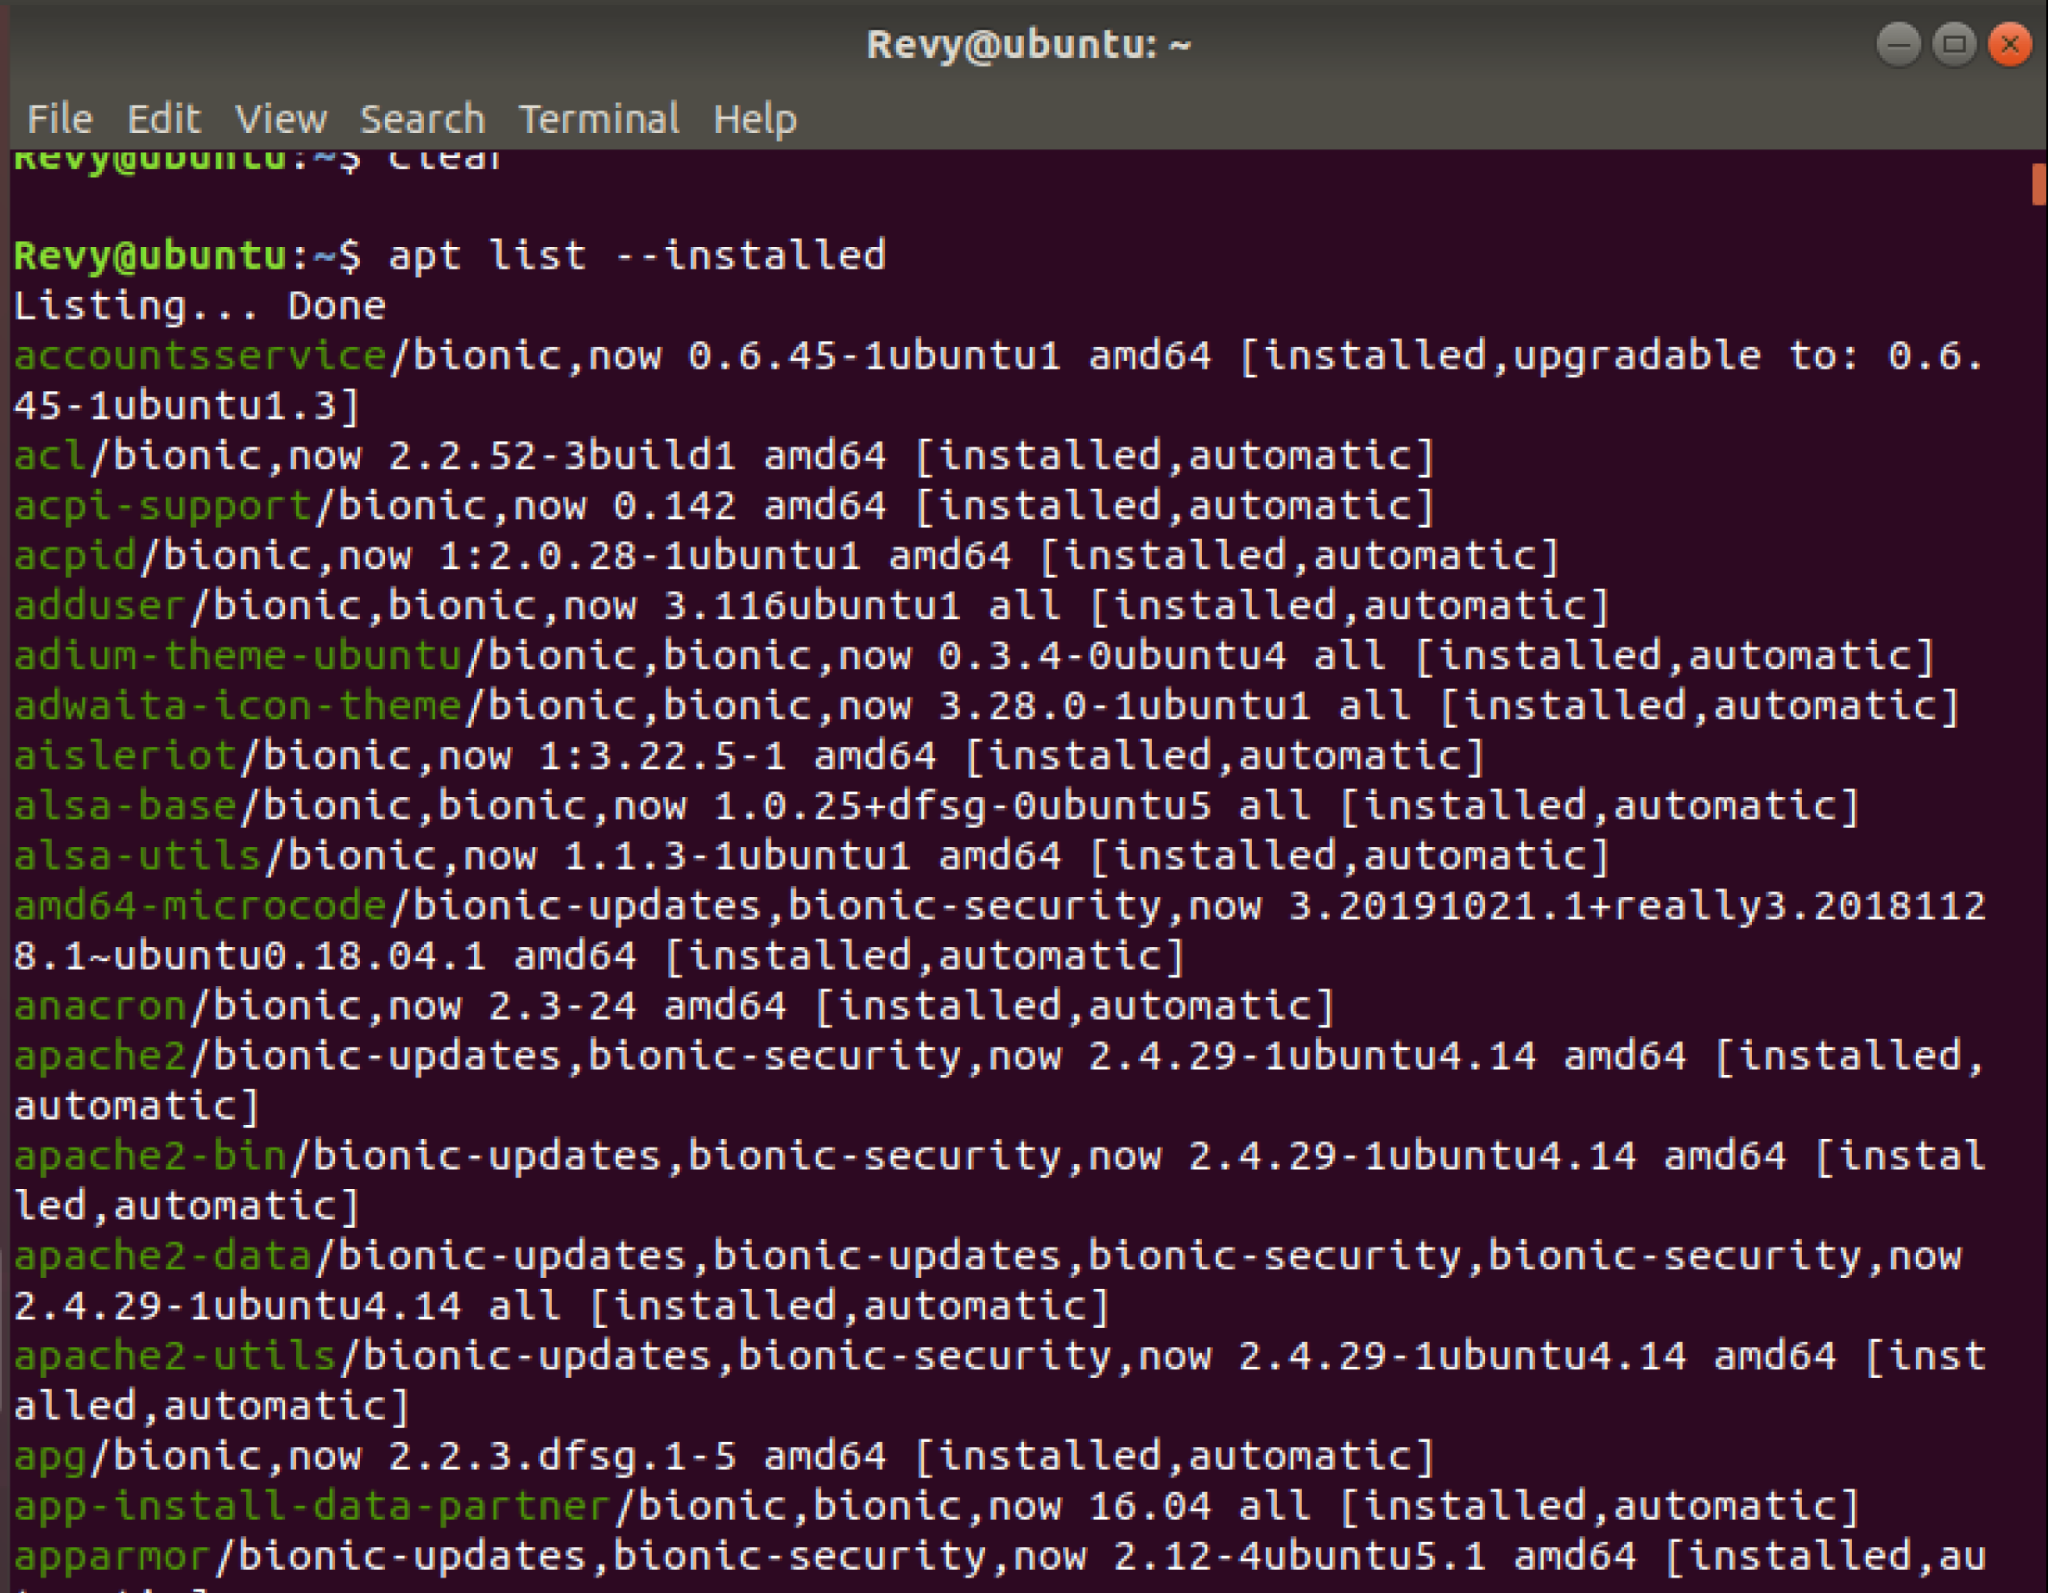
As you can see from the image above, there are quite a lot of commands that are listed here! Most of the ones that you will find here as dependencies, meaning that you will have a large list of libraries and other packages that you didn’t install directly, but are installed when Ubuntu gets installed, this includes applications that should be present here like ThunderBird Mail and Firefox.
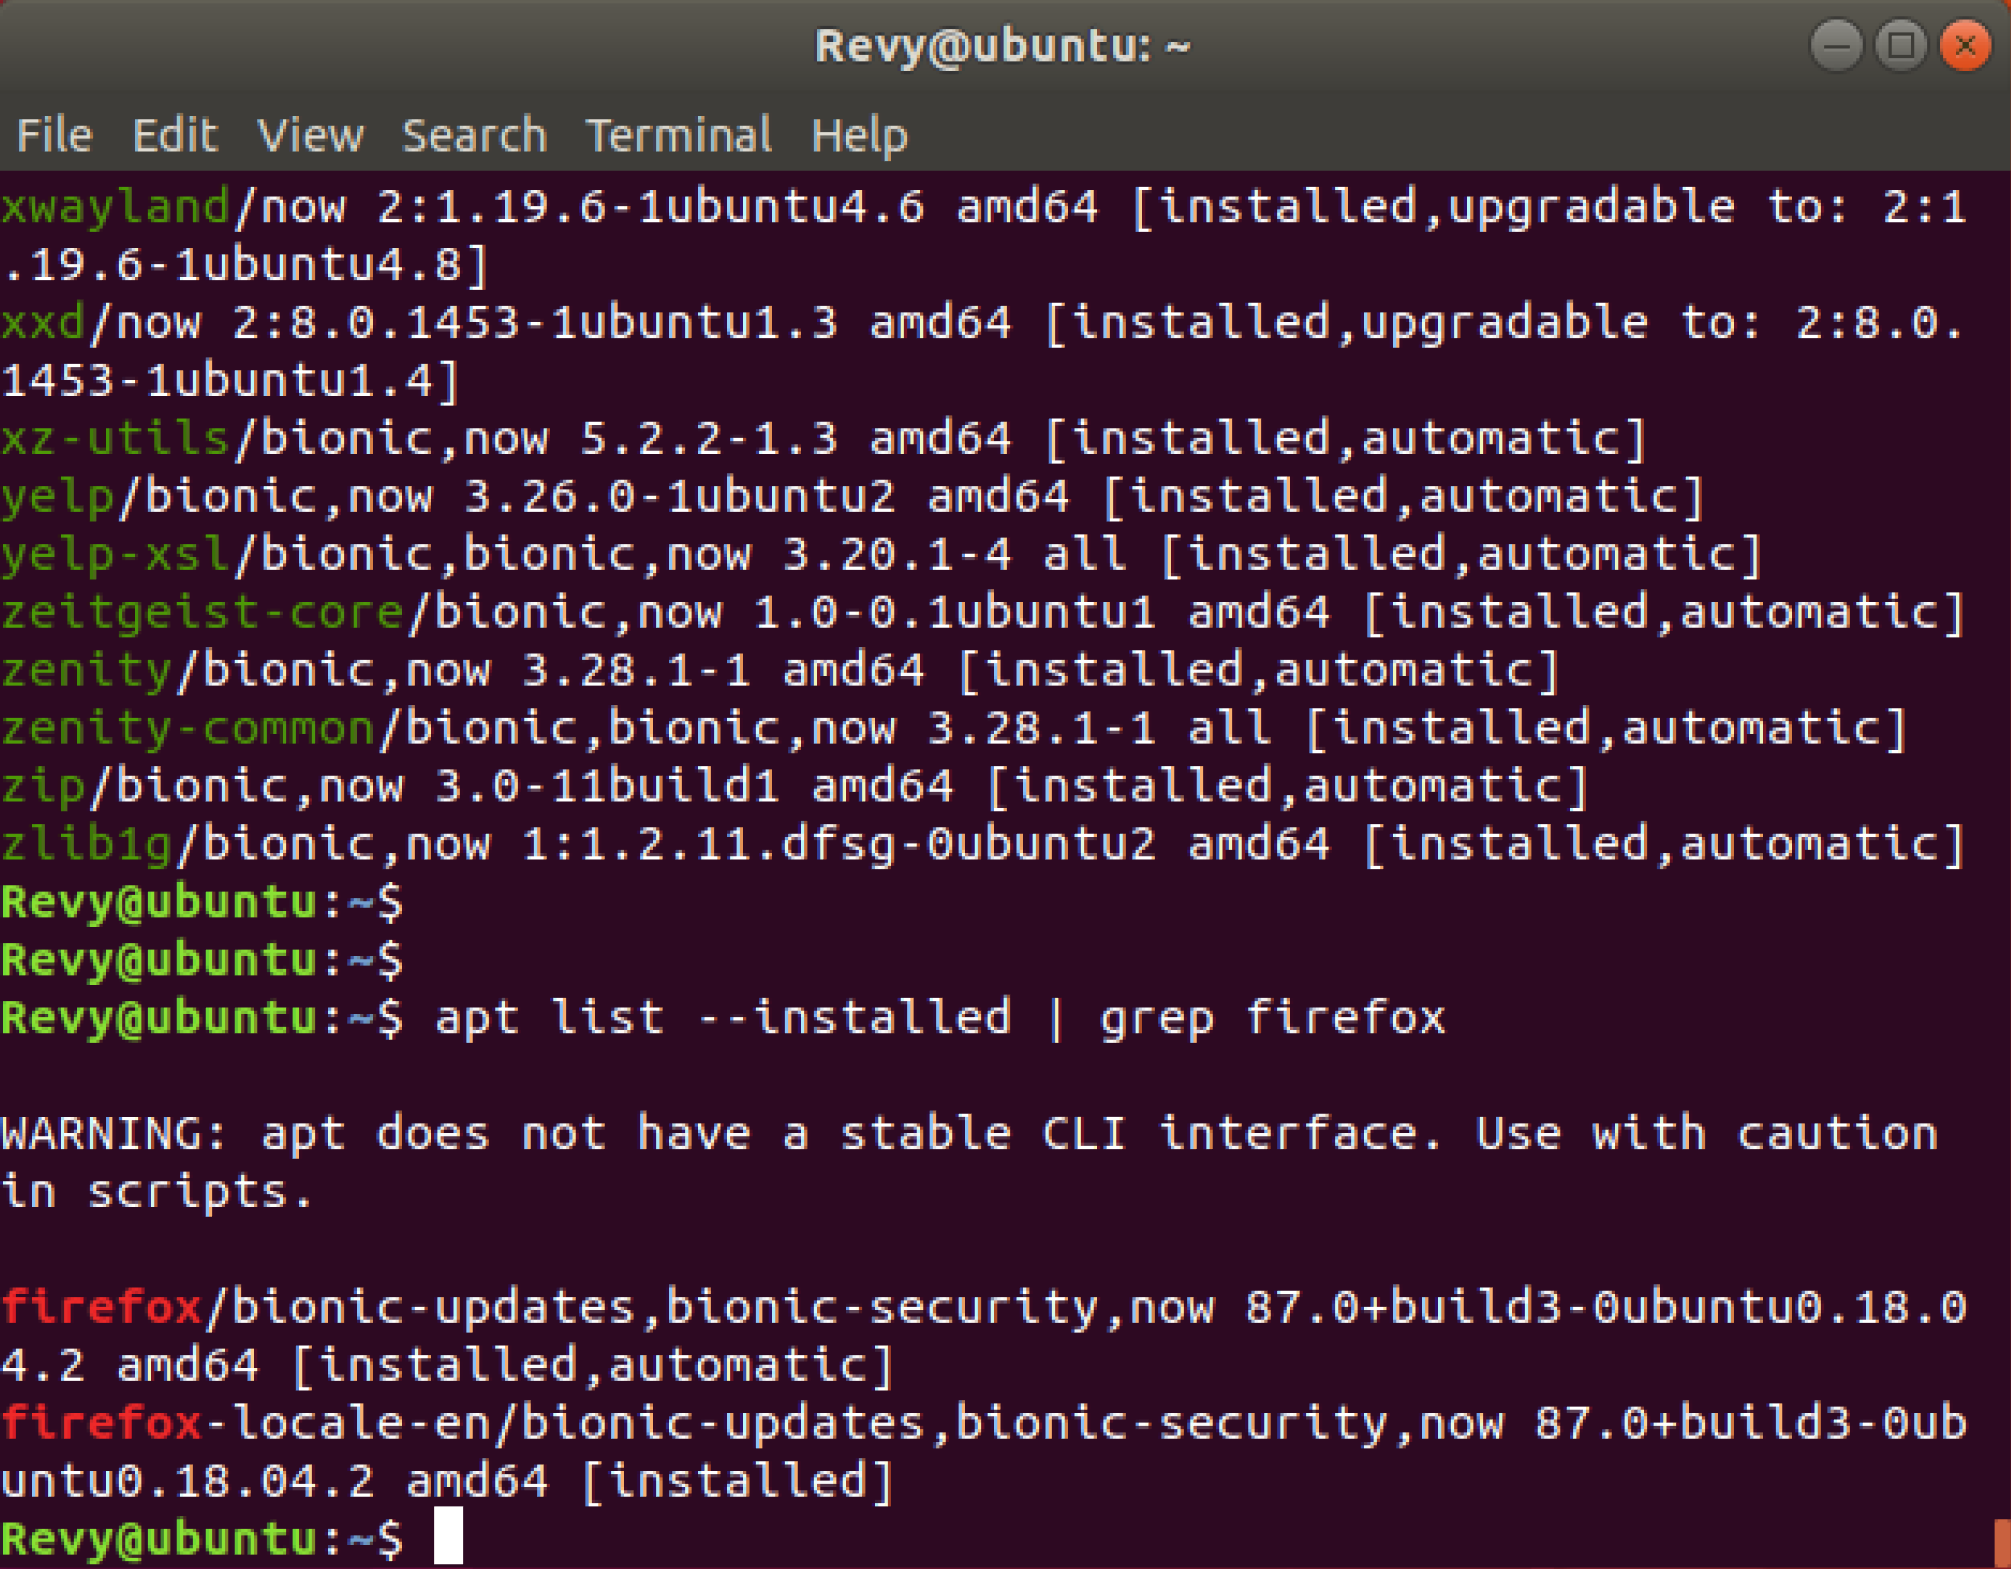
If you would want to go ahead and search for a specific package, you can do this by using the grep command to filter out the specific package you may be looking for! Lets go ahead and try to find an application that we know should be installed by default, Firefox. Go ahead and run the command apt list –installed | grep firefox this will run the apt list command previously talked about, while also adding in grep to search for any packages mentioning Firefox directly. It should give you an output similar to this!
This can be done in an alternative way as well that is more quiet and would not be picked up as easily if you were trying to do this covertly, this is the apt -qq list firefox --installed command, it should give you an output similar to the one above here, but is a much “quieter” way of searching for applications.
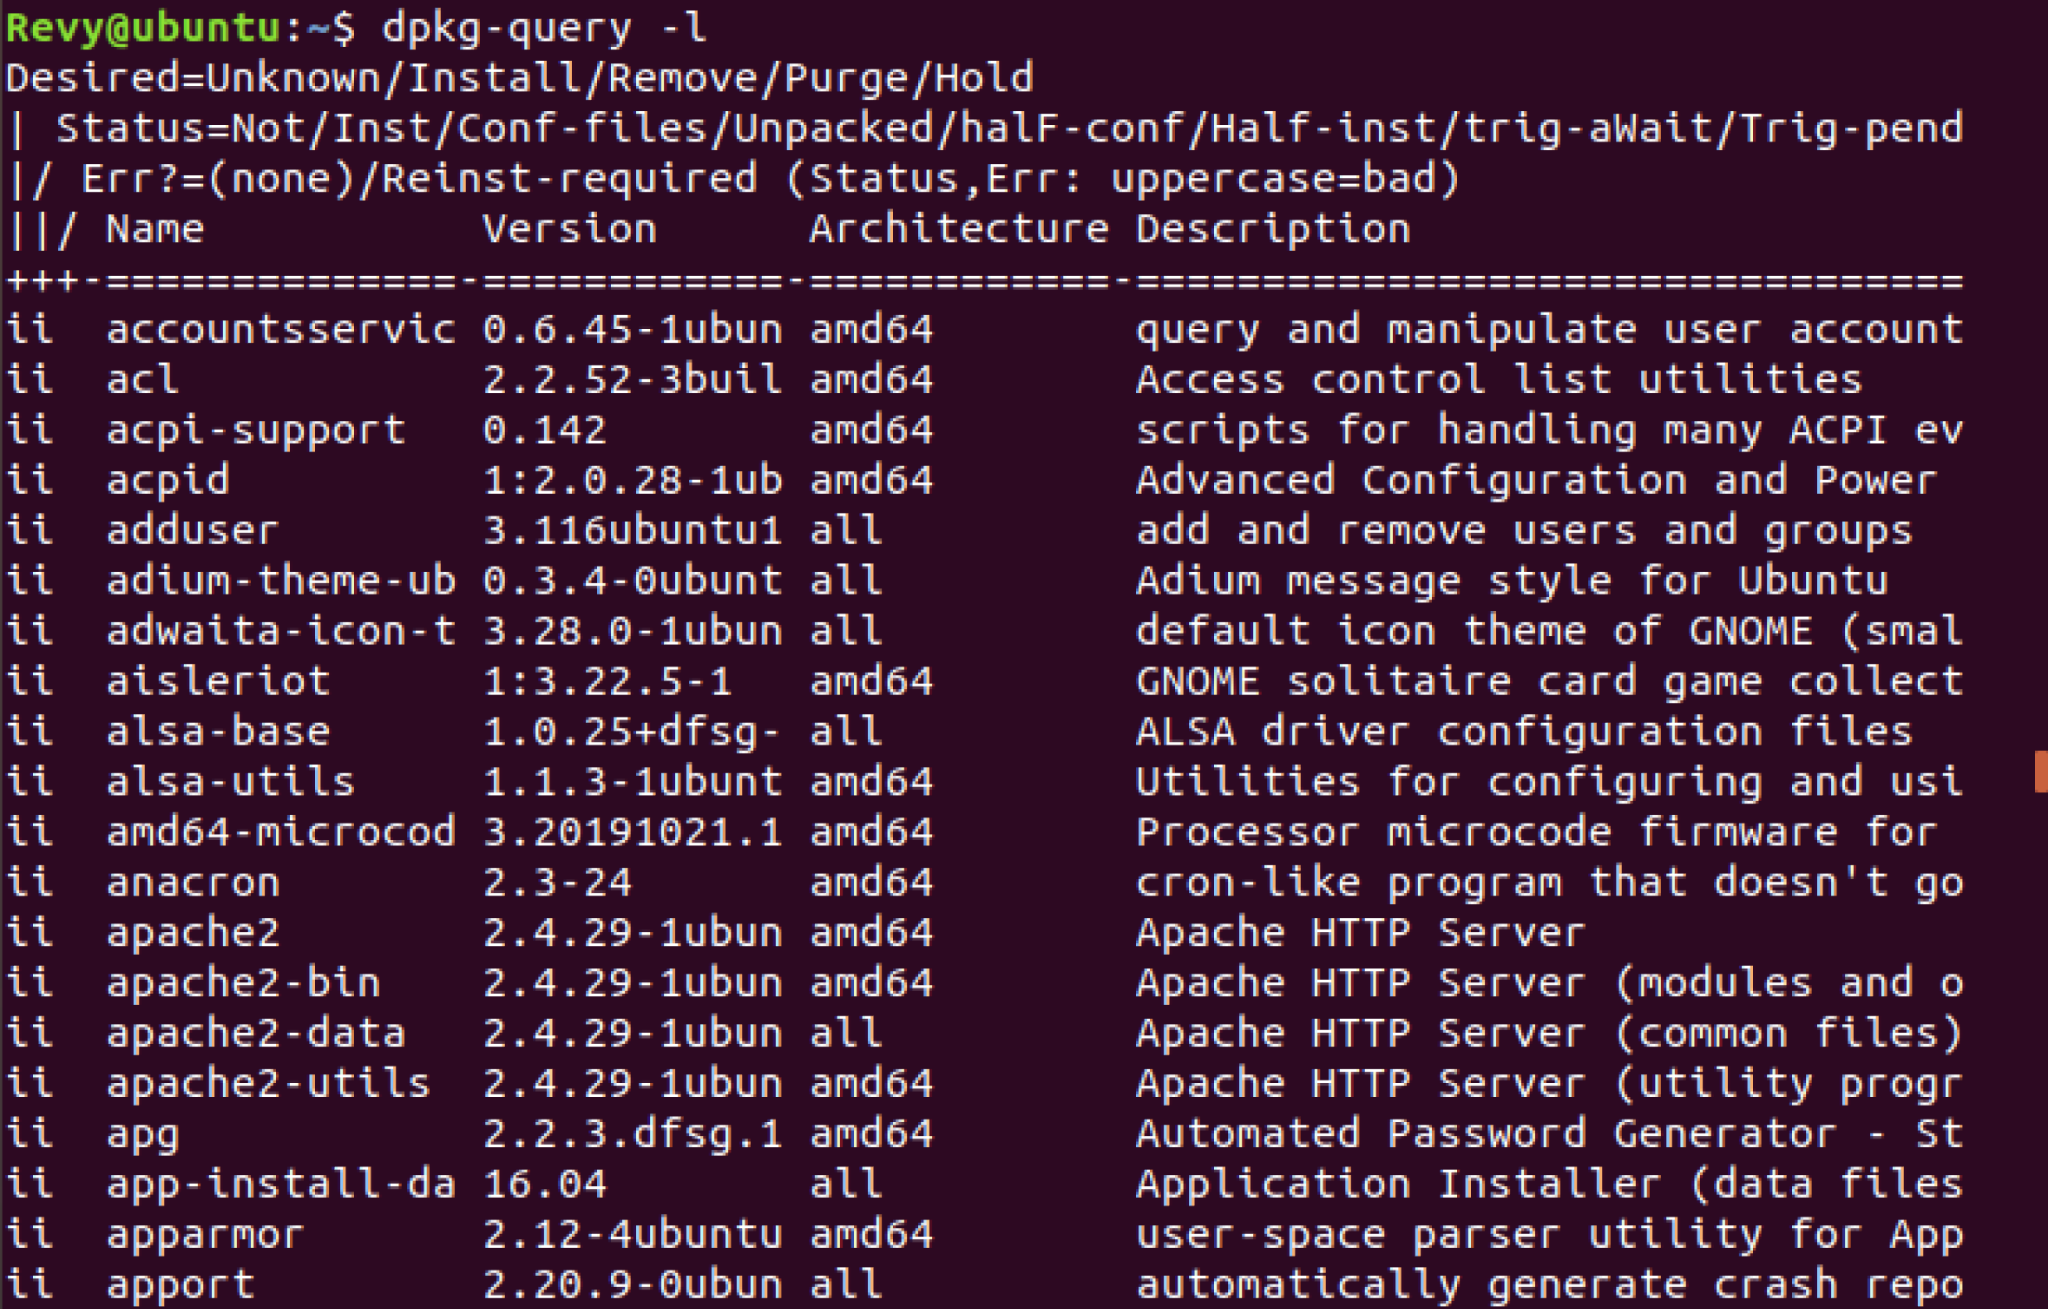
There is one more way you can find some applications that were installed via APT and this is dpkg-query -l. The reason this works is because as mentioned earlier within the documentation, Debian is based on these dpkg packages and APT uses them in a more user friendly way. If we go ahead and run the command, we can see much of the list here again, this time with more advanced information such as the architecture that it was built on as well as a Description for what the application does, which may be helpful if you see a application got installed and you do not know what it does immediately, or if you are suspicious if it is malicious or not. Also, you can combine grep with his command as well in order to try and find packages!
Once you have found out what applications you do not want to have on your Linux box, it comes to the time of getting rid of them. In order to remove a package, we will go back to APT, this time being sudo apt remove package-name, this will uninstall the package from you machine, however, this will not fully delete it. Oftentimes configuration files and other associated files remain harbored within the machine, and you would want to fully get rid of these if you want to clear out your machine of these applications, to do so, you will need to purge the package. To do so, we start back with APT, this time it will be sudo apt purge package-name, this will fully remove the package from your system!
After doing your deletion, you may want to do some cleaning to fully ensure your machine has gotten rid of everything associated with said application. There are a couple of commands here all related once again to the APT command.
The first one we will cover is sudo apt-get clean. This command will clear up your apt cache, which is created when installing a package using the apt command. The application gets downloaded and its dependencies are kept within the cache, and once the application is fully downloaded, these deb files are moved out, however this is never done immediately. This is done because if a package is removed and reinstalled, if the deb files are still in the cache, they will not need to download the package fully again!
This makes it much easier if you need to reinstall something, however if you do not imagine needing this then you can go ahead and use this command. You can also use sudo apt-get autoclean if you would like, as this removes deb files that are outdated and would not be used anymore by more up to date versions of that application
The last APT command we will cover for right now is sudo apt-get autoremove. When you go ahead and install an application by using APT, the system will go ahead and grab the dependencies, and within Linux many applications use the same libraries, so if you remove a specific application, the dependencies will most likely stay on your system. You use this command to get rid of these dependencies that you no longer need, or it is not used by any other application within your system. There are various GUI versions of this such as CCleaner, but they are not always present within a system, and if you need to automate something, these commands are much more useful!
Finding APT applications that were installed:
Now that you have the rundown on the ins and the outs of APT, it is your job to go ahead and search out the four applications that Rock installed using APT on this machine. Once you find that application go ahead and remove that application using the methods mentioned above. I will give you four hints, one for each of the applications you will be finding and removing. Do not look below the three hints until you believe that you have found them but you may look if you want to confirm the commands you would use to remove them!
1) The first application that you will be removing was covered within the TAR section
2) The second application is where this lab guide is being hosted right now
3) The third application contains the word messaging in its dpkg description
4) The fourth application is all about movies
Answers:
The three applications you were looking for were PuTTY, GIT and Telegram. All three of these applications were not supposed to be installed on this machine. PuTTY is a SSH client, GIT is a control system that manages and coordinates work done with multiple people, mplayer is used as a movie player and Telegram is a messaging application. All three of these applications are currently unneeded for the system, and should be removed promptly. To do so, go ahead and run the commands of:
sudo apt remove git-all

sudo apt remove putty

sudo apt remove telegram-desktop

sudo apt remove mplayer
Once you have done this, go ahead and use the purge command to make sure all of the files associated with them are gone as well:
sudo apt purge git-all

sudo apt purge putty

sudo apt purge telegram-desktop

sudo apt purge mplayer
Now that you have done that, feel free to use any of the clean commands we covered above! With this we are done with the APT section of this lab.
Snap:
There are multiple ways that you can install applications using packages in Linux. You may not realize why we would need another method to do so considering that Ubuntu is based within Debian, but you may want to use other packaging systems for various different reasons, such as why you would want to use snap. Snap is another packaging system that does not fully integrate into your system, meaning that in a way they are isolated and will remain within the .snap package, much like a container. Snap also automatically updates your applications, meaning you will not need to update the applications yourself and run the risk of running older applications that may contain vulnerabilities. Lastly, Snap is universal, meaning that while they may not fully integrate perfectly with every distribution, they can be run on all distributions which is nice if you need to set up a variety of devices.
This is not to say that you should only be using snap. Apt is slightly more secure in a different manner, that being that all apps within APT are reviewed by the current distribution you are using, while snap supports signature validation, however the publisher provides the app directly to the user and a user would need to trust the publisher since no external reviews are performed. APTs also can conserve storage space by having multiple applications use similar libraries, and APT fully integrates into the GUI environment correctly for the version of Linux you are using.
With this version of Ubuntu we are running, snap actually comes preinstalled, which makes sense as more and more people seem to be using it as an alternative to APT at the moment. However, if this is not the case, you will actually need to use APT to install snap, this is done with sudo apt install snapd. Once you do this you will need to make sure that it is enabled, and to do this, run the command sudo systemctl enable –now snapd.socket. Not only does this ensure that snap works, but will always automatically start upon boot of your machine.
How do you find applications using snap though? Well, there is an official Snap website from Ubuntu that lists plenty of the applications you can download, however there is also a CLI command you can run in order to find specific packages. Lets go ahead and search for VLC a media player and see what comes up!
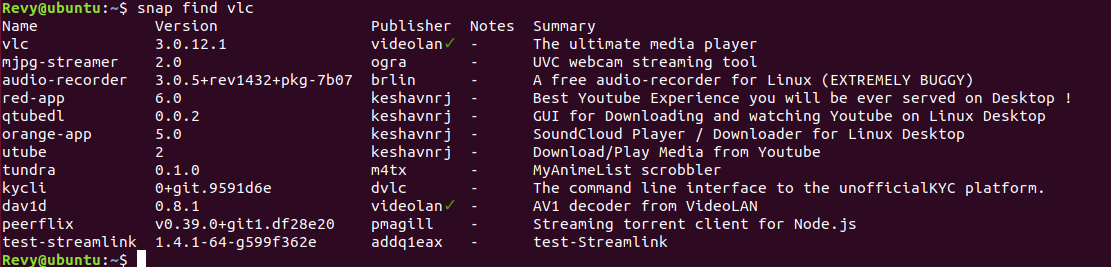
As you can see from above, we found a lot more than just VLC, this is because with the snap find command, it finds all matching content with that search query, however the first one listed is the one that we were looking for. There is a checkmark next to the publisher of the first one, which indicates that they are a trusted publisher!
Once you find the application that you would like, type in the sudo snap install package in order to go ahead and begin downloading the package! However, this will not be needed as we are trying to remove applications that got snuck onto here! So how do we go ahead and find these snap packages?
Two ways, first is snap list, this will list all of the snap packages on your system, however this is also indicates snap packages that were installed alongside the installation of the OS, however, by looking at the packages listed from this, you can get a pretty good idea of what snap packages were installed onto here.

If you want an easier way of tracking the new ones installed, you are in luck! There is another command that lists a history of the snap command on your system, this is the snap changes command. Using these two commands you can get conclusive evidence of what applications were installed on here!

Believe it or not, there is indeed another way you can view most of your snap packages! That is via the Ubuntu Software Centre! Go ahead and look on the right hand side of your screen, and look for an orange shopping bag of sorts, it should look like this!

Go ahead and click on this to open it, and when you do you should be greeted with a lovely GUI application store! From here, you can download a whole bunch of software and games to your Linux box! However, the section we are looking for in particular is the Installed option at the top. Go ahead and click on there to see all of these applications, as well as the ones that were installed via Snap!
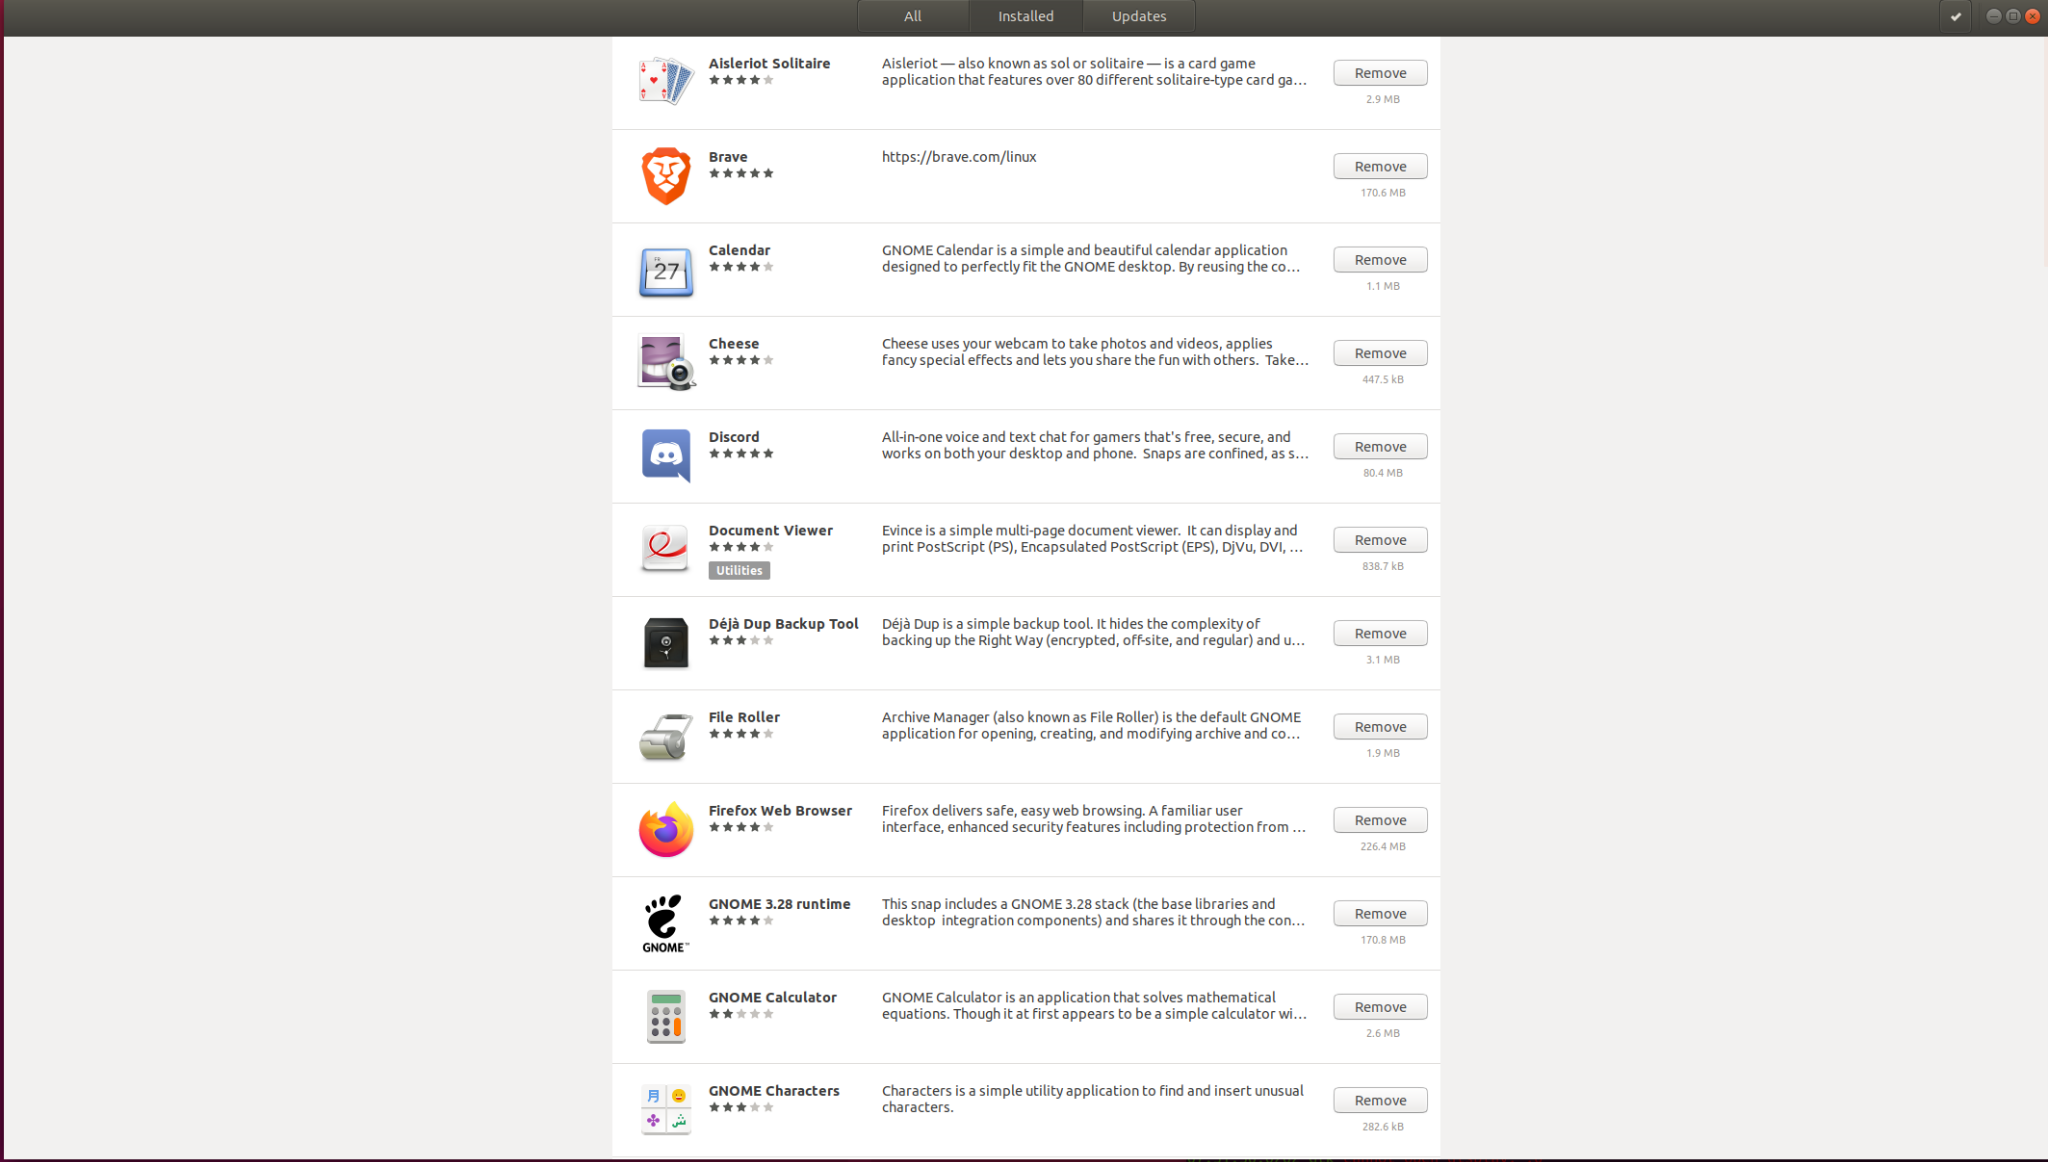
From all of these listing options, we can get a good idea of what applications were installed onto here, the first one being Discord, which is a service similar to a Skype or a Slack, used to communicate with others, can be used within a workspace environment but is often used for social interaction. We also have sublime-text here, a text editor which can be used for writing code or markup, not needed for this box at all though. Nightfall-hacker is a game, which definitely shouldn't be here at work! Brave is an alternative web browser, but we want to stick with firefox for our machines, and then we have Spotify which is a music player, which is also not needed for our machines!
In order to remove snap packages, run the command of sudo snap remove, for all of the applications listed here, it will look like this:
sudo snap remove discord

sudo snap remove sublime-text

sudo snap remove nightfall-hacker

sudo snap remove brave

sudo snap remove spotify
Certain packages may take longer as they are bigger than others, however once you do this, you do not have to do any purging or cleaning like you have to do with APT as these are all stored in there own separate containers, not fully integrated into your machine, which is very nice! Also, before moving on, you could have removed some of these packages from the system by using the Ubuntu Software Centre as well! However, I believe that knowing the CLI is the most efficient way of doing this.
We have gotten rid of most of these applications so far, however there is one last one we will need to cover in order to make sure all of the applications have been removed.
Flatpak:
Flatpak is the newest attempt at a universal packaging format that is currently being used. It aims to provide cross platform solutions to install applications and packages with its own benefits as well. This benefits the developer as if you design for Flatpak, you can get your software on multiple distributions. Not to mention, Flatpak can run on almost any linux distribution without any modifications needed.
There are many similarities between Flatpak and Snap, they both have their own appstore, and run within their own containers essentially, Flatpak differs when it comes to having multiple repos where it stores its software packages. Meaning if you want to use it via a CLI, you are going to need to know these repos!
To get Flatpak on your device, you would need to run sudo apt install flatpak, but seeing as Rock already installed something with flatpak, we do not need to worry about this. Once we have done this, we need to actually connect Flatpak to Flathub, its most popular repository at the moment, to do this you will need to run this command flatpak remote-add –if-not-exists flathub [https://flathub.org/repo/flathub.flatpakrepo]{.ul}. You may have to run this as Revy, and once this is done you can go ahead and begin searching ro applications if you would like, such as libreoffice! To do this run, sudo flatpak search libreoffice and you should be able to see it clearly!

If you would want to then install the package after finding this, you would go ahead and run the command of flatpak install flathub applicationID, as you can see from above, the application ID is the first thing listed! However, once again, we are not looking to install right now, we are looking to get rid of any of the Flatpak applications that were installed on our machine.
To see all of the Flatpak packages installed on our machine, run the command of sudo flatpak list to see all of them!

Not much is listed here! I can say soundly that the bottom three are the ones that get installed when Flatpak is installed, and the top one is the suspect we are looking for! Electron Mail is another mail server that is based on ProtonMail, anyways we do not need this either on our machine so we need to get rid of it!
To do so we need to get the ApplicationID which the list above shows us. To get rid of Electron Mail, run sudo flatpak uninstall com.github.vladimiry.ElectronMail/x86_64/stable once you have done this, we have gotten rid of all of the rouge applications on our machine!
However, before ending our journey, I should mention that there is another way if you want to see your most recently installed packages. To do so run the command grep “ install “ /var/log/apt/history.log this will list all of the most recently used apt commands that feature install within the command, very useful to track some of these applications that were installed locally on the machine a bit quicker.

Password Hardening:
Before we call it a day with this lab, I want to run over some quick password hardening for our machine. Firstly though, these mistakes were mostly caused by Rock, who had improper sudo access, to fix this, lets go ahead and get rid of this. To do so, run the command sudo deluser Rock sudo. This removes Rock Instantly from the Sudo group and no he no longer has Sudo privileges that he was abusing earlier! You can test this if you want by switching over to Rock and try to run a Sudo command.
The next thing that we would want to do here when it comes to hardening our system is to create a Password Policy and enforce it! To do this we are going to need to install the pwquality application, which provides us a way to configure our password quality requirements for our system! This will make it so our passwords are always as secure as the Admin wants them to be!
To get this ready, we need to run the command sudo apt-get -y install libpam-pwquality cracklib-runtime, this will give us all of the packages we need in order to create a Password Policy! Now we need to edit a specific file for our policy, that being the common-password file. Open up any text editor you would like, and navigate to the /etc/pam.d/common-password file. It should look like this when you open it up.
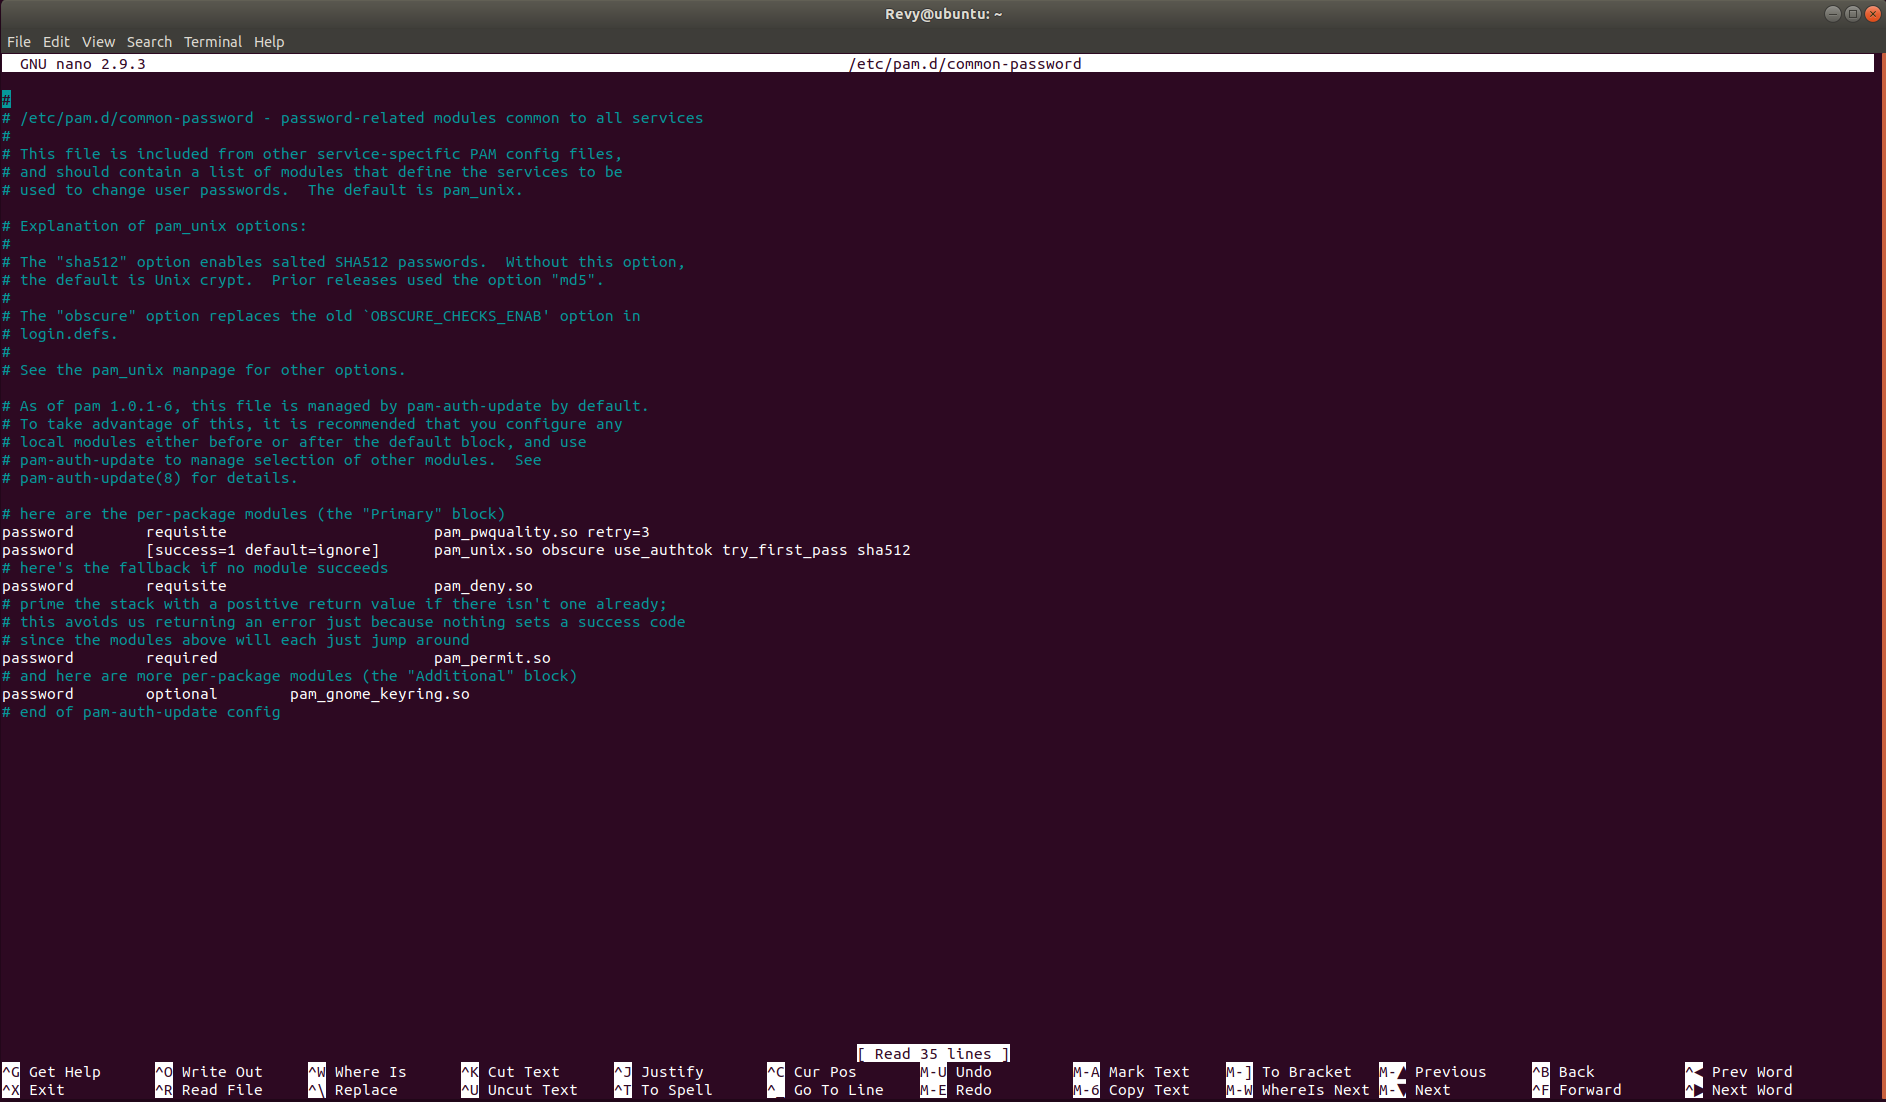
In here, we are going to need to change a specific line, that being the line that mentions password requisite pam_pwqaulity.so retry=3. We are going to change a lot of this, in the end it should look like the image below:

What do these changes do however? Well let’s take it one at a time. The retry=3 allows the user 3 times to enter the password before an error. minlen=8 means the length can not be less than 8 words. maxrepeat=3 allows three characters to be repeated in a row. The next set of commands, ucredit, lcredit, dcredit and ocredit all call for at least 1 character being present, that being an uppercase character, a lowercase character, digit character and other characters. difok=3 makes the number of characters in the new password that must have not been present in the old password. We then have the geoscheck=1 which makes it check for words in the /etc/passwd entry that are not in the current password. reject_username makes it so you can’t have the username forwards or backwards in the password and finally enforce_for_root makes sure this applies to the root user as well!
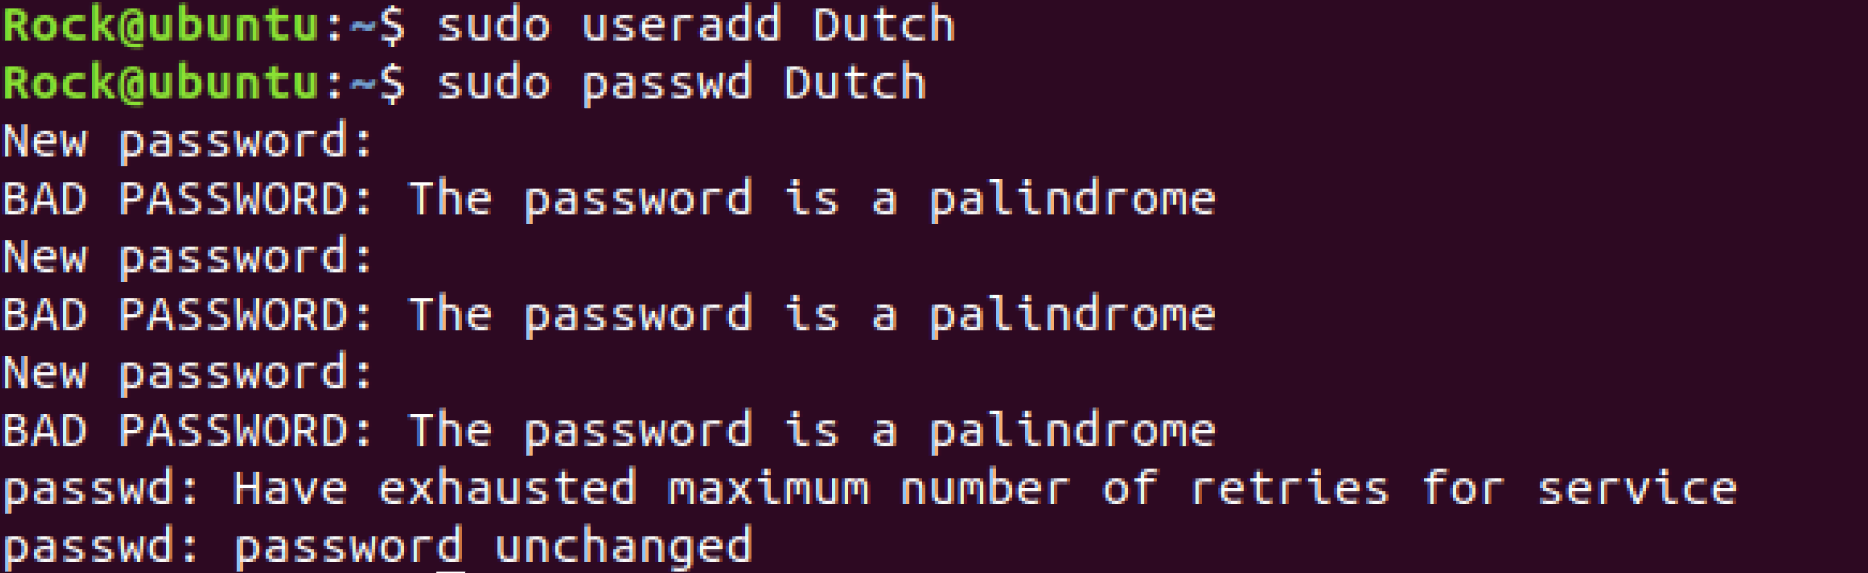
With all of this set, go ahead and do a sudo reboot to apply our policy. After we have done this and our system is back up and running, we can give it an attempt! Let’s make a new user sudo useradd Dutch, and after we do this, let’s try to give him a weak password with a sudo passwd test, and we can then see what happens when we attempt to do this!
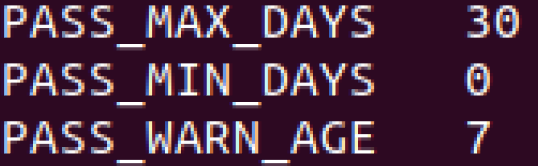
Our last Password change we want to complete here lies within the file of /etc/login.defs, go ahead and use a text editor to gain access into it and once you have done that, look for the PASS_MAX_DAYS line and change the amount of days from 99999 to 30! This will make it so you can only keep a password for 30 days before needing to change it! With these two policies intact, our passwords are now quite safe as well as our machine!