SMTP Server Lab
Download and Setup Instructions:
Before starting the lab, make sure you downloaded the ZIP file provided to you. When you do that, begin to unzip the file and place the folder wherever appropriate. These following instructions assume you are using a VMware Workstation Client, however most of these instructions are easy to follow no matter what VM client you use.
Go to the File tab in the upper left hand corner of the window, once
you have clicked it, a drop down menu will appear. From there, click on
Open. It should then open up a file explorer, navigate to where you
put your VMs and do either of the following. Click on the
Sprint4_Cyber Patriot.vmx image and it should appear within your
client. If that does not work, click on the Sprint 4_Cyber_PatriotVM.ovf, from there it will open up an import menu,
where you can name your VM and choose where to store it.
Once you have chosen both of these click on the Import button, and the VM should appear for you! Once you have the VM in front of you, click on the Edit Virtual Machine Settings, here is where the settings for the VM are. Below is an image showing what your VMs settings should be, if needed you can always turn down how much Hard Disk space the VM is taking up, as you would not need too much for this. Once checked out you should be good to go, by clicking Ok, and then click on Power on this Virtual Machine.

User Accounts:
For this lab, we will be using this main user, while switching between the others when needed. This lab will primarily only be using this specific user, however if you need access to the admin account (cyber user) it will be provided here as well. Do not give students access to this account however, as you will only need it in case of accidents occurring.
- cyberuser - Main User
- User Login:
CyberPatriot-Linux - Password:
Mail005
- User Login:
- Quote - Other User
- User Login:
Quote - Password:
curlybrace
- User Login:
Housekeeping before jumping into the lab:
Once logged in, make sure to run this command to make sure your systems are up to date/your box is connected. Also, make sure to take note of the IP your machine gives you here, you will need to use it a lot in this lab:
dhclient
ip addr

sudo apt update
sudo apt update
sudo apt upgrade
Due to you being assigned a DHCP address and wordpress usually having an issue with this, we need to do an adjustment at the beginning of the lab. Login as cyberuser and then run:
ip addr
For me I got the ip address of 192.168.235.145, you are going to
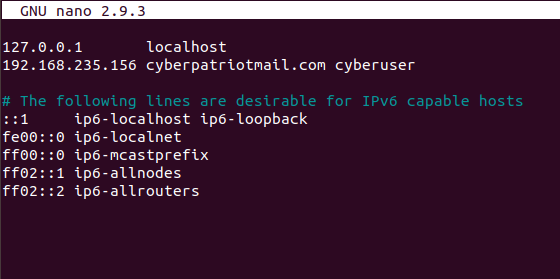
want to apply whatever IP address you got to the /etc/hosts file. To
do this sudo nano into /etc/hosts and add the IP address to the
line that has cyberpatriot. This is what it should end up looking like:
Testing SMTP
Background Knowledge to cover before hand:
- What is an SMTP server? SMTP server, or a Simple Mail Transfer Protocol server is an application thats primary focus is to send, receive or relay outgoing email between senders and recipients.
- What is Postfix? Postfix is a popular open source Mail Transfer Agent that transfers email using SMTP. You can use Postfix as an SMTP server.
- What is S-nail? S-nail is an mail processing system that uses command line syntax. It supports direct mail delivery via smtp.
- What is an open mail relay? An smtp server configured in such a way that it allows anyone on the internet to send email through it. In this scenario it will be done locally, but we can still see intent as a way to be exploited by spammers.
For this scenario, you are using cyberuser. Your task today is to take a look into your company’s Postfix SMTP server. While not fully developed or implemented yet with an entire mail system, they want to make sure that the SMTP server is secure enough before moving on.
When ready, log in as cyberuser using the credentials provided
above, and ignore or go through any Linux pop ups that may appear on
your screen. When ready, open up a terminal instance and run the command
systemctl status postfix to see if your SMTP server is up and
running. It should be running, but if not, systemctl start postfix
should be the fix.
SMTP servers run on a particular port, it being port 25. In order to
check to see if the server is listening, run the command netstat -plunt to check what ports you are listening on. You should see it
listening locally on 0.0.0.0, it should look like this.

Another helpful thing you can do here is to see how parts of your
postfix server have been configured. To do this run the sudo dpkg-reconfigure postfix command. It will be pre-populated with
previous responses, but it can still be helpful to see. The server is
set to be an Internet Site which means mail is sent and received using
SMTP. We have our mail name, cyberpatriotmail.com set up as well, as
we are only concerned with localhost for this. The next important
setting is the Local Networks section. This is the network block which
the host is going to be relaying mail for. The rest of the
configurations in here can stay the same.
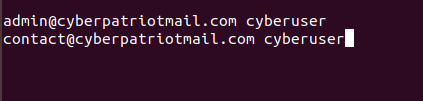
However, Postfix also allows you to map email accounts to specific
users. We can check this out by doing sudo nano /etc/postfix/virtual, within here we can see that cyberuser has admin@cyberpatiotmail.com and contact@cyberpatriotmail.com set to himself, meaning if someone tries to email that address they cyberuser will receive that
mail.
Alongside Postfix, we are using s-nail as our client. Open it up by
typing s-nail into the command line a very simple mailbox should
appear. There should already be a message for you waiting in there! To
open it up press 1.

Upon pressing the 1 key, the email should have popped up for us. It is a pretty simple “init” message used to test if the mailbox is properly working. Not only that but we can tell that we sent the email to “yourself”, since the admin account sent an email to contact, which as established earlier, is just cyberuser. If you want to hold onto the message press h, if you want to delete though go ahead and press the h key. If you want to exit out of the mailbox, type in quit.
What about sending mail? What are some of the ways we can do that? To
start off let us su over to the Quote account. After that, there
are quite a number of ways we can test out sending mail, for this
example though, let us continue to use the s-nail command. Type in
this command:
echo 'hello' | s-nail -s 'quote' contact@cyberpatriotmail.com
What this command does is we first echo what we want in our message, in this case it is hello. After that we use the | to pipe it into another command, that being the s-nail command. The -s is used for our subject which is quote, and the address after that would be who you are sending the email to, in this case it is the contact email address that will be forwarded to the cyberuser. When you are all set press enter to send the email! Switch back over to cyberuser by typing in exit and then check your mailbox by typing in s-nail and the email should be there waiting for you!
We have a good idea of how our SMTP server is working now, however we were told that there could possibly be some vulnerabilities afoot within our server, let’s try to see if we can find them.
The best way to test for vulnerabilities on an SMTP server is to use the
telnet command, a command normally used for interacting with remote
computers, but since we are all running this on a localhost, we can just
use it to connect to our specific SMTP server by specifying a port
number. To do this run the command:
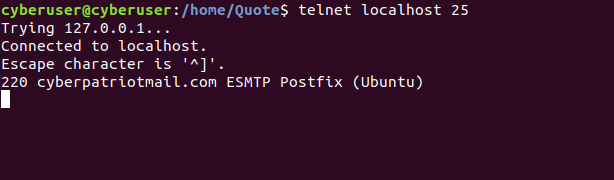
telnet localhost 25
This will connect us to port 25, the port that allows all SMTP traffic
to go through it. Upon pressing enter, you should see that we were able
to connect, it listing our hostname and domain, as well as us being on
an SMTP postfix server:
Now that we are here, we can run a multitude of commands, including even
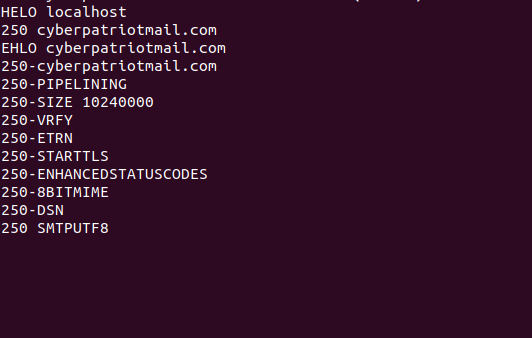
being able to send emails from within here! The first two commands we
will be running are HELO and EHLO. Both of these commands are
essential parts of the SMTP protocol, used when the server would try to
introduce each other and identify who each other are and which one is
the receiving server.For example, running HELO localhost would shoot
back 250 cyberpatriotmail.com, which not only signifies that the
command works, but what the name of the server is. There is also EHLO localhost, which shows us various options that our SMTP server
supports:
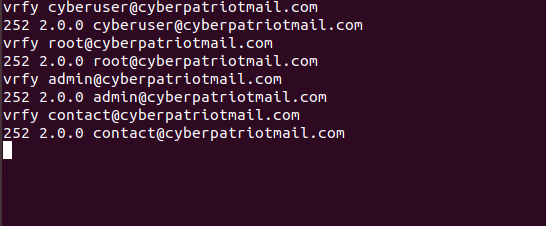
The command in particular we want to pay attention to here is the VRFY
command. Why is that? The VRFY command can potentially be an incredibly
dangerous tool for users who are able to connect to our server via
telnet and port 25. In a real world scenario, attackers can potentially
use the VRFY command to check and see if a specific user ID exists
within the server. Attackers would use this to formulate a harvest
attack, which is a way of seeing valid email addresses from a server
to see what addresses they would be able to attack.
To test the command type in VRFY followed by some of the addresses
we have on the server. Try it with these following addresses:
- cyberuser
- root
- contact
- Admin
You should see something that looks like this after running these commands in telnet. This tells us that these users and accounts exist within our server. Not only that, but they can try and guess what our naming scheme is based off of some of these names, mainly from contact and admin.
This isn’t the only issue we have here though, due to the way our SMTP
server is configured, it allows anyone with a connection to send email
through it. Not only that but we have it so it isn’t trying to
authenticate email senders, meaning that it is prone to spoofing and
other hacking techniques. To perform an attack like this, make sure you
still have a telnet session up and running. Next, you are going to
want to type in these commands line by line at a time to send a spoofed
email.
MAIL FROM:<spoof@spoof.com>
RCPT TO:<cyberuser@cyberpatriotmail.com>
DATA
SUBJECT: Spoof
You got spoofed
.
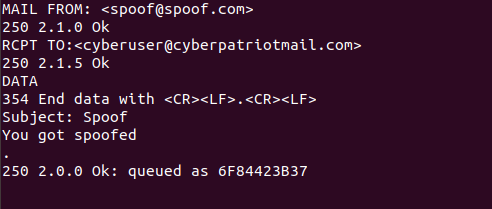
When completed, you can type in quit to exit out of the telnet
session, and now open up s-nail to see if we got the message.
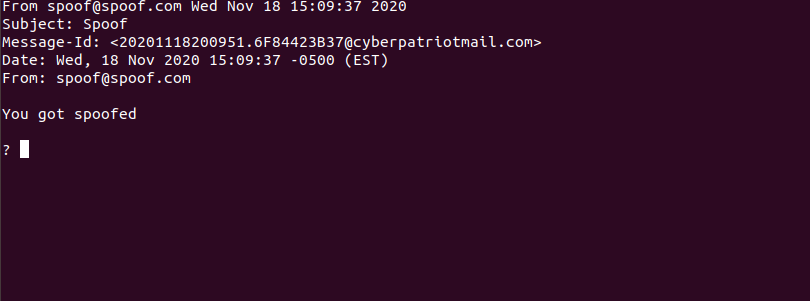
As you can see, we have completely spoofed an email sender. This is not a safe sign at all for our server, there are no verifications to see if the accounts actually exist or not so anyone who connects to the server could pretend to be anyone and potentially prey on employees to try and get them to click on it.
This type of attack can be made even more dangerous, if you head back
into a telnet session, we can potentially make the spoofed email
even more complex. You can do this by running a command similar to the
image below.

What this is doing, is much like the previous example, using the telnet
session to send an email to a user on our server. However, once it gets
to the data section of our email, by using Content-Type: text/html, he
can change the way the email will be structured when sent. He changed
his sender name to Santa and to the recipient to Naughty, even though he
will be sending the email still to cyberuser. This type of spoof adds
more layers of confusion to the user receiving the email, and in the
right hands, can really trick users into thinking they are someone else
by obfuscating the email address they are actually sending information
from. Exit out of the telnet session and go back into s-nail to see
if you got the email.
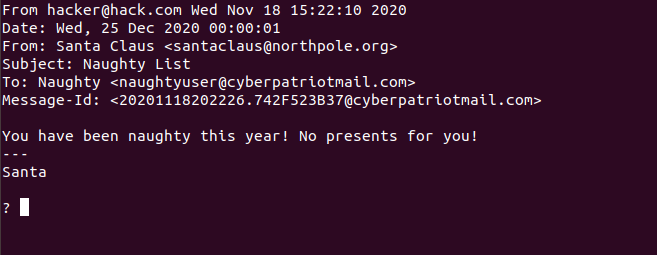
Thanks to s-nail, it is able to list the actual user it was sent from,
however in another client such as Thunderbird, this would be completely
obfuscated to the user. If one were to glance at this quickly enough
though, they may not be able to catch it in time before falling to the
fake email.
Our last vulnerability we want to cover is Open Relay. An Open Mail
Relay SMTP server is a mail server configured in a way in which anyone
can send mail through your server, however not only being restricted to
the users on the server, anyone on any type of mailing server such as
gmail.com. Now for the way the lab is structured, if you try this the
email will not be sent out to gmail if you try to send it through gmail.
This is because you would need to have your SMTP server set up to have
things such as an MX record and a registered domain, which could cost
money and be a lot more work for this lab, however the open relay attack
will still seemingly go through. To check this out go back into a
telnet session and follow the image below.
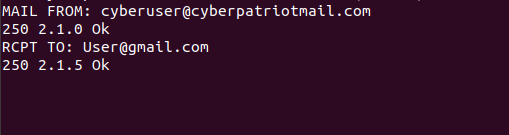
As you can see, the SMTP server completely let the recipient of the
email address be located outside of our server. If that was an actual
user on gmail.com and if the server was actually allowed to send outside
of the contained network, the email would go through to gmail.com. This
is highly dangerous as spammers could use our server to send out spam
emails to specific addresses they are looking to attack. Since they are
using our server, this makes it a lot harder to trace.
SMTP Hardening:
There are quite a few issues our server has, but what are some ways we can try to fix these issues?
First, we should go ahead and disable the VRFY command. To do this enter these commands:
postconf -e disable_vrfy_command=yes
sudo systemctl restart postfix
What this command does, is it adds the disable_vrfy_command=yes
line to our Postfix configuration. This will completely get rid of the
usability of the command VRFY on our server. This prevents many of the
dangers that we mentioned earlier, such as finding out what users are on
our server and being able to take a guess at our servers naming scheme.
In order to prevent our server from being used as an open relay server, the best way to fight it is to add more lines to the postfix configuration file. Open up the file by running this command:
sudo nano /etc/postfix/main.cf
And then add the following lines to the bottom of the file:
smtpd_recipient_restrictions = permit_mynetworks, permit_sasl_authenticated, reject_unauth_destination
smtpd_sender_restrictions = reject_unknown_sender_domain
Make sure to restart postfix again after doing this! This makes it so if anyone is going to try to use your server as an open relay, they would need to log into your server first. This makes it secure now because this will prevent malicious actors attempting to use your SMTP server for spamming or phishing.
Another way to harden our server is to make it so you will need to use
the HELO command in order to communicate with each other or take
incoming requests. This command will make it so:
postconf -e smtpd_helo_required=yes
Once again, restart postfix to enable this change.
Postfix by default is made to listen on all interfaces, which is not needed if you just want to relay messages to other systems such as outgoing emails. We can change this by making it only listen on our local interface. Just as a note, you may need to restart your entire box if you want these changes to go through, as the postfix reset may not be enough.
postconf -e inet_interfaces=loopback-only
Following these tips can make your SMTP server a lot more secure!